装饰器使用
cc 类
将装饰器 ccclass 应用在类上时,此类称为 cc 类。cc 类注入了额外的信息以控制 Cocos Creator 对该类对象的序列化、编辑器对该类对象的展示等。因此,未声明 ccclass 的组件类,也无法作为组件添加到节点上。
ccclass 装饰器的参数 name 指定了 cc 类的名称,cc 类名是 独一无二 的,这意味着即便在不同目录下的同名类也是不允许的。当需要获取相应的 cc 类时,可以通过其 cc 类名来查找,例如:
序列化。若对象是 cc 类对象,则在序列化时将记录该对象的 cc 类名,反序列化时将根据此名称找到相应的 cc 类进行序列化。
当 cc 类是组件类时,
Node可以通过组件类的 cc 类名查找该组件。
@ccclass('Example')
export class Example extends Component {
}
组件类装饰器
此类装饰器是只能用来修饰 Component 的子类。
executeInEditMode
默认情况下,所有组件都只会在运行时执行,也就是说它们的生命周期回调在编辑器模式下并不会触发。executeInEditMode 允许当前组件在编辑器模式下运行,默认值为 false。
const { ccclass, executeInEditMode } = _decorator;

@ccclass('Example')
@executeInEditMode(true)
export class Example extends Component {
    update (dt: number) {
        // 会在编辑器下每帧执行
    }
}
requireComponent
requireComponent 参数用来指定当前组件的依赖组件,默认值为 null。当组件添加到节点上时,如果依赖的组件不存在,引擎会自动将依赖组件添加到同一个节点,防止脚本出错。该选项在运行时同样有效。
const { ccclass, requireComponent } = _decorator;

@ccclass('Example')
@requireComponent(Sprite)
export class Example extends Component {
}
executionOrder
executionOrder 用来指定脚本生命周期回调的执行优先级。小于 0 的脚本将优先执行,大于 0 的脚本将最后执行。排序方式如下:
- 对于同一节点上的不同组件,数值小的先执行,数值相同的按组件添加先后顺序执行
- 对于不同节点上的同一组件,按节点树排列决定执行的先后顺序
该优先级设定只对 onLoad、onEnable、start、update 和 lateUpdate 有效,对 onDisable 和 onDestroy 无效。
const { ccclass, executionOrder } = _decorator;

@ccclass('Example')
@executionOrder(3)
export class Example extends Component {
}
disallowMultiple
同一节点上只允许添加一个同类型(含子类)的组件,防止逻辑发生冲突,默认值为 false。
const { ccclass, disallowMultiple } = _decorator;

@ccclass('Example')
@disallowMultiple(true)
export class Example extends Component {
}
menu
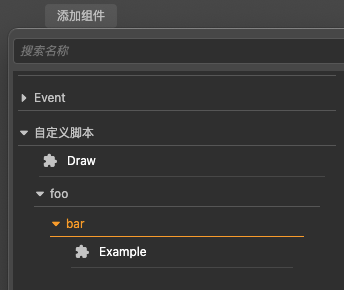
@menu(path) 用来将当前组件添加到组件菜单中,方便用户查找。
const { ccclass, menu } = _decorator;

@ccclass('Example')
@menu('foo/bar')
export class Example extends Component {
}
help
指定当前组件的帮助文档的 URL。设置完成后,在 属性检查器 中就会出现一个帮助图标,点击即可打开指定的网页。
const { ccclass, help } = _decorator;

@ccclass('Example')
@help('https://docs.cocos.com/creator/3.4/manual/zh/scripting/decorator.html')
export class Example extends Component {
}
属性装饰器
属性装饰器 property 可以被应用在 cc 类的属性或访问器上。属性装饰器用于控制 Cocos Creator 编辑器中对该属性的序列化、属性检查器 中对该属性的展示等。
属性装饰器的各种特性是通过 @property() 的参数来指定的。完整可选择参数可以参考:属性参数
property 装饰器写法参考如下:
@property({
    type: Node,
    visible: true,
})
targetNode: Node | null = null;
接着,下方会罗列出一些常用属性参数写法。
type 参数
选项 type 指定了属性的 cc 类型。可以通过以下几种形式的参数指定类型:
基础属性类型
CCInteger、CCFloat、CCBoolean、CCString是基础属性类型标识,一般仅用于数组属性的内部类型声明。非数组类型不需要显式声明这些类型。CCInteger声明类型为 整数CCFloat声明类型为 浮点数CCString声明类型为 字符串CCBoolean声明类型为 布尔值
其他 cc 类型
所有的 cc 类型 都需要显式指定,否则编辑器无法正确识别类型,序列化也无法写入正确类型。
数组类型
当使用基础属性类型或者 cc 类作为数组元素时,可以被通过数组类型声明被编辑器所识别。例如
[CCInteger]、[Node]将分别以整数数组和节点数组的形式在 属性检查器 中展示。
若属性未指定类型,Cocos Creator 将从属性的默认值或初始化式的求值结果推导其类型:
- 若值的类型是 JavaScript 原始类型
number、string、boolean,则其类型分别对应 Creator 的CCFloat、CCString和CCBoolean。 - 其他情况下属性的类型则是 未定义 的,编辑器上会提示
Type(Unknown)字样。
注意:当声明 JavaScript 内置构造函数
Number、String、Boolean用作类型时将给出警告,并且将分别视为 cc 类型中的CCFloat、CCString、CCBoolean。已经初始化的数组属性修改类型后,需要手动清除掉原来的数组数据,重新赋值,否则会因为数据类型不一致,导致数据错乱。
注意:需要在编辑器 属性检查器 中展示的属性,属性名开头不应该带
_,否则会识别为 private 属性,private 属性不会在编辑器组件属性面板上显示。
下列代码演示了不同 cc 类型的属性声明:
import { _decorator, CCInteger, Node, Enum } from 'cc';
const { ccclass, property, integer, float, type } = _decorator;

enum A {
    c,
    d
}
Enum(A);

@ccclass
class MyClass {
    @property // JavaScript 原始类型,根据默认值自动识别为 Creator 的浮点数类型。
    index = 0;

    @property(Node) // 声明属性 cc 类型为 Node。当属性参数只有 type 时可这么写,等价于 @property({type: Node})
    targetNode: Node | null = null; // 等价于 targetNode: Node = null!;

    // 声明属性 children 的 cc 类型为 Node 数组
    @property({
        type: [Node]
    })
    children: Node[] = [];

    @property({
        type: String,
    }) // 警告:不应该使用构造函数 String。等价于 CCString。也可以选择不声明类型
    text = '';

    @property
    children2 = []; // 未声明 cc 类型,从初始化式的求值结果推断元素为未定义的数组

    @property
    _valueB = 'abc'; // 此处 '_' 开头的属性,只序列化,不会在编辑器属性面板显示

    @property({ type: A })
    accx : A = A.c;
}
为了方便,额外提供几种装饰器以快速声明 cc 类型。如果你只需要为属性定义 type 参数,那么可以直接使用下列装饰器替代 @property:
| 装饰器 | 对应的 property 写法 |
|---|---|
| @type(t) | @property(t) |
| @integer | @property(CCInteger) |
| @float | @property(CCFloat) |
import { _decorator, CCInteger, Node } from 'cc';
const { ccclass, property, integer, float, type } = _decorator;
@ccclass
class MyClass {
    @integer // 声明属性的 cc 类型为整数
    index = 0;

    @type([Node]) // 声明属性 children 的 cc 类型为 Node 数组
    children: Node[] = [];

    @type(String) // 警告:不应该使用构造函数 String。等价于 CCString。也可以选择不声明类型
    text = '';
    // JavaScript 原始类型 `number`、`string`、`boolean` 通常可以不用声明
    // 可以直接写
    @property
    text = '';
}
visible
一般情况下,属性是否显示在 属性检查器 中取决于属性名是否以 _ 开头。如果是以 _ 开头,则不显示。
如果要强制显示在 属性检查器 中,可以设置 visible 参数为 true:
@property({ visible: true })
private _num = 0;
如果要强制隐藏,可以设置 visible 参数为 false:
@property({ visible: false })
num = 0;
serializable
属性默认情况下都会被序列化,序列化后就会将编辑器中设置好的属性值保存到场景等资源文件中,之后在加载场景时就会自动还原成设置好的属性值。如果不想序列化,可以设置 serializable: false。
@property({ serializable: false })
num = 0;
override
所有属性都会被子类继承,如果子类要覆盖父类同名属性,需要显式设置 override 参数,否则会有重名警告:
@property({ tooltip: "my id", override: true })
id = "";
group
当脚本中定义的属性过多且杂时,可通过 group 对属性进行分组、排序,方便管理。同时还支持对组内属性进行分类。
group 写法包括以下两种:
@property({ group: { name } })@property({ group: { id, name, displayOrder, style } })
| 参数 | 说明 |
|---|---|
id | 分组 ID,string 类型,是属性分组组号的唯一标识,默认为 default。 |
name | 组内属性分类的名称,string 类型。 |
displayOrder | 对分组进行排序,number 类型,数字越小,排序越靠前。默认为 Infinity,表示排在最后面。若存在多个未设置的分组,则以在脚本中声明的先后顺序进行排序 |
style | 分组样式,目前只支持 tab 样式。 |
示例脚本如下:
import { _decorator, Component, Label, Sprite } from 'cc';
const { ccclass, property } = _decorator;

@ccclass('SayHello')
export class SayHello extends Component {

    // 分组一
    // 组内名为 “bar” 的属性分类,其中包含一个名为 label 的 Label 属性
    @property({ group: { name: 'bar' }, type: Label })
    label: Label = null!;
    // 组内名为 “foo” 的属性分类,其中包含一个名为 sprite 的 Sprite 属性
    @property({ group: { name: 'foo' }, type: Sprite })
    sprite: Sprite = null!;

    // 分组二
    // 组内名为 “bar2” 的属性分类,其中包含名为 label2 的 Label 属性和名为 sprite2 的 Sprite 属性,并且指定排序为 1。
    @property({ group: { name: 'bar2', id: '2', displayOrder: 1 }, type: Label })
    label2: Label = null!;
    @property({ group: { name: 'bar2', id: '2' }, type: Sprite })
    sprite2: Sprite = null!;

}
将该脚本挂载到节点上,则在 属性检查器 中显示为:
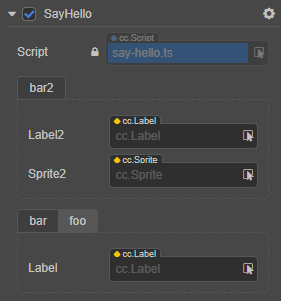
因为分组一未指定 displayOrder,分组二指定了 displayOrder 为 1,所以分组二会排在分组一的前面。
若需要对分组内的属性排序,也可以使用 displayOrder。以分组二为例,目前是按照在脚本中定义的先后顺序进行排序,label2 在 sprite2 的前面。我们将其调整为:
// 分组二
// 组内名为 “bar” 的属性分类,其中包含名为 label2 的 Label 属性和名为 sprite2 的 Sprite 属性,并且指定排序为 1。
@property({ group: { name: 'bar2', id: '2', displayOrder: 1 }, displayOrder: 2, type: Label })
label2: Label = null!;
@property({ group: { name: 'bar2', id: '2' }, displayOrder: 1, type: Sprite })
sprite2: Sprite = null!;
回到编辑器,在 属性检查器 中可以看到 sprite2 已经排在 label2 的前面了:
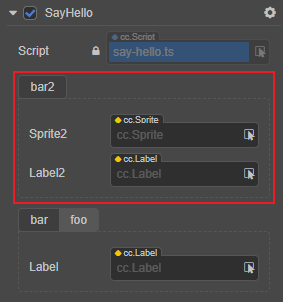
内置类型界面
针对一些常用类型,引擎内部提供了默认界面,开发者可以根据自身的需求使用:
颜色界面:
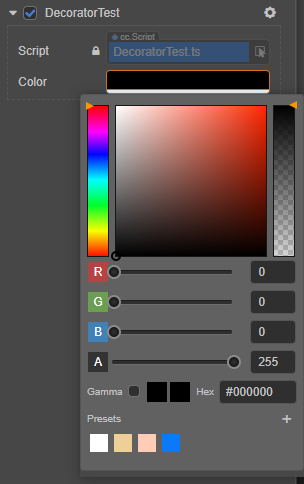
代码示例如下:
ts@property(Color) color:Color曲线:用于保存曲线类型、样式以及采样数据。
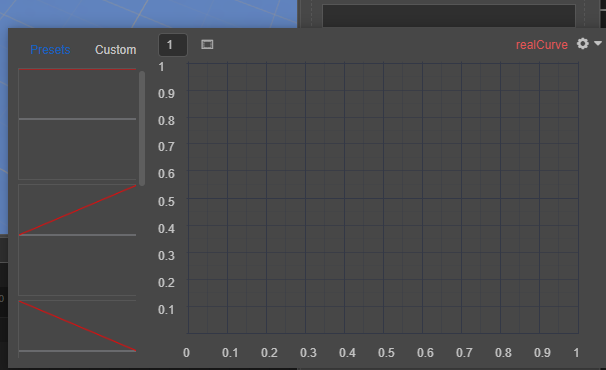
代码示例如下:
ts@property(RealCurve) realCurve:RealCurve = new RealCurve();曲线范围:可以通过常量、曲线、双曲线或双常量进行控制。
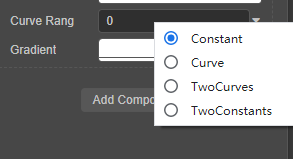
代码示例如下:
ts@property(CurveRange) curveRang : CurveRange = new CurveRange();渐变色:记录渐变色的关键值和用于计算渐变色的结果
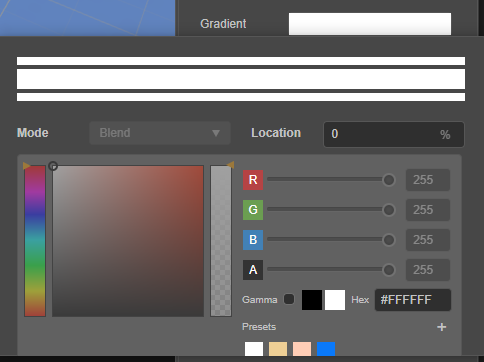
代码示例如下:
ts@property(Gradient) gradient = new Gradient();渐变色范围:通过颜色、渐变色、双颜色或双渐变色控制颜色
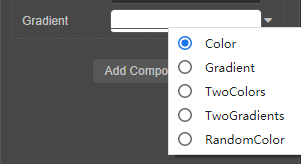
代码示例如下:
ts@property(GradientRange) gradientRange:GradientRange = new GradientRange();
