Cocos Creator
Publish to Native Platforms
Click Project -> Build in the menu bar to open the Build panel.
The native platforms that can be selected currently include Android, iOS, Mac, and Windows. Among them, the options for publishing to iOS, Mac, and Windows only appear when using the corresponding operating system.

Environment Configuration
Publishing to the native platform requires installation and configuration of some necessary environments. For details, please refer to the Setup Native Development Environment documentation.
Build Options
For the general build options of each platform, please refer to the General Build Options documentation.
Generic Build Options for Native Platforms
Due to the adjustment of the current build mechanism, the processing of different platforms is built into the Build panel in the form of a plugin.
After selecting the native platform to be built in the Platform option of the Build panel, notice that in addition to the expanded options of the specific native platform, there is also an expanded option for Native. The build options in Native are the same on all native platforms.
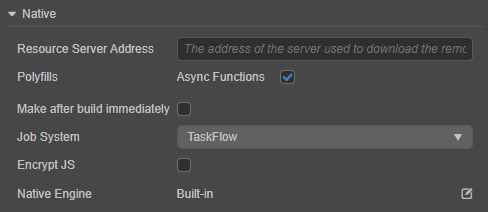
Resource Server Address
When the package size is too large, the resource can be uploaded to the resource server and downloaded through the network. This option is used to fill in the address where the resource is stored on the remote server. Developers need to manually upload the remote folder in the release package directory to the filled resource server address after build. For details, please refer to the Upload resources to remote server documentation.
Polyfills
This option is a polyfills option for some new features supported by the scripting system, and currently only supports Async Functions. After checking, the generated project will bring the corresponding polyfills, that is, the package body will be enlarged, and the developer can choose whether to use it according to actual needs.
Make Immediately After Build
If this option is checked, the Make step will be executed automatically after the build is completed, and no manual operation is required.
Job System
This option is currently used by the internal function module of the engine to manage the project's job flow and requires no further user attention. Should such need emerges, please take note:
- TBB and TaskFlow performs verily depending on the execution environment and project specifications, thus should be selected accordingly.
- TBB / TaskFlow is supported by specific versions when used to deploy to native platforms. For more information, please see the Version Support section below.
Encrypt JS
This option is used to encrypt the published script. The jsc file will be generated in the built-in assets directory, this file is encrypted. The js file will be backed up in the script-backup directory for debugging, and will not enter the APP during packaging.
JS Encryption Key: This value will be used as the key to encrypt the js file on the Native platform. It will be randomly generated when the project is created.
Zip compression: If checked, the script size can be reduced.

Native Engine
This option is used to show whether the built-in engine or a custom engine is currently being used. Click the Edit button behind it to go to the Preferences -> Engine Manager panel for settings.
Build Options for the Android Platform
Android platform build options:
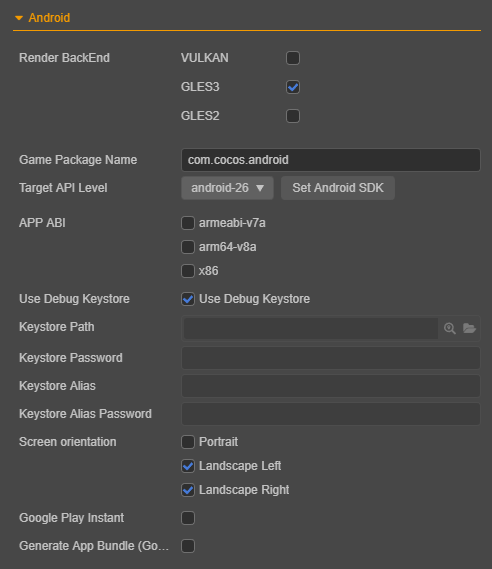
Render BackEnd
Rendering currently supports using VULKAN, GLES3 and GLES2 of these three types, GLES3 is used by default. In the case of multiple being selected at the same time, the runtime will select the rendering backend to be used according to the actual support of the device.
Game Package Name
Game Package Name is usually arranged in reverse order of the product website URL, such as com.mycompany.myproduct.
Note: the package name can only contain numbers, letters and underscores. The last part of the package name must start with a letter, not an underscore or number.
Target API Level
Set the Target API Level required when compiling the Android platform. Click the Set Android SDK button next to it to quickly jump to the configuration page. For specific configuration rules, please refer to the Configuring Native Development Environment documentation.
APP ABI
Set the CPU type that Android needs to support. It is possible to choose one or more options. Currently, there are four types: armeabi-v7a, arm64-v8a, x86 and x86_64.
Notes:
After selecting an ABI to build, build another ABI without cleaning. At this time, the so of both ABIs will be packaged into the apk. This is the default behavior of Android Studio. If using Android Studio to import the project, after selecting an ABI to build, first execute Build -> Clean Project and then build another ABI. At this time, only the latter ABI will be packaged into the apk.
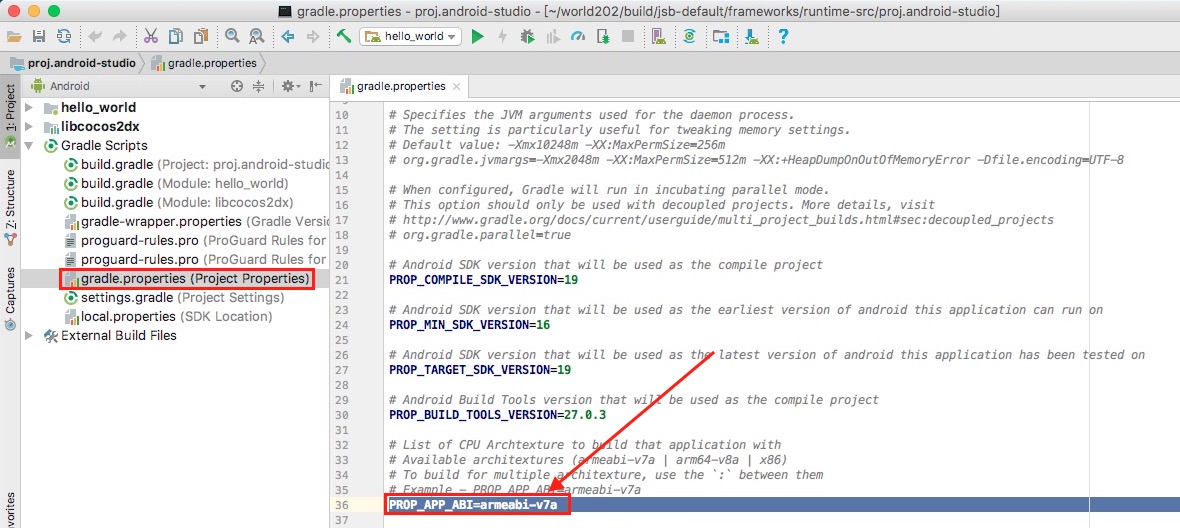
After the project is imported with Android Studio, it is an independent existence and does not depend on the build release panel. To modify the ABI, just modify the PROP_APP_ABI property in the gradle.properties file.
Use the Debug Keystore
Android requires that all APKs must be digitally signed with a certificate before they can be installed. Cocos Creator provides a default keystore. Check Use debug keystore to use the default keystore. If the developer needs to customize the keystore, uncheck the Use debugging keystore check. For details, please refer to the Official Documentation.
Screen Orientation
The screen orientation currently includes Portrait, Landscape Left, and Landscape Right.
- Portrait: the screen is upright and the Home button is down.
- Landscape Left: the screen is placed horizontally, and the Home button is on the left side of the screen.
- Landscape Right: the screen is placed horizontally, and the Home button is on the right side of the screen.
Google Play Instant
Check this option to package and publish the game to Google Play Instant. Google Play Instant relies on Google Play and is not a new distribution channel, but closer to a game micro-end solution. It can realize that the game can be played immediately without installation, which is conducive to the trial play, sharing and conversion of the game.
The following notes are required when using:
- The Android Studio should be v4.0 and above.
- The Android Phone should be v6.0 and above. Devices with Android SDK version between 6.0 and 7.0 need to install Google Service Framework, while those with SDK version 8.0 or higher do not need it and can install it directly.
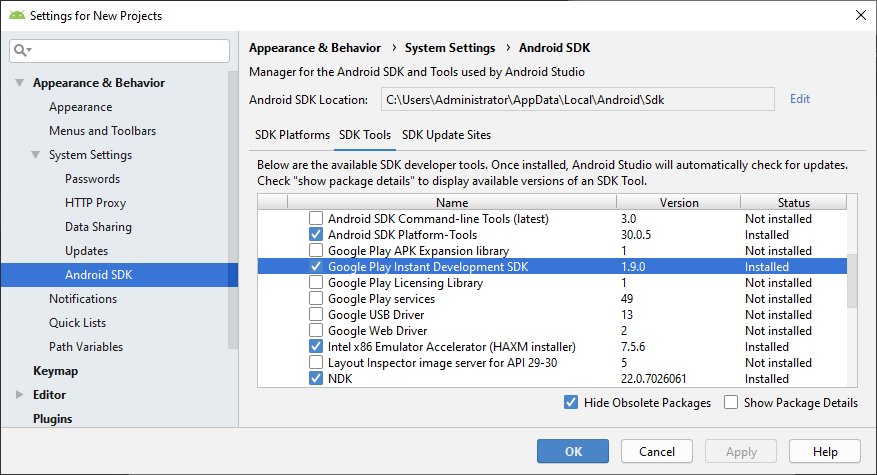
- For the first compilation, open the built project with Android Studio to download the Google Play Instant Development SDK (windows) or Instant Apps Development SDK (Mac) support package. If the download is unsuccessful, it is recommended to set up the HTTP proxy of Android Studio.
Make App Bundle (Google Play)
Check this option to package the game into App Bundle format for uploading to the Google Play store. For details, please refer to the Official Documentation.
Windows Platform Build Options
The build options for the Windows platform include Render BackEnd and Target Platform.
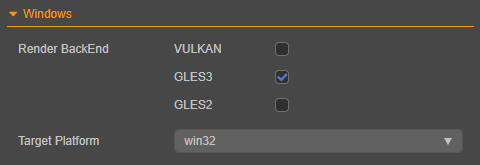
Render BackEnd
Currently, VULKAN, GLES3 and GLES2 are supported, and GLES3 is checked by default. If more than one is checked at the same time, the rendering backend will be selected based on the actual support of the device at runtime.
Target Platform
Set the compilation architecture, both x64 and win32 are currently supported.
If x64 is selected, only x64 architecture is supported to run on.
If win32 is selected, both architectures are supported to run on.
Build Options for the iOS Platform
The build options for the iOS platform include Bundle Identifier, Orientation, Target iOS Version, Render BackEnd and Developer Team. The setting of Orientation is the same as the Android platform.
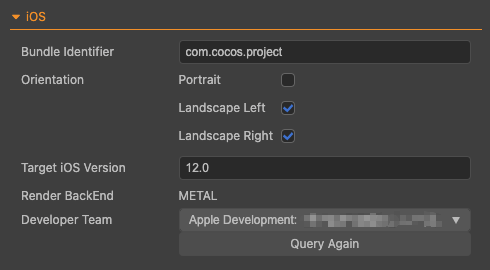
Bundle Identifier
Package name, usually in reverse order of product website URL, such as com.mycompany.myproduct.
Note: the package name can only contain numbers (0~9), letters (A~Z, a~z), underscores (-) and dots (.). The last part of the package name must start with a letter, not an underscore or number.
Target iOS Version
The option specifies the version of the iOS software when publishing to the iOS platform and defaults to 12.0. The version number is recorded in the TARGET_IOS_VERSION field of the proj/cfg.cmake file in the release package directory after the build.
Render BackEnd
Currently, only METAL is supported for the Render BackEnd. See the official documentation Metal for details.
Developer Team
This option is used to configure the Development Team signature information when building and compiling iOS projects. If the signature information is manually configured in Xcode when compiling with Xcode, the configuration in Xcode takes precedence. When a rebuild is performed, the value of this option will override the value configured in Xcode.
Mac Platform Build Options
The build options for the Mac platform include Bundle Identifier, Target macOS Version, Support M1 and Render BackEnd.
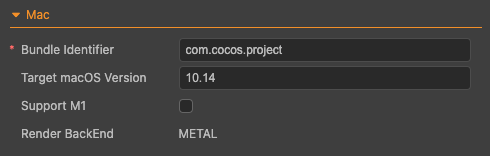
Bundle Identifier
Package name, usage is consistent with the iOS platform.
Target macOS Version
This option specifies the macOS system version when publishing to the Mac platform and defaults to 10.14. The version number is recorded in the TARGET_OSX_VERSION field of the proj/cfg.cmake file in the release package directory after the build.
Support M1
This option is used to better flag support issues for some known engine modules on Apple M1 (Silicon) architecture devices.
Render BackEnd
This option currently uses the METAL rendering backend by default, see the official documentation Metal for details.
Version Support
The minimum version of each functional module is supported in the native platform as follows:
| Function Module | Android | iOS |
|---|---|---|
| VULKAN Render BackEnd | API Level 24(7.0) | - |
| Google Play Instant | API Level 23(6.0) | - |
| TBB Job System | API Level 21(5.0) | 10.0 |
| TaskFlow Job System | API Level 18(4.3) | 12.0 |
| Forward Render Pipeline | API Level 21(5.0) | 10.0 |
Creator 3.0 supports C++14. v3.1 is upgraded to C++17 since v3.1 supports the TaskFlow Job System, which relies on C++17.
However, since C++17 is only supported in iOS 12+, we dropped it back to C++14 in v3.3.2 in order to support iOS 10.0. Note that in v3.3.2, if TaskFlow Job System in used, C++17 will be automatically enabled to support compilation.
Correspondingly, the minimum version support for each version of Creator on native platforms is as follows:
| Native Platform | Creator 3.0 | Creator 3.1 ~ 3.3.1 | Creator 3.3.2 and above |
|---|---|---|---|
| Android | API Level 18(4.3) | API Level 21(5.0) | API Level 18(4.3) |
| iOS | 10.0 | 12.0 | 10.0 |
The highest version is supported as follows:
- Android: API Level 31(12.x)
- iOS: 15.x
Build a Native Project
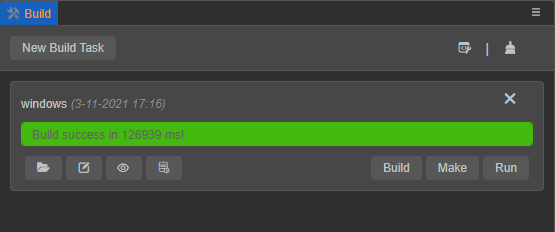
After the build options are set, start building. Click the Build button at the bottom right corner of the Build panel to start the build process.
When compiling scripts and packaging resources, a blue progress bar will be displayed on the Build Tasks page of the Build panel. If the build is successful, the progress bar will reach 100% and be displayed in green:
Build Directory
After the build is over, what we get is a standard Cocos2d-x project, which has the same structure as the newly created project using Cocos Console. Taking the Windows platform as an example, the directory structure of the exported native project package windows is:
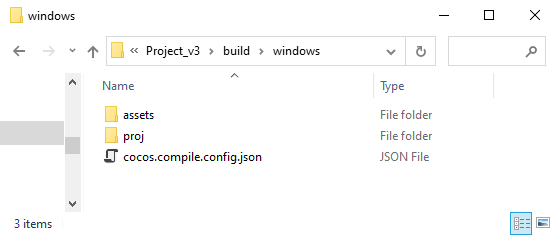
assets: store project resources.proj: store the currently built native platform project, which can be used for the IDE of the corresponding platform to perform compilation tasks. For details, please refer to the introduction below.cocos.compile.config.json: compile options configuration for this build.
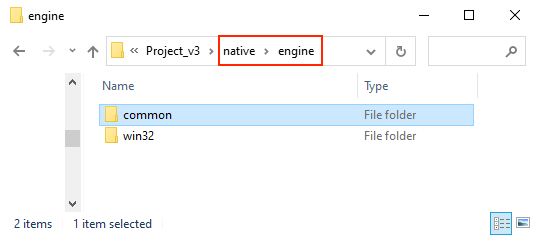
Because the underlying C++ code generated after the native platform (such as Android, Windows) is built is completely consistent, in v3.0, extract the underlying C++ code separately and place it in the shared native/engine/common folder in the project directory. In this way, when the native platform is built, if it is detected that the folder already exists, this part of the content will not be processed again, which speeds up the build.
For more instructions on the directory structure, please refer to the Build Directory Differences - Native Platform documentation.
Secondary Development
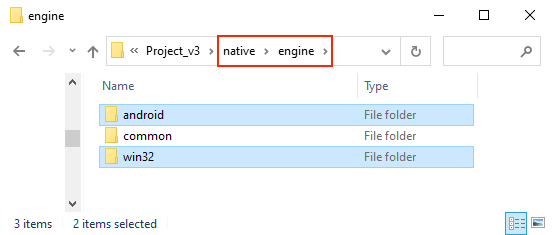
v3.0 separates the code and configuration, put part of the code and configuration into the source code management, located in the native\engine\currently built platform name folder under the project directory (for example, native\engine\win32, native\engine\android).
Developers can integrate the SDK or do secondary development here. Deleting the release package directory (such as build\windows) generated after the build will not affect the integrated SDK, but the premise is that is needed to add a code reference in the directory:
- If the integrated SDK is common to all native platforms, it is necessary to add a reference in
native\engine\common\CMakeLists.txtin the project directory. - To do secondary development based on iOS, Mac, and Windows platforms, add a reference in
native\engine\currently built platform name\CMakeLists.txtin the project directory (for example,native\engine\ios\CMakeLists.txt)) - If the secondary development is based on the Android platform:
- C++: need to add a reference in
native\engine\android\CMakeLists.txtin the project directory. - Java: need to add a reference in
build\android\proj\build.gradlein the project release package.
- C++: need to add a reference in
For more information about the use of CMake, please refer to the CMake Introduction documentation.
Build and Run
Cocos Creator supports Make and Run Preview steps via the editor or the corresponding IDE for each platform (e.g.: Xcode, Android Studio, Visual Studio).
Via the Editor
After the build is completed, continue to click the Make button next to it, and it will prompt:
make package YourProjectBuildPath success!
Note: after the first generation of the Android platform or the version upgrade, it is recommended to open the project through Android Studio, download the missing tools according to the prompts, and then compile and run.
After the "Make" process is complete, continue to click the Run button next to it. Part of the compilation may continue. Please wait patiently or check the progress through the log file. The operating results of each platform are:
- Mac/Windows platform will run the preview directly on the desktop
- The Android platform must be connected to the physical device via USB, and the preview can be run after the USB debugging is turned on on the physical device.
- The iOS platform will call the simulator to run the preview, but it is recommended to connect to the physical device through Xcode to execute Make and Run, please refer to the introduction below.
Via IDE
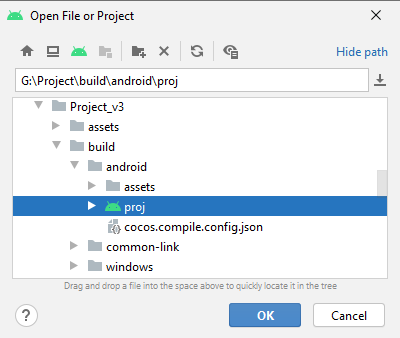
Click the folder icon button in the lower left corner of the build task, and the build path will be opened in the file manager of the operating system. In this path, the proj under the build directory contains the currently built native platform project.
Next, open these generated native projects using the IDE corresponding to the native platform (e.g.: Xcode, Android Studio, Visual Studio) and make further operations like compilation, preview and release.
Android
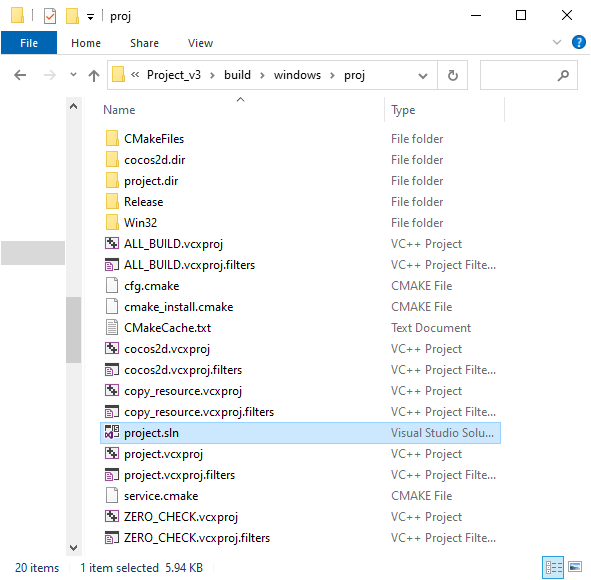
Windows
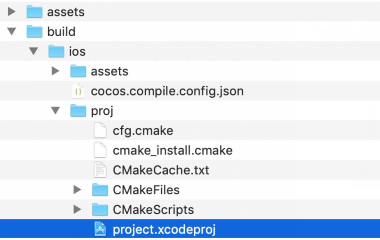
iOS and Mac
Note: do not perform secondary development in these native platform projects, otherwise it will be overwritten when rebuilding.
Please search for information about using the native platform IDE, here we won't go over it again. To learn how to debug on the native platform, please refer to the Debugging JavaScript on Native Platforms documentation.
Precautions
The project built in debug mode on MIUI 10 system may pop up the prompt box of "Detected problems with API compatibility". This is a problem introduced by MIUI 10 system itself, just use release mode to build.
When packaging the iOS platform, if the developer does not use WebView related functions in the project, please make sure to remove the WebView module in Project -> Project Settings -> Feature Cropping to improve the success of iOS App Store machine review rate. If the developer really needs to use WebView (or the added third-party SDK comes with WebView), and therefore the iOS App Store fails the machine review, they can still try to appeal via email.
There are some differences between the compiled results of the Android platform through the editor and Android Studio:
After executing the Make step through the editor, the
builddirectory will be generated under the release path, and the.apkwill be generated under theapp\build\outputs\apkdirectory of thebuilddirectory.After compiling with Android Studio,
.apkwill be generated inproj\app\build\outputs\apkdirectory.
Android and Android Instant use the same build template, and the generated projects are all in the
build\android\projdirectory. Please note for this directory:If it is the code used solely by the Android platform, please put it in the
app\srcdirectory, and put the third-party library used separately in theapp\libsdirectory (if these two directories do not exist, create them).If the code and third-party libraries used by Android Instant are used separately, please put them in the
instantapp\srcandinstantapp\libsdirectories respectively (if these two directories do not exist, create them).For code and third-party libraries shared by Android and Android Instant, please put them in the
srcandlibsdirectories respectively (if these two directories do not exist, create them).
When compiling for Android by clicking the Make button in the Build panel,
assembleRelease/Debugwill be executed by default, andinstantapp:assembleRelease/Debugwill be executed by default when compiling for Android Instant.