Cocos Creator
Publishing to Native Platforms
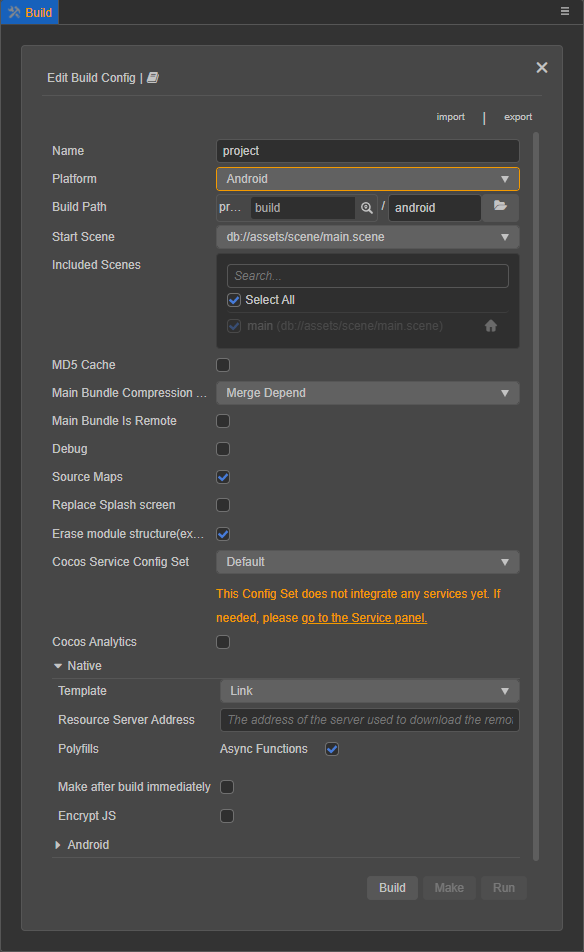
To access the Build panel, go to the top menu bar and select Project -> Build.
Cocos Creator currently supports deployment to native platforms including Android, iOS, Mac and Windows. Options for publishing to iOS, Mac, and Windows are only accessible when using their corresponding operating systems.
Prerequisites
Publishing to native platforms requires installation and configuration of the target platform’s intended IDEs. For details, please refer to documentation on Setup Native Development Environment.
Builder Configuration
Publishing requires general-purpose builder configuration regardless of target platforms. For more information, please refer to documentation on General Build Options.
Common Builder Configuration for Publishing to Native Platforms
Cocos Creator integrates deployment capabilities to various platforms in the form of modularized plug-ins.
Users may select the target platform of deployment by selecting from the drop-down menu at the Platform property in the Build panel. Doing so will not only unlock extended options for the selected platform, but also extended general-purpose options for deployment to native platforms under the Native tab in the Build panel. These options are consistent across all targeting platforms.
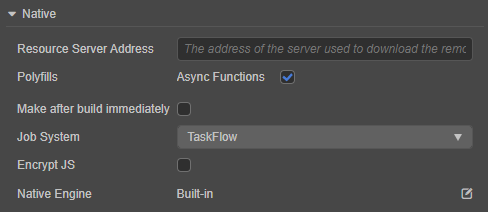
Resource Server Address
Cocos Creator allows project resources to be uploaded online and accessed remotely. Users may upload the content of the remote folder in the release package directory to a server of their choosing and enter the server address in this property after build is done. For details, please refer to Upload resources to remote server.
Polyfills
Cocos Creator introduced new features implemented with polyfills including Async Functions. Once enabled, corresponding polyfills will be added to the release package, resulting in larger package size. Users may choose to include said polyfills in the release package out of their own accord.
Make Immediately After Build
Once enabled, the Make process will be executed automatically after the build is completed. No user intervention will be required.
Job System
Job System is managed by the internal mechanisms and does not require manual modifications. Should such need emerges, please take note:
- TBB / TaskFlow gives varying performances depending on the execution environment and project specifications, thus should be selected accordingly.
- Cocos Creator supports specific versions of TBB / TaskFlow for deployment. For more information, please see below in section Compatibility.
Encrypt JS
Once enabled, scripts in the project will be encrypted and encapsulated in a .jsc file which can be found in the assets folder of the project directory. The original script files will be stored in the script-backup folder for debugging purposes and will not be added to the release package.
JS Encryption Key: Value will be used as the encryption key for script encryption and will be generated randomly at the project’s creation.
Zip compression: If enabled, scripts will be compressed, reducing package size.

Native Engine
Users may choose Cocos Creator’s built-in native engine or their custom typescript engine to deploy to native platforms. Click Edit to open the Preferences panel and enter the custom engine directory under the Engine Manager tab.
Build for Android
Build options for Android are as follows:
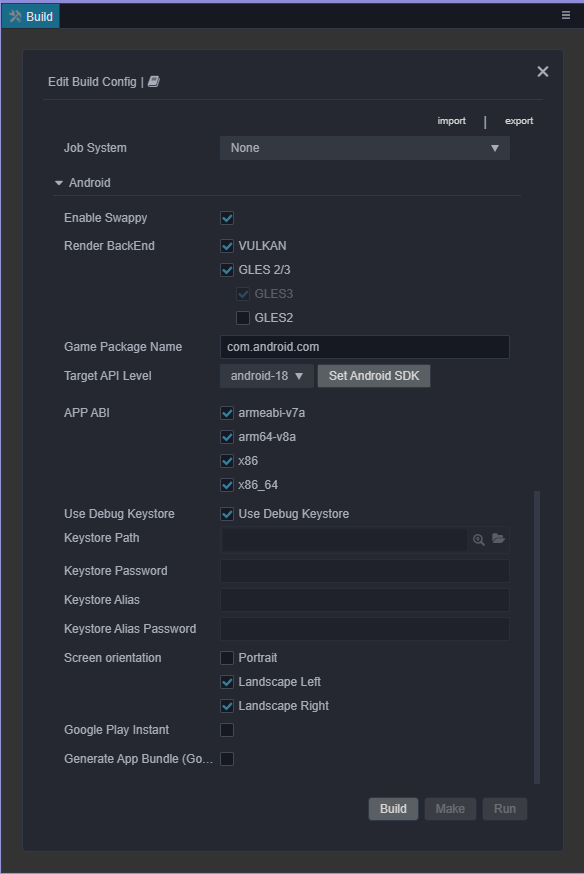
Enable Swappy
Enable or disable Swappy for GLES and Vulkan. Swappy is the Android-specific frame pacing solution that regulates render cycles, thus stabilizing frame rate and reducing invalid renders.
For more information, please refer to Frame Pacing Library Overview.
Render BackEnd
Users may select the graphic API being utilized at runtime, which includes VULKAN, GLES3 and GLES2. It is required to make at least one selection.
If GLES 2/3 is selected, GLES3 must be checked by default as GLES2 is not allowed to be selected independently.
If multiple options are selected simultaneously, graphic API will be selected automatically according to the device at runtime.
Game Package Name
By convention, Game Package Name is the product website URL rearranged in reverse, such as:
com.mycompany.myproduct.
Note: Legal characters for package names include all alphanumeric characters, period (‘.’) and underscore (‘_’). The last section of the package name (in the example above: ‘myproduct’) cannot start with a number or underscore.
Target API Level
To deploy on Android devices with Android SDK, it is required to specify target API level. If the Android SDK is not set, click the Set Android SDK button to open Preferences panel where it is parameterized under the External Programs tab. For a more detailed guideline on setting up Android SDK, please refer to Configuring Native Development Environment.
APP ABI
Users can select the types of processors supported by the project. Cocos Creator offers support to 4 types of processors: armeabi-v7a, arm64-v8a, x86 and x86_64.
Notes:
Once a type of ABI is selected and the release package is built accordingly, it is vital to cleanse the project before a second build using a different ABI is executed. If a cleanse is not performed, both versions will be packed in the .apk package. This is not ideal but is the default setting of Android Studio. When importing a project with Android Studio, be sure to select Build -> Clean Project after one build is complete and before a second build begins. With the project cleaned, only the second build will be packed in the .apk package.
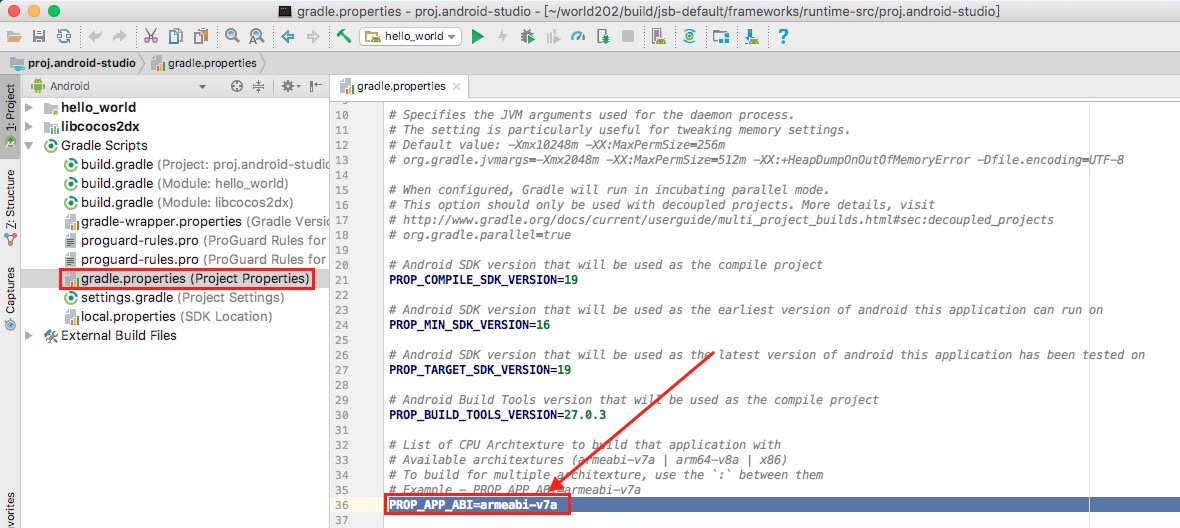
Once the project is imported in Android Studio, it is no longer managed by Cocos Creator or any of its builder properties. To modify an already selected ABI in Android Studio, users may access the PROP_APP_ABI property in gradle.properties.
Use the Debug Keystore
It is mandatory for all APKs to be digitally signed with a certificate before they can be installed or updated. Cocos Creator provides a default keystore which can be enabled via Use Debug Keystore. Alternatively users can import their custom keystore by specifying its directory at the Keystore Path property. Please see Android’s official documentation on the subject for more information.
Screen Orientation
Projects can be published in 3 screen orientation settings: Portrait, Landscape Left, and Landscape Right.
- Portrait: Portrait is characterized by the screen’s height being greater, or equal to, the screen’s width. It is typically ideal for viewing the product by holding the device in an upright position, where Android’s navigation bar is positioned at the bottom of the device’s screen.
- Landscape Left: Landscape is characterized by the screen’s width being greater, or equal to, the screen’s height. It is typically ideal for viewing the product by resting the device on its left or right side. In Landscape Left mode, Android’s navigation bar is positioned at the left side of the screen.
- Landscape Right: Similar to Landscape Left mode, Landscape Right mode puts Android’s navigation bar at the right side of the screen.
Google Play Instant
To deploy the product on Google Play Instant, users can enable this property and adhere to the following prerequistes:
Android Studio v4.0 or above installed.
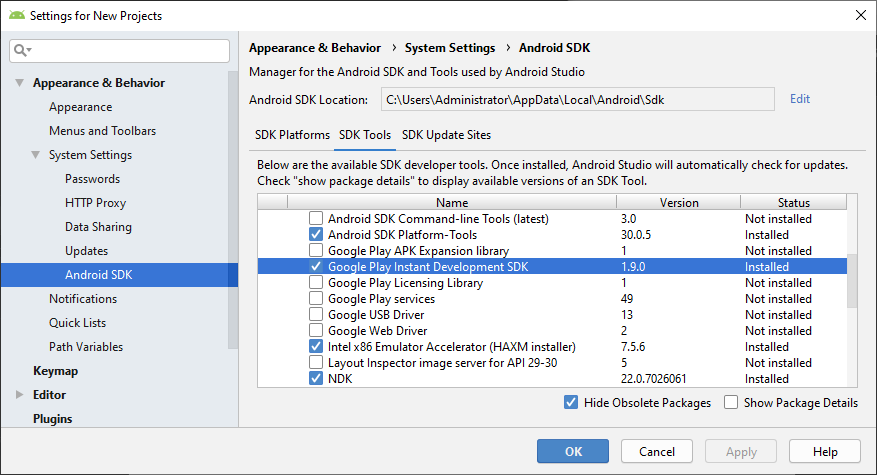
Since Google Play Instant can only be launched on devices with Android 6.0 or higher, users of Android SDK version 6.0 – 7.0 should also have Google Service Framework installed.
Before compilation in Android Studio, users should also download and install Google Play Instant Development SDK (for Windows) or Instant Apps Development SDK (for Mac.) If downloads were unsuccessful, it may be required to set up HTTP proxies for Android Studio.
Make App Bundle (Google Play)
Enable this property to build the release package in an Android App Bundles format. Please refer to Android’s official documentation on the subject for more information.
Build for Windows
Build options for the Windows include Render BackEnd and Target Platform.
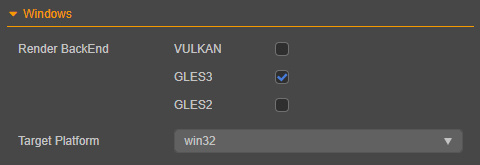
Render BackEnd
Users may choose between Vulkan, GLES3 and GLES2 as the graphic API at backend.
If GLES 2/3 is selected, GLES3 must be checked by default as GLES2 is not allowed to be selected independently.
If multiple options are selected simultaneously, graphic API will be selected automatically according to the device at runtime.
Target Platform
Users can build the executable in either win32 or x64 architecture.
If the project is built in x64, only 64-bit versions of Windows may execute it.
If the project is built in win32, both 32-bit and 64-bit versions of Windows can execute it.
Build for iOS
Build options for iOS include Bundle Identifier, Orientation, Skip the update of Xcode project, Render BackEnd, Developer Team and Target iOS Version. Settings for Orientation is identical to that of Android's.

Bundle Identifier
By convention, bundle identifier is the product website URL rearranged in reverse, such as:
com.mycompany.myproduct.
Note: Legal characters for package names include all alphanumeric characters, period (‘.’) and underscore (‘_’). The last section of the package name (in the example above: ‘myproduct’) cannot start with a number or underscore.
Skip the update of Xcode project
When enabled, Xcode project will retain its original state as generated by CMake and will not be updated with each subsequent build. However, this also prevents Xcode project to be updated accordingly should CMake configuration is altered.
Render BackEnd
Currently, METAL is the only supported graphic API for iOS deployments. Please refer to Apple’s official documentation for more details.
Developer Team
This information is used to configure Development Team signature when building and compiling iOS projects. If said information is already configured in Xcode, it takes precedence over what is being entered in this property. However, any subsequent builds will cause information from this property to override what is configured in Xcode.
Target iOS Version
This property specifies the target version of iOS platform and defaults to 12.0. This can also be modified by the TARGET_IOS_VERSION variable in file proj/cfg.cmake found in the release package after build is done.
Build for Mac
Build options for Mac include Bundle Identifier, Target macOS Version, Support Apple Silicon, Skip the update of Xcode project and Render BackEnd.
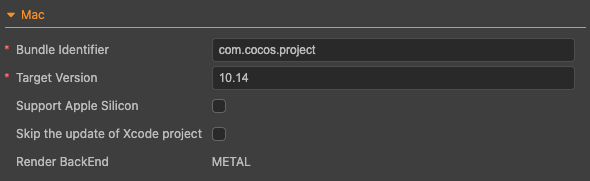
Bundle Identifier
Naming conventions for macOS deployments are consistent with that of iOS.
Target macOS Version
This property specifies the target version of macOS platform and defaults to 10.14. This can also be modified by the TARGET_OSX_VERSION variable in file proj/cfg.cmake found in the release package after build is done.
Support Apple Silicon
This property helps flag issues with Apple M1 (Silicon) processors.
Skip the update of Xcode project
When enabled, Xcode project will retain its original state as generated by CMake and will not be updated with each subsequent build. However, this also prevents Xcode project to be updated accordingly should CMake configuration is altered.
Render BackEnd
Currently, METAL is the only supported graphic API for iOS deployments. Please refer to Apple’s official documentation for more details.
Version Support
The minimum versions of each functional module supported in their respective native platforms are as follows:
| Function Module | Android | iOS |
|---|---|---|
| VULKAN Render BackEnd | API Level 24(7.0) | - |
| Google Play Instant | API Level 23(6.0) | - |
| TBB Job System | API Level 21(5.0) | 10.0 |
| TaskFlow Job System | API Level 18(4.3) | 12.0 |
| Forward Render Pipeline | API Level 21(5.0) | 10.0 |
Cocos Creator 3.0 supports C++ 14. Starting from v3.1, Cocos Creator supports C++ 17 and TaskFlow Job System.
Since C++ 17 is only supported in iOS 12 and higher, we reverted back to C++ 14 in v3.3.2 and later versions to offer better support for iOS 10.0. Please take note that in v3.3.2, C++ 17 is automatically enabled if TaskFlow Job System is in use.
To summarize, the minimum versions of native platforms being supported by Cocos Creator are as follows:
| Native Platform | Creator 3.0 | Creator 3.1 ~ 3.3.1 | Creator 3.3.2 and above |
|---|---|---|---|
| Android | API Level 18(4.3) | API Level 21(5.0) | API Level 18(4.3) |
| iOS | 10.0 | 12.0 | 10.0 |
The latest versions being supported by Cocos Creator are:
- Android: API Level 31(12.x)
- iOS: 15.x
Start the Build Process
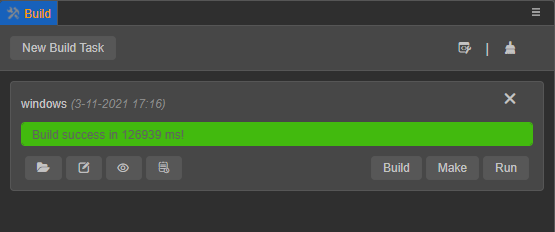
With the builder properties set, click the Build button at the bottom right corner of the Build panel to start the build process.
While building is in progress, a blue progress bar will be displayed on the Build Tasks page in the Build panel. If the build is successfully done, the progress bar will reach 100% and turn green.
Build Directory
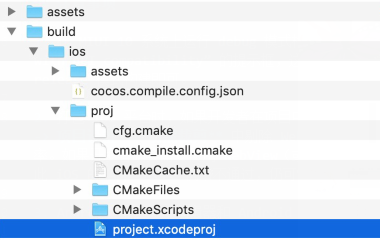
A successful build operation yields working files in the build folder of the project directory which is of the same structure as a newly created project using Cocos Console. For instance, a build targeting Windows platform should yield a folder named windows with content as follows:

assets: project assets and resourcesproj: generated project that can be opened in IDEs corresponding to the target platform where compilation is performed. For more instructions, please see below.cocos.compile.config.json: compilation options for this build
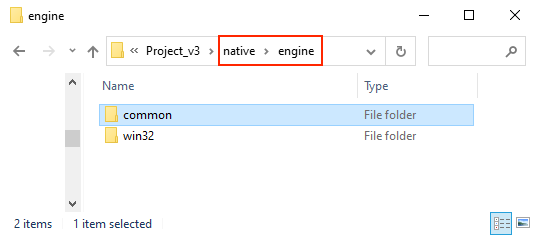
Low-level C++ codes generated after a project targeting native platform is built are identical, despite the specific platform (be it Android, Windows, etc.) they intend for. For this reason, low-level codes are not included in the build directory. Rather they have been moved to the native/engine/common folder in the Cocos Creator project directory. As such, build process can be significantly sped up across multiple builds targeting different platforms.
To learn more on the build directory structure, please refer to Build Directory Differences - Native Platform.
Secondary Development
Since v3.0, part of the code and configuration files are stored separately in the the native\engine\currently built platform name folder project directory.
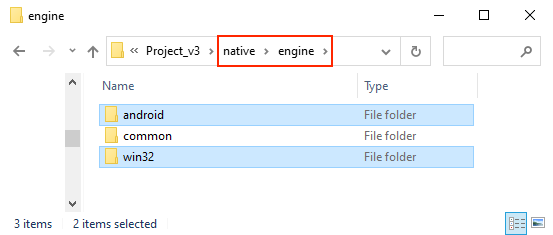
Users can also integrate new SDKs by storing them in this directory. Deleting existing builds from their directory (such as builds\windows) will not impact integrated SDKs as long as code reference is added in the directory.
- If the integrated SDK is applicable to all supported native platforms, it can be added as a reference in
native\engine\common\CMakeLists.txtin the project directory. - To do secondary development based on iOS, Mac, and Windows platforms, add a reference in
native\engine\currently built platform name\CMakeLists.txtin the project directory (for example,native\engine\ios\CMakeLists.txt)) - If the secondary development is based on the Android platform:
- C++: need to add a reference in
native\engine\android\CMakeLists.txtin the project directory. - Java: need to add a reference in
build\android\proj\build.gradlein the project release package.
- C++: need to add a reference in
For more information on CMake, please refer to CMake Introduction.
Build and Run
Cocos Creator supports Make and Run Preview via the editor or the corresponding IDE for each platform (e.g. Xcode, Android Studio, Visual Studio).
Via Cocos Creator
After the build process is completed, click the Make button which will prompt the message:
make package YourProjectBuildPath success!
Note: When building targeting Android platform, it is recommended to open the built project in Android Studio, download and install the missing modules and plug-ins as prompted, then return to Cocos Creator and repeat the operations above.
After the "Make" process is complete, click the Run button next to it. Some unfinished compilation may still be ongoing at this point. Please wait patiently or check the progress through the log file. After compilation is done, users will get:
- Mac / Windows: Preview will be executed on desktop.
- Android: Preview can be executed on a USB-connected device provided the device has USB debugging enabled.
- iOS: Preview will be executed via a simulator, but can also be executed on a device via Xcode.
Via IDE
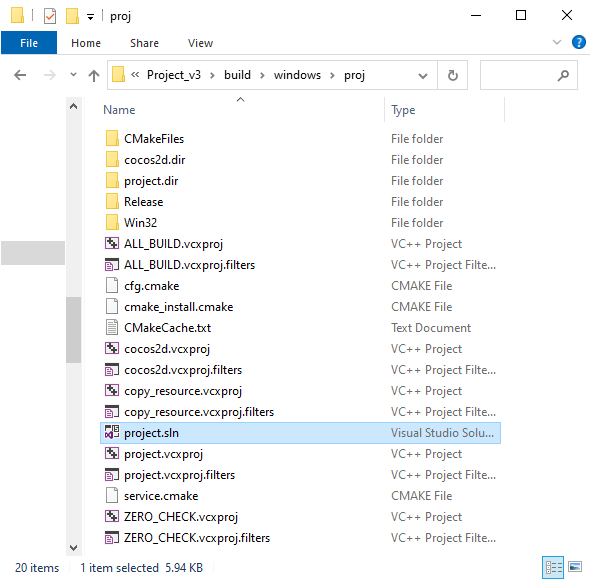
Users can access the build directory with the folder button at the lower left corner of each build task listed in the Build panel. Under proj folder in the build directory is a project file that can be opened with IDEs.
Open the project in the IDEs of their respective platform (Xcode for iOS, Android Studio for Android, Visual Studio for Windows, etc.) where users may continue with regular operations such as compilation, preview and release.
Android

Windows
iOS and Mac
Note: It is not advisable to do secondary development in IDEs at this point as they will be overridden if the project is rebuilt by Cocos Creator.
To learn more about debugging in IDEs, please refer to Debugging JavaScript on Native Platforms.
Caveats
When running a debug build on MIUI 10, system may prompt the message "Detected problems with API compatibility." This issue will not emerge with release builds.
When deploying a project to iOS without WebView functionalities incorporated, please be sure to disable the WebView module in Cocos Creator at Project -> Project Settings -> Feature Cropping. This will noticeably increase the success rate of the project passing iOS App Store’s automatic submission review. If the project requires WebView or related third-party SDKs incorporated to function properly, it is likely to be flagged by the submission review system, in which case it is advisable to contact Apple for an appeal.
When building for Android, compilation output of Cocos Creator and Android Studio may differ in the following ways:
After the Make process is executed in Cocos Creator, the
buildfolder will be generated in the release directory, and the .apk package will be generated in theapp\build\outputs\apkfolder of the build directory.After the project is compiled in Android Studio, the .apk package will be generated in the
proj\app\build\outputs\apkfolder.
Projects targeting Android and Android Instant are built with the same template. Build output can be found in the
build\android\projfolder. Regarding this folder, please take note:Code intended for the Android platform should be stored in the
app\srcfolder. Third-party libraries should be stored separately in theapp\libsfolder. If these folders do not exist in the build directory, users can create them manually.Code intended for the Android Instant should be stored in the
instantapp\srcfolder. Third-party libraries should be stored separately in theinstantapp\libsfolder. If these folders do not exist in the build directory, users can create them manually.Code and libraries shared by Android and Android Instant should be stored in the
srcandlibsfolders respectively. If these folders do not exist in the build directory, users can create them manually.
When compiling for Android by clicking the Make button in the Build panel,
assembleRelease/Debugwill be executed by default. Similarly,instantapp:assembleRelease/Debugwill be executed by default when compiling for Android Instant.