
- 中文
- Cocos Creator
- Cocos2d-x
- AnySDK
-
Cocos Creator 2.0Version: 2.0
Declare class with cc.Class
cc.Class is a useful API, which is used to declare Class in Cocos Creator. For the convenience of categorization, we call the Class that uses the cc.Class declaration CCClass.
Define CCClass
First invoke the cc.Class method, passing in an prototype object and set up the needed type parameters by way of a key-value pair in the prototype object, then the needed class can be created.
var Sprite = cc.Class({
    name: "sprite"
});
The above code assigns the created class to the Sprite variable. Besides, it set the class name to "sprite". Class name is used for serialization, which can normally be omitted.
Instantiation
The above Sprite variable is assigned to a JavaScript constructor, which can be used to create new object:
var obj = new Sprite();
Judge class
When you need to judge the class of an object, you can use the JavaScript built-in instanceof:
cc.log(obj instanceof Sprite); // true
Constructor
Use ctor to declare constructor:
var Sprite = cc.Class({
    ctor: function () {
        cc.log(this instanceof Sprite);    // true
    }
});
Instance method
var Sprite = cc.Class({
    // declare a instance method called "print"
    print: function () { }
});
Inheritance
Use extends to extends an already declared class:
// base class
var Shape = cc.Class();

// sub class
var Rect = cc.Class({
    extends: Shape
});
Superclass constructor
The constructor of the super class will be automatically invoked at first before the instantiation of the child class, you do not need to call it explicitly by yourself.
var Shape = cc.Class({
    ctor: function () {
        cc.log("Shape");    // The superclass constructor will be automatically invoked
                            // during instantiation,
    }
});

var Rect = cc.Class({
    extends: Shape
});

var Square = cc.Class({
    extends: Rect,
    ctor: function () {
        cc.log("Square");   // then call the child constructor.
    }
});

var square = new Square();
The output of the above code is "Shape" and "Square".
Property declaration
By employing attribute declaration in the component script, we can visually show the field of the script component in Properties panel so that we can adjust the attribute value in the scene easily.
To declare the attribute, all you need to do is put the attribute name and parameters in the cc.Class defining properties field, for instance:
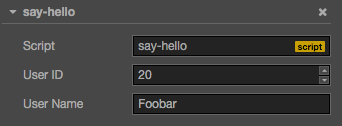
cc.Class({
    extends: cc.Component,
    properties: {
        userID: 20,
        userName: "Foobar"
    }
});
At this time, you can see in Properties panel the two properties you just defined:
In Cocos Creator, we provide two kinds of attribute declaration methods:
Simple declaration
In most cases, we can use simple declaration.
When the property declared is the JavaScript primitive type, it can be written directly into:
  properties: {
      height: 20,       // number
      type: "actor",    // string
      loaded: false,    // boolean
      target: null,     // object
  }
When the property declared has type (such as
cc.Node,cc.Vec2etc.), you can finish the declaration by writing its constructor in the declaration, such as:properties: { target: cc.Node, pos: cc.Vec2, }When the declared property type is inherited from
cc.ValueType(such ascc.Vec2,cc.Color,cc.Sizeetc.), in addition to using constructor above, it can also be assigned with an instance, such as:properties: { pos: new cc.Vec2(10, 20), color: new cc.Color(255, 255, 255, 128), }When the property declared is an array, you can finish the declaration by writing its type or constructor in the declaration, such as:
  properties: {
      any: [],      // array of arbitrary type
      bools: [cc.Boolean],
      strings: [cc.String],
      floats: [cc.Float],
      ints: [cc.Integer],

      values: [cc.Vec2],
      nodes: [cc.Node],
      frames: [cc.SpriteFrame],
  }
Note: other than the situations above, we all need to use complete declaration to write for other types.
Complete declaration
Under some circumstances, we need to add attributes for the property declaration. These attributes control the property display mode in Properties panel, and the property behavior in the scene serialization process. For example:
properties: {
    score: {
        default: 0,
        displayName: "Score (player)",
        tooltip: "The score of player",
    }
}
The code above specified three attributes default, displayName and tooltip. They specify the default value of score is 0, and its property name in Properties panel will be shown as “Score (player)”, and when the cursor moves on to the property, it will show the corresponding Tooltip.
Below are the general attributes.
- default: set default value for property, the default value will be used only when the component attaching to a node for the first time.
- type: restrict data type of property, see CCClass Advanced Reference: type attribute for details
- visible: the property is invisible in the Properties panel if set to false
- serializable: do not serialize this property if set to false
- displayName: display the assigned name on the Properties panel
- tooltip: add Tooltip of property in the Properties panel
For detailed usage please refer to Property attribute.
Array declaration
The default of array must be set to [], if you are about to edit in Properties panel, then you also need to set the type into constructor, enumeration, or cc.Integer, cc.Float, cc.Boolean and cc.String.
properties: {
    names: {
        default: [],
        type: [cc.String]   // use type to specify that each element in array must be type string
    },

    enemies: {
        default: [],
        type: [cc.Node]     // type can also defined as an array to improve readability
    },
}
get/set declaration
After setting get or set in the property, when you access the property, the pre-defined get or set method will be triggered. Defining the method is as follows:
properties: {
    width: {
        get: function () {
            return this._width;
        },
        set: function (value) {
            this._width = value;
        }
    }
}
You can define the get method only, so this is like one property of read only.