Light
Light is really important for building mood and ambiance for a game. There are currently 4 lighting techniques supported. You would use different lighting techniques depending upon your needs. Each lighting effect achieves a different result.
Ambient Light
An AmbientLight object will apply light evenly for everything in the scene.
Think of lighting in an office environment. The lights are overhead and when you
look at objects around the office you see them in the same light. Example:
auto light = AmbientLight::create (Color3B::RED);
addChild(light);
This produces:

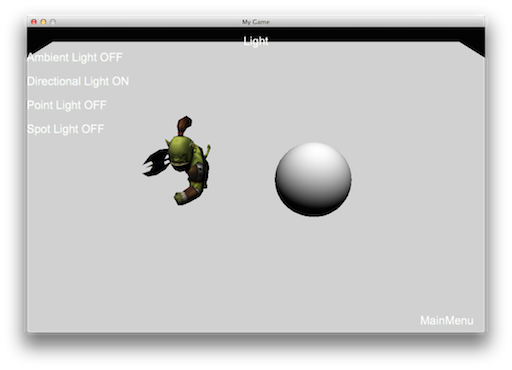
Directional Light
DirectionalLight is often used to simulate a light source such as
sunlight. When using DirectionalLight keep in mind that is has the same density
no matter where you are in relationship to it. Also think about being outside on
a sunny day with the sun beaming down on you. When you look directly at the sun,
it is an intense light even if you move a few steps in any direction. Example:
auto light = DirectionLight::create(Vec3(-1.0f, -1.0f, 0.0f), Color3B::RED);
addChild(light);
This produces:
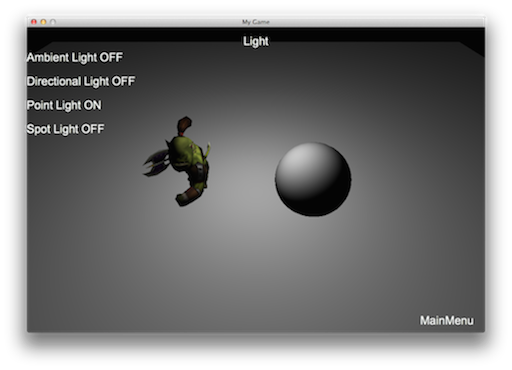
Point Light
PointLight is often used to simulate the effect of light bulbs, lamps
or torches. The direction of a PointLight is from the lighted position to the
PointLight. Keep in mind that the density is different depending upon the
distance from the PointLight. What does this mean? If you are close to the
start of the PointLight it will be really strong. If you are towards the end
of the PointLight it will be dim. PointLight also becomes weaker the larger
the distance it is projected. Example:
auto light = PointLight::create(Vec3(0.0f, 0.0f, 0.0f), Color3B::RED, 10000.0f);
addChild(light);
This produces:
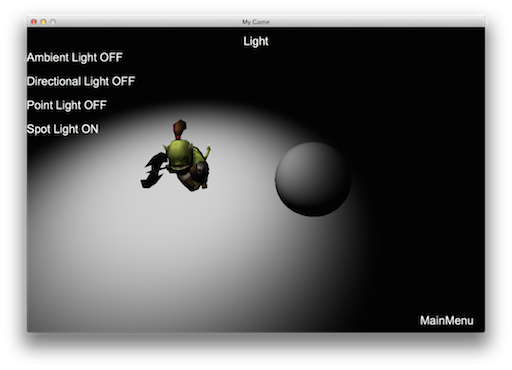
Spot Light
A SpotLight object is often used to simulate a flashlight. This means that it
is emitted in just one direction in the shape of a cone. Think about the power
going out in your house. You may need to take a flashlight down into your basement
to reset your circuits. The flashlight produces a cone shaped lighting pattern
and you can only see objects inside that cone pattern. Another example is in dark,
dungeon based games where your path is light by torches. You can only see the
limited cone shape that those torches emit. Example:
auto spotLight = SpotLight::create(Vec3(-1.0f, -1.0f, 0.0f), Vec3(0.0f, 0.0f, 0.0f),
Color3B::RED, 0.0, 0.5, 10000.0f) ;
addChild(spotLight);
This produces:
Light Masking
What do you use for lights in your kitchen or living room? Probably a few lamps? Do you ever notice that perhaps you only use a lamp to light up a certain portion of the room? You are essentially applying a lighting mask!
A lighting mask is used on a Node to only apply a particular lighting source
to it. For example, if you had multiple lights in a Scene, a Node can only be
lighted by one of the lights instead of all three. You can use setLightFlag(LightFlag)
to control which Node objects are effected by the light. It is important to note
that all lighting sources are rendered in a single pass. Due to mobile platform
performance issues the use of multiple light sources is not recommended. The
default maximum is 1. If you want to open multiple light sources you must define
the following keys in info.plist:
<key> cocos2d.x.3d.max_dir_light_in_shader </key>
<integer> 1 </integer>
<key> cocos2d.x.3d.max_point_light_in_shader </key>
<integer> 1 </integer>
<key> cocos2d.x.3d.max_spot_light_in_shader </key>
<integer> 1 </integer>