Cocos Creator
Extending Build Process
To build a platform plug-in a common editor plug-in format is required. For the basic structure of the plug-in, please refer to the First Extension documentation . To extend the build function, it is necessary to understand the overall process of the build. Please read the Introduction to the build process and FAQ guide documentation.
Quick start
Click Project -> New Build Extension in the menu bar of the editor, and select Global/Project to create a build extension package.
If selecting Global, the build extension will be applied to all Cocos Creator projects. The path of Global is:
Windows:
%USERPROFILE%\.CocosCreator\extensionsmacOS:
$HOME/.CocosCreator/extensions
If selecting Project, this will apply the build extension to the specified Cocos Creator project. The path of Project is:
$Your project address/extensions
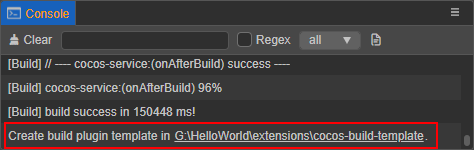
After the build extension is created, notice the generation path of the plugin in the Console. Click on the path to open the build extension package in the file manager of the operating system.
Before enabling the build extension, execute
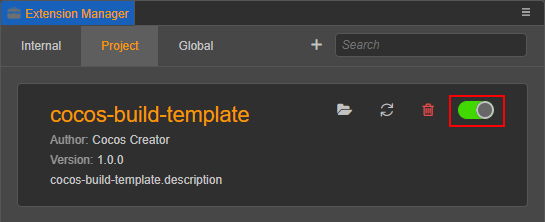
npm installin the directory to install some dependent @types modules to compile normally. The interface definition that comes with the editor has been generated under the @types folder in the root directory. Developer -> Export.d.ts from the menu bar of the editor shows the latest interface definitions.Click Extension -> Extension Manager in the menu bar of the editor to open the Extension Manager panel. Then select the Project/Global tab in the Extension Manager, and click the Refresh Icon button to see the build extension just added. Then click the Enable button on the right to run the plug-in normally.
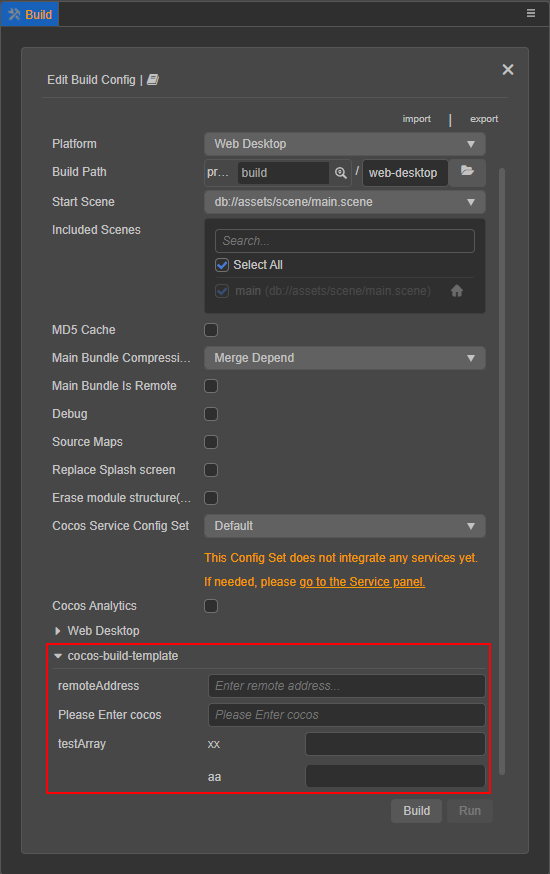
After the build extension is enabled, open the Build panel, notice the expansion bar of the build extension plugin. Click Build to join the build process.
To modify the content of the built extension, directly modify the build extension package under the
extensionsdirectory, review thereadme.mdfile in the build extension package directory for details. Find the corresponding build extension in the Extension Manager, and click the Reload icon button. The extension in the editor will re-run with the latest code and files.
Basic configuration process
To extend the build function of the plug-in, add the builder field to the contributions in package.json, and the relative path configuration of the corresponding module can be passed to the specified platform in the field.
Example package.json:
json
// package.json

{
    "contributions": {
        "builder": "./dist/builder"
    }
}Note: the
builderfield specifies the./dist/builder.jsstart script is the compiled script, and the source file of the start script is located in./source/builder.ts. To configure the start script, change it in the source file.
Start script configuration
The plugin entry configuration code example is shown below:
ts
// builder.ts

// Allow external developers to replace parts of the build asset handler module. Please refer to the "Custom Texture Compression Processing" section below for details.
export const assetHandlers: string = './asset-handlers';

export const configs: IConfigs = {
    'web-mobile': {
        hooks: './hooks',
        options: {
            remoteAddress: {
                label: 'i18n:xxx',
                render: {
                    ui: 'ui-input',
                    attributes: {
                        placeholder: 'Enter remote address...',
                    },
                },
                // Validation rules, there are currently several commonly used validation rules built in, and the rules that need to be customized can be configured in the "verifyRuleMap" field
                verifyRules: ['require', 'http'],
            },
            enterCocos: {
                    label: 'i18n:cocos-build-template.options.enterCocos',
                    description: 'i18n:cocos-build-template.options.enterCocos',
                    default: '',
                    render: {
                        // Please click "Developer -> UI Components" in the menu bar of the editor to view a list of all supported UI components.
                        ui: 'ui-input',
                        attributes: {
                            placeholder: 'i18n:cocos-build-template.options.enterCocos',
                        },
                    },
                    verifyRules: ['ruleTest']
                }
            },
            verifyRuleMap: {
                ruleTest: {
                    message: 'i18n:cocos-build-template.ruleTest_msg',
                    func(val, option) {
                        if (val === 'cocos') {
                            return true;
                        }
                        return false;
                    }
                }
            }
        },
};
Please pay extra attention to the following points when writing start scripts:
The environment variables in different processes will be different. The start script will be loaded by the rendering process and the main process at the same time, do not use the editor interface that only exists in a single process in the start script.
There are two ways to configure the key of
config:One is for a single platform configuration, and the key is filled in as platform plugin name (available in the editor menu bar Extensions -> Extension Manager -> Internal to view the platform plug-in name).
One is the configuration for all platforms, the key is filled in as
*. These two configuration methods are mutually exclusive, please do not use them in the same build extension package.
Note: these two configuration methods are mutually exclusive, please do not use both in the same build extension package. Otherwise the configuration for a single platform (key value
platform build plugin name) will overwrite the configuration for all platforms (key value*).
Start script interface definition
The detailed interface definition is described as follows:
ts
declare type IConfigs = Record<Platform | '*', IPlatformConfig>;
declare interface IBuildPlugin {
    hooks?: string; // Storage path of hook function
    options?: IDisplayOptions; // Platform parameter configuration that needs to be injected
    verifyRuleMap?: IVerificationRuleMap; // Register parameter verification rule function
}
declare type IDisplayOptions = Record<string, IConfigItem>;
declare interface IConfigItem {
    // The default value, the registered default value will be in the "options.[platform].xxx" field in the plugin configuration
    default?: any;

    render: ?{
        // The rules for rendering UI components are consistent with the unified rules at "ui-prop". Only configurations with UI properties specified will be displayed on the Build panel
        ui?: string;
        // The configuration parameters passed to the UI component
        attributes?: IUiOptions;
    };

    // Configure the displayed name, if you need to translate, then pass in "i18n:${key}"
    label?: string;

    // A brief description of the setting, which will be displayed on the title when the mouse hovers over the configuration name.
    description?: string;

    // Type of configuration
    type?: 'array' | 'object';

    // If type is an array, the data will be rendered according to the specified data type and "itemConfigs"
    itemConfigs?: Record<string, IConfigItem> | IConfigItem[];
}

declare interface IUiOptions extends IOptionsBase {
    // Validation rules array, build provides some basic rules, and you can also specify new validation rules through “verifyRuleMap”. Only when pass in “require” will be a valueless checksum, otherwise only when there is a value.
    verifyRules?: string[];
}

declare interface IUiOptions extends IOptionsBase {
    class?: string | string[]; // The name of the style that needs to be set on the current "ui-prop"
}
For the interface definition of IOptionsBase please refer to ui-prop automatic rendering rule definition.
Custom build hook function code configuration
In the script module defined by the hooks field in the entry configuration, hook functions can be written that build the life cycle. In different hook functions, the data received will be different. All hook functions run in the build process, and the engine method can be used directly in the build process.
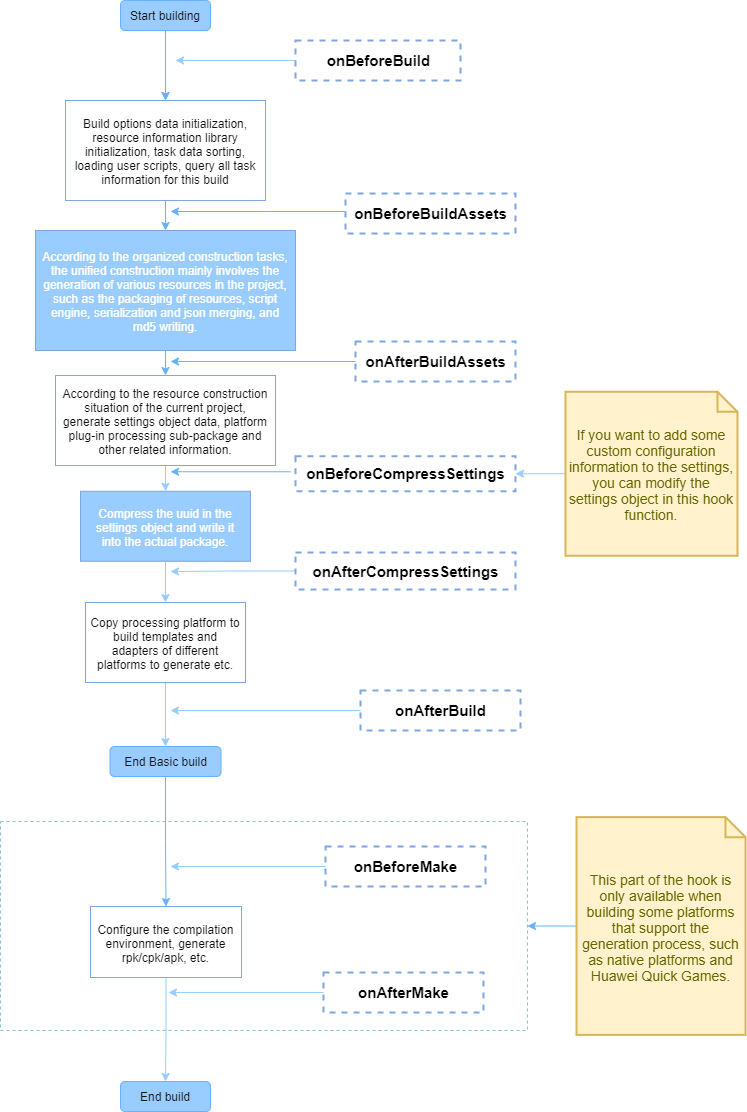
The relationship between the public hook function and the life cycle of the build can be seen in the following figure:
The rough interface definition of hook function is as follows:
ts
declare interface IHook {
    throwError?: boolean; // The hook function injected by the plugin, whether to exit the build process directly and show the build failure when the execution fails.
    // ------------------ hook function --------------------------
    onBeforeBuild?: IBaseHooks;
    onBeforeCompressSettings?: IBaseHooks;
    onAfterCompressSettings?: IBaseHooks;
    onAfterBuild?: IBaseHooks;

    // Compile the generated hook function (only valid if the platform's build process has a "Make" step)
    onBeforeMake?: (root: string, options: IBuildTaskOptions) => void | Promise<void>;
    onAfterMake?: (root: string, options: IBuildTaskOptions) => void | Promise<void>;
}
type IBaseHooks = (options: IBuildTaskOptions, result?: IBuildResult) => void | Promise<void>;Notes:
- the
resultparameter can be accessed only at the beginning ofonBeforeCompressSettings, and theoptionspassed to the hook function is a copy of theoptionsused in the actual build process, and only used as a reference for information acquisition, so directly modifying it does not really affect the build process, although it can be modified successfully. To modify the build parameters, please set in theoptionsfield of the entry configuration code. Due to the numerous interface definitions, you can refer to the@types/packages/builderfolder in the build extension package for detailed interface definitions.- The hook function is allowed to be an asynchronous function, and the build will await the completion of the hook function execution before executing the next process by default.
A simple example:
ts
export function onBeforeBuild(options) {
    // Todo some thing...
}
export async function onBeforeCompressSettings(options, result) {
    // Todo some thing...
}
Custom texture compression processing
The assetHandler path configuration specified in the start script configuration above allows external developers to register some asset handling functions to replace the engine's handler module when building partial assets. Currently only texture compression handler registration is available.
Creator provides its own compression tools to handle compressed texture assets at build time, but does not focus on image compression because it needs to be compatible with different user environments and usually the compression tools are chosen to work on most computers rather than the most efficient ones. Therefore, Creator has opened up a plug-in mechanism in v3.4, which allows users to directly register compression processing functions for the corresponding texture assets, which will be called at the appropriate processing time when building.
The specific steps are as follows:
In the start script, write the relative path of the
assetHandlersmodule script:tsexport const assetHandlers = './asset-handlers';In the
assetHandlersscript module, thecompressTexturesfunction has been opened up for developers to write the corresponding handler function directly incompressTextures, which will be called during the texture compression phase of the build.The handler function takes the current array of remaining unprocessed texture compression tasks and removes them from the original array when processing is complete. Texture compression tasks that are not removed are considered unprocessed and are placed in the next corresponding processing function until all processing functions have been processed, and if there are still unprocessed texture compression tasks, they are placed back in the Creator's original texture compression process.
When there are multiple plugins registered with texture compression handler functions, they are executed in the order in which the plugins are started. If the previous plugin processes all the texture compression tasks, the subsequent plugins registered with the handler functions will not receive the tasks.
The code example is as follows:
tstype ITextureCompressType = | 'jpg' | 'png' | 'webp' | 'pvrtc_4bits_rgb' | 'astc_12x12'; // See interface definition for detailed format interface ICompressTasks { src: string; // Source file address dest: string; // Address of the generated target file (default suffix is PNG, other types need to be changed manually) quality: number | IPVRQuality | IASTCQuality | IETCQuality; // Compression quality 0 - 100 or other compression levels format: ITextureCompressType; // Compression type } export async function compressTextures(tasks: ICompressTasks[]) { for (let i = 0; i < Array.from(tasks).length; i++) { const task = Array.from(tasks)[i]; if (task.format ! == 'jpg') { // Texture compression tasks that are skipped are passed to the next processing function until they finally enter the Creator's original build-time texture compression process continue; } task.dest = task.dest.replace('.png', '.jpg'); await pngToJPG(task.src, task.dest, task.quality); // Remove the finished texture compression task from tasks, so that it will not be processed again when building tasks.split(i, 1); } }
Debugging build extension plugins
When the build extension plugin is involved in the build process, the associated code runs in the following three processes:
- Main Process: executes the start script and its dependent assets.
- Rendering Process: executes some of the fields registered in the start script to the Build panel.
- Build Process: executes the script defined in the
hooksfield of the start script.
Main Process (Start Script)
The main process mainly executes the start script used in the build extension plugin to participate in the build process (the script specified in the builder field), and the plugin's own start script (the script specified in the main field).
When the code running in the main process is modified, the plugin must be restarted and then the process to be updated must be refreshed (this will be optimized later to try to solve the code update problem with a single restart, but refreshing is still the most thorough reloading method). The main process currently does not have a more appropriate debugging method, you can use the command line to open the editor to view the main process code log to assist debugging:
bash
// Mac
/Applications/CocosCreator/Creator/3.0.0/CocosCreator.app/Contents/MacOS/CocosCreator --project projectPath

// Windows
... \CocosCreator.exe --project projectPath
Rendering Process (Build Panel)
The start script of the build extension plugin has some fields that are registered to the Build panel, such as the display configuration of options, the panel field, and the panel script itself, which is loaded and executed in the render process. The rendering process is actually the window's own execution process. Open the DevTools to debug the dom elements, styles, scripts, etc. on the Build panel.
If the code registered to the Build panel is modified, refresh the panel without restarting the plugin.
Open the DevTools for the rendering process of the Build panel
Click on the Build panel and press the shortcut Ctrl + Shift + I (Windows) or Command + Option + I (Mac) to open the DevTools for the Build panel.
How to reload (refresh) the panel
Press Ctrl/Command + R after clicking on the Build panel or the DevTool in the Build panel.
Build Process (hooks Script)
The actual execution phase of the build is a separate worker process, ensuring that even if an abnormal crash occurs, it will not affect the normal use of other windows. The scripts defined in the hooks field of the start script are also loaded and executed in this separate worker process.
If only the script defined in the hook field is modified, the build process can be refreshed without restarting the plugin. To do this, press Ctrl/Command + R after opening the build DevTools, as in the Build panel above.
Opening the DevTools for the build process
This includes the following three ways:
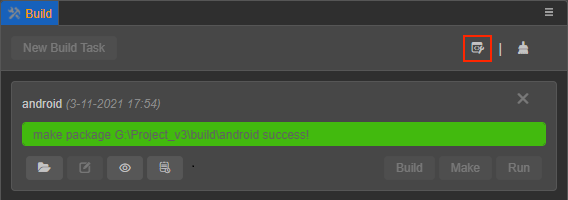
Click the Open Build DevTools button at the top right of the build task window in the Build panel.
Click Developers -> Open Build DevTools in the main editor menu to open it.
In any plugin code or in the console, execute the following code:
tsEditor.Message.send('builder', 'open-devtools');Editor.Messagecan be extended to suit additional needs. For example, developers can catch errors in the code written to build the plugin, and automatically open DevTools once there is an exception or something like that.