Cocos Creator
Publish for the Huawei HarmonyOS
Starting with v3.2, Cocos Creator supports packaging games as Huawei HarmonyOS (.hap) applications.
Preparations
Enter AppGallery Connect website to register for a HUAWEI ID.
After logging in, select Create Project and Add HarmonyOS App, select the Platform as HarmonyOS.
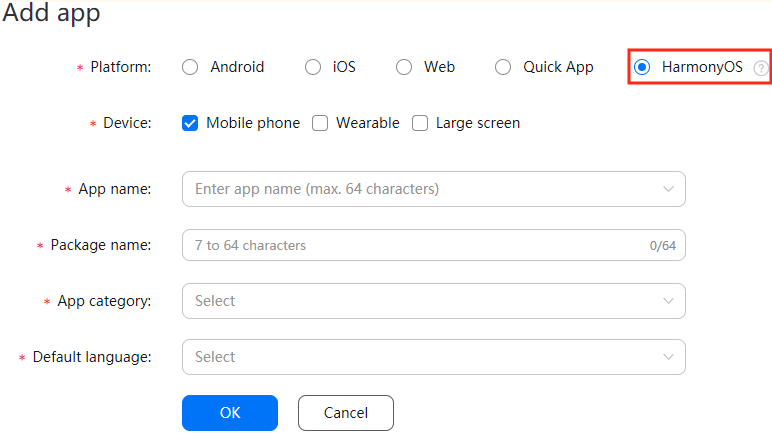
Note: the Package name needs to be consistent with the Game Package Name in the Build panel of Cocos Creator.
Download and install HUAWEI DevEco Studio. After the installation is complete Configure Development Environment, download the HarmonyOS SDK, please check Java and Native for the SDK packages in the SDK Platforms page.
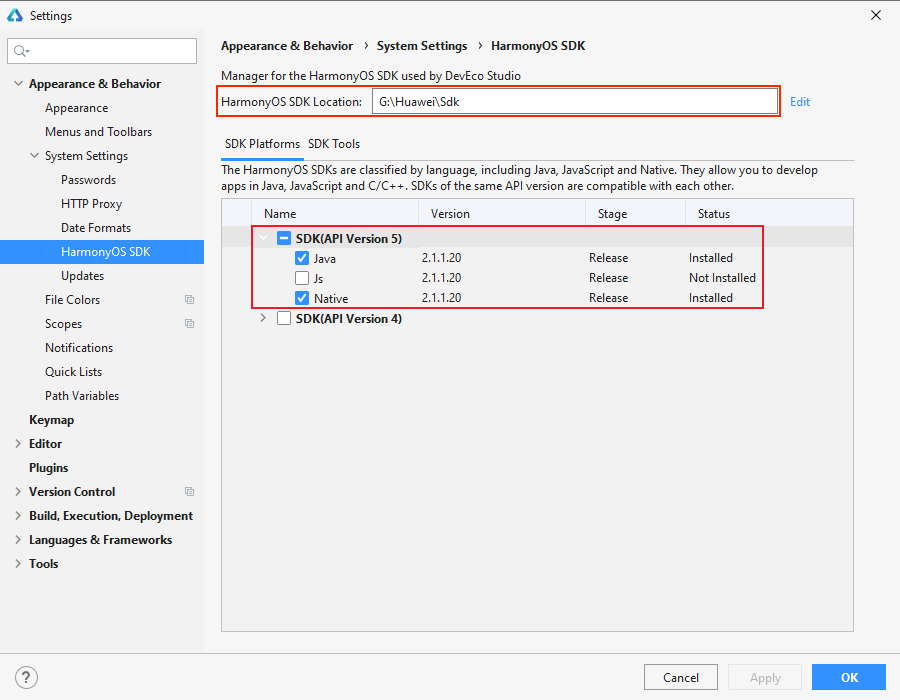
Remember the directory indicated by HarmonyOS SDK Location shown at the top of the window, fill in the path of this SDK in the Preferences panel of Cocos Creator later.
Release process
Building with Cocos Creator
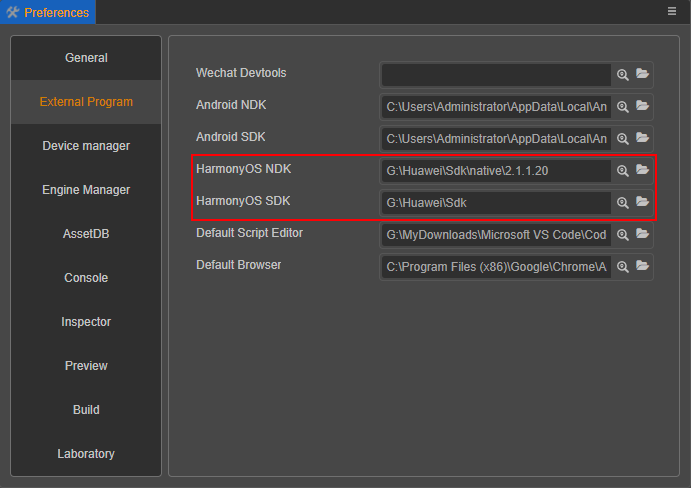
Use Cocos Creator to open the project, click Cocos Creator -> Preferences -> External Programs in the upper menu bar, configure HarmonyOS NDK and HarmonyOS SDK path:
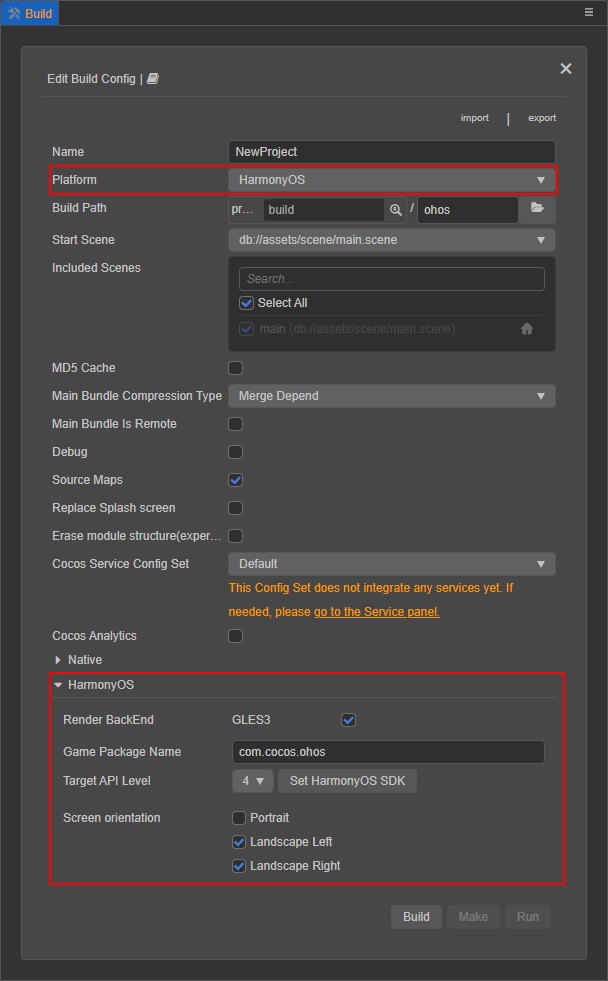
Open the Build panel from Project -> Build in the menu bar. Select HarmonyOS in Platform in the Build panel, and configure Build Options as needed. Next, click the Build button at the bottom right.
Notes:
- Game Package Name in the expanded option of HarmonyOS needs to be consistent with the Package name when adding the HarmonyOS application in the AppGallery Connect.
- We deprecated the Render BackEnd in the expanded option of HarmonyOS since v3.4.2 due to HarmonyOS offering full support to GLES3.
Open the project directory after the build is complete, notice that the
ohosfolder is generated under thenative\enginedirectory, which contains the HarmonyOS project generated by the build.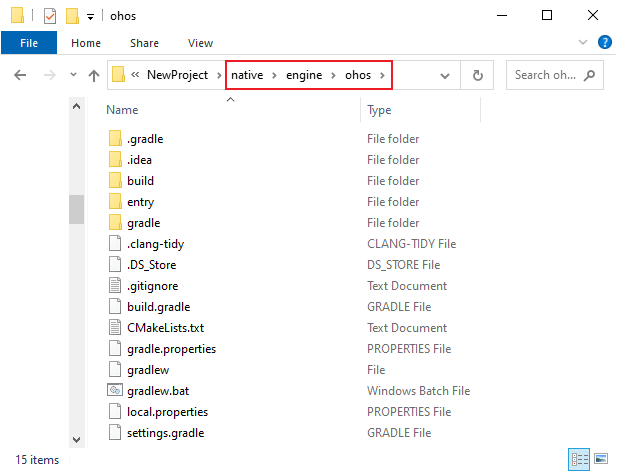
Note: currently, HarmonyOS does not support multi-directory builds, so the generated HarmonyOS project is in the
native\enginedirectory, unlike other platforms that generate in thebuilddirectory of the project.Next, open the
ohosfolder with HUAWEI DevEco Studio to perform further compilation, as described below.
Compile and run through HUAWEI DevEco Studio
Open HUAWEI DevEco Studio, click Open Project and select the HarmonyOS project (
ohosfolder) generated after the build in the previous step.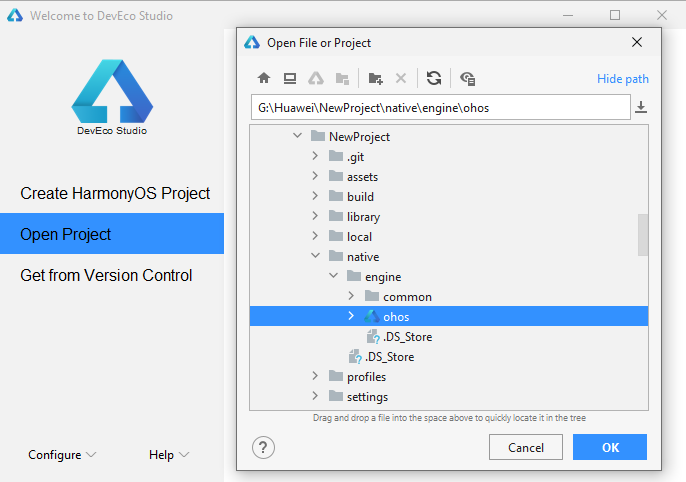
Prepare the signature file. For the method of obtaining the signature file, please refer to the contents of the Signature File section below.
Configure the signature file. Click File -> Project Structure in the DevEco Studio menu bar, then select Modules -> entry -> Signing Configs and configure the signature information. For details, please refer to the Configure Signature Information documentation.
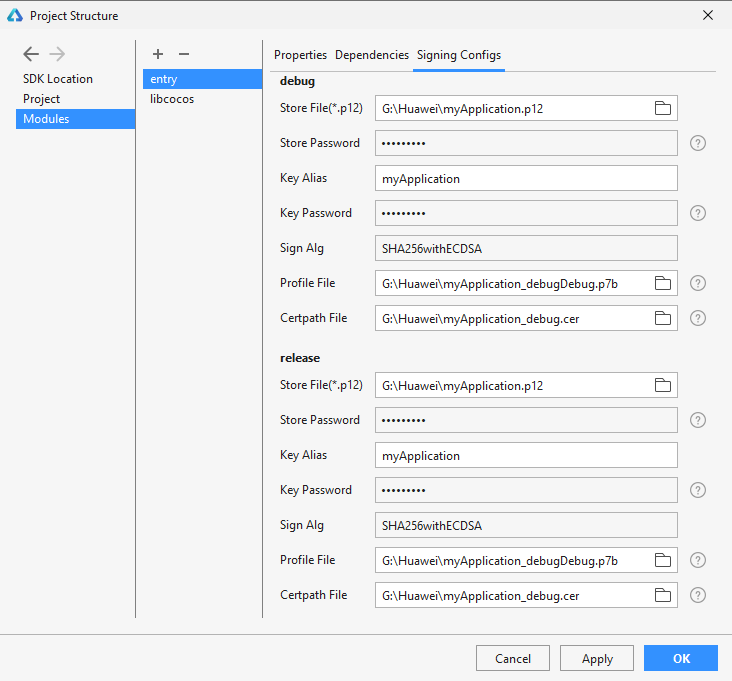
Then proceed to configure the signature information in Project -> Signing Configs.
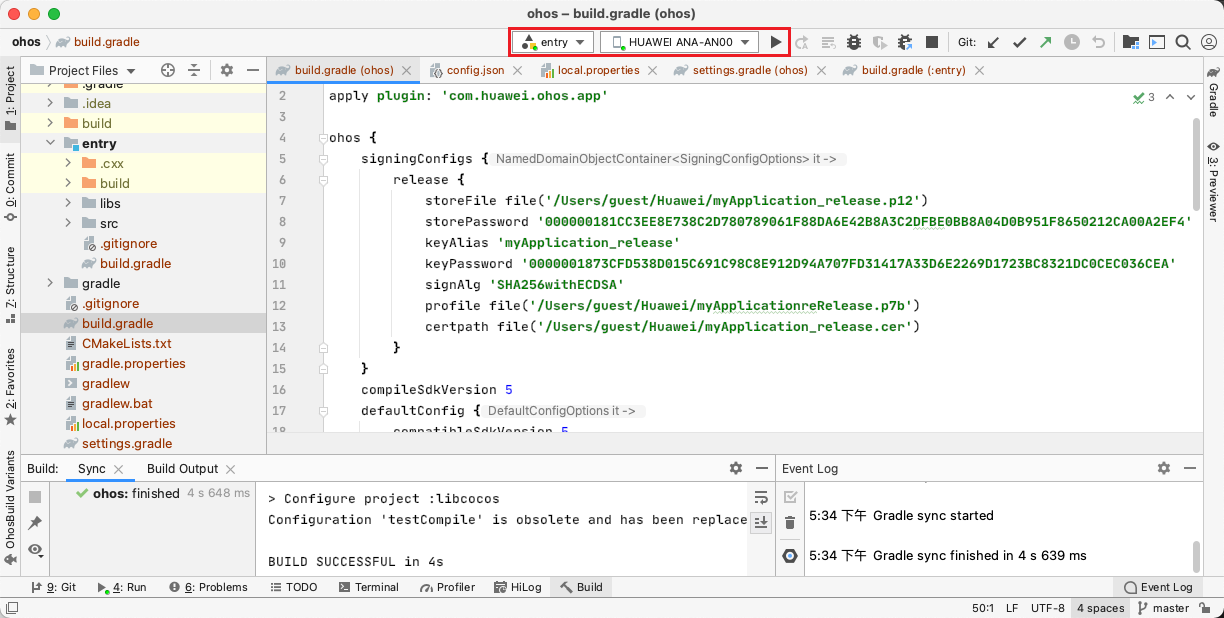
After setting and saving, the configured signature information can be viewed in the project directory in the
native\engine\ohos\entry\build.gradlefile in the project directory.Depending on the build type (Debug/Release) and whether the generated
.hapcontains signature information, the developer can configure in combination as needed, please refer to the Building and Creating HAPs documentation for details.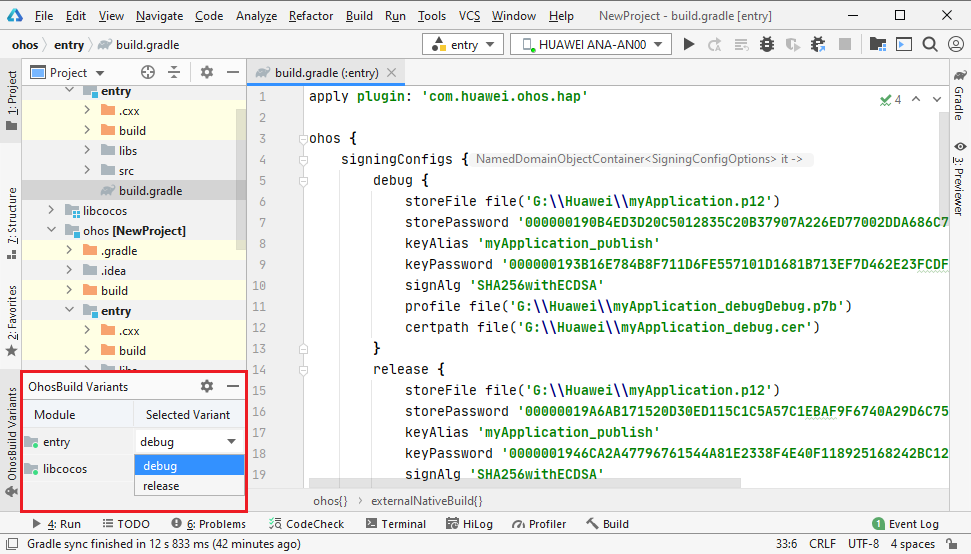
Then click on the Build -> Build Hap(s)/APP(s) -> Build Hap(s) in the menu bar to execute the compilation process and generate the
.hapfile.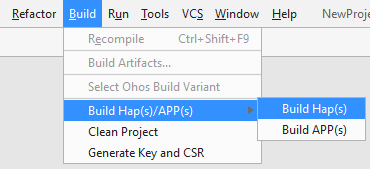
After compiling, the
.hapfile with signature information is generated in thenative\engine\ohos\build\outputs\hapdirectory of the project directory.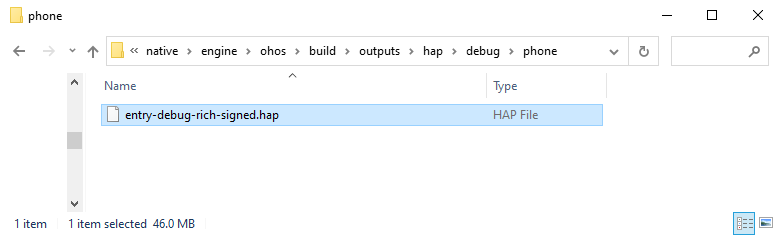
All
.hapfiles with/without signature information are generated in thenative\engine\ohos\entry\build\outputs\hapdirectory of the project directory.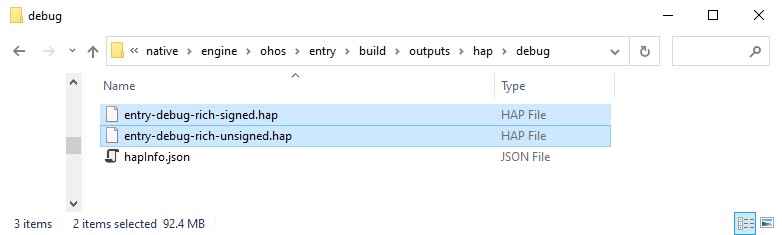
Connect Huawei devices with HarmonyOS system using USB, then click Run -> Run ‘entry’ in the menu bar or click the Run button above to run the HarmonyOS app to your device. Please refer to the Running Your App documentation for details.
Note: if the app icon is not found when running on the device, check if there is an
installationFreefield withtruein thenative\engine\ohos\entry\src\main\config.jsonfile in the project directory, change it tofalse.If need to upload and publish HarmonyOS apps to Huawei AppGallery Connect, please refer to the official Release HarmonyOS Application Guide documentation for the specific process.
Signature file
HarmonyOS applications use digital certificates (.cer files) and HarmonyAppProvision files (.p7b files) to ensure the integrity of the application. First, use DevEco Studio to generate a key and certificate request file, and then use the certificate request file to apply for a digital certificate and profile file for publishing/debugging in AppGallery Connect.
Generate key and certificate request file
In DevEco Studio, click Build -> Generate Key and CSR in the upper menu bar to generate a key (.p12 file), and then generate a certificate request file (.csr). For details, please refer to the Generating a Key Store and CSR documentation.
Generate and download a digital certificate (.cer file)
Visit the AppGallery Connect website, select Users and permissions -> Certificate management, click the New certificate button in the upper right corner.

Enter the required certificate information in the New certificate dialog box that is displayed. Certificate type Choose Release certificate/Debug certificate as required. The certificate request file is the
.csrfile generated in DevEco Studio in the previous step.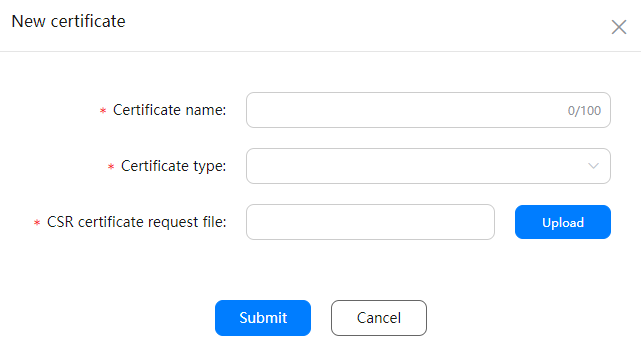
- Certificate name: Enter up to 100 characters.
- Certificate type: Select Release certificate/Debug certificate as required.
- CSR certificate request file: Select the
.csrfile generated in DevEco Studio in the previous step.
After filling in the information, click Submit, a release/debugging certificate (
.cerfile) will be generated, and click the Download button behind the certificate to download it to the local.
For more information, please refer to the Apply for Digital Certificate documentation.
Generate and download HarmonyAppProvision Profile file (.p7b file)
Enter AppGallery Connect website, select My Project, select the HarmonyOS project and application created before.
Click the HarmonyOS app services -> HAP Provision Profile management item on the left, and then click the Add button at the top right of the page to create a
.p7bfile.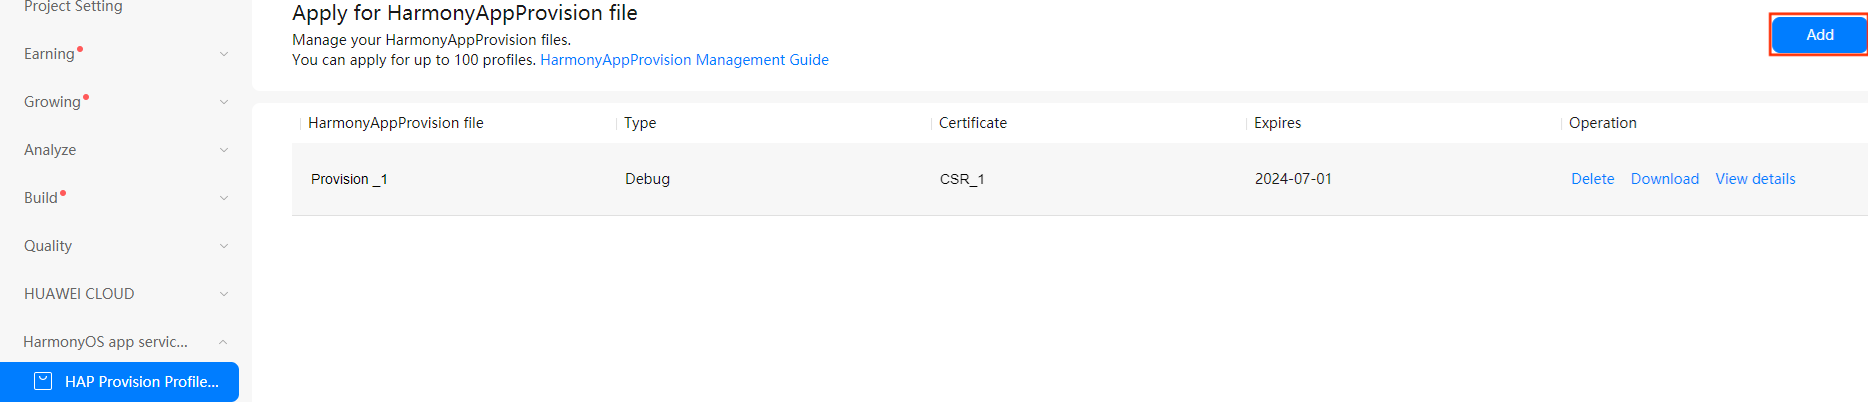
Enter the required information in the HarmonyAppProvision information dialog box that is displayed.
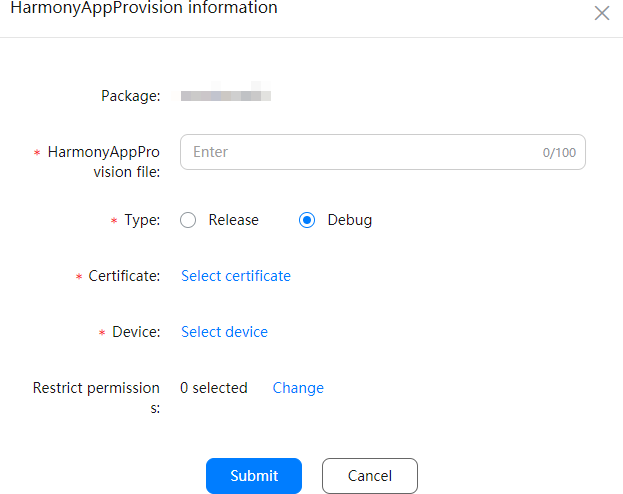
- HarmonyAppProvision file: Enter the file name, which contains up to 100 characters.
- Type: Select Release or certificate as required.
- Certificate: Select the
.cerfile generated in the previous step. - Device: Please refer to the Registering Debugging Devices documentation for configuration. It is not necessary to configure this item when the Type is set to Release.
After setting, click Submit to download the generated
.p7bfile to the local.
For more information, please refer to the Application Profile documentation.
Known issues
- WebView does not support
touchevents, touch is not responsive. - VideoPlayer does not support dragging video when playing remote video.
- EditBox is not zoomed out when full screen, and does not re-layout after keyboard retraction.
- Gravity/acceleration sensor delay around 500ms, poor followability.