AR Automated Behavior Editing
In AR scenes, there is always an unknown dependency between virtual objects and real entities. If we can clearly and conveniently describe the conditional characteristics of real entities and execute matching behaviors based on these conditions, it can greatly simplify the handling of complex AR features for developers and allow them to focus on writing business-related code. Cocos CreatorXR provides AR automated behavior editing components that abstract common physical features and logical behaviors into elements that developers can freely combine. The graphical interface significantly reduces the cost and entry barrier for AR application development.
Each automated behavior editing component for a specific feature has its own unique feature library and action library. The following describes all the AR features supported by the automated behavior editing in the current version:
Plane Tracking
Right-click in the Hierarchy panel and choose Create -> XR -> Plane Tracking to create a plane agent node that can describe a plane entity in the physical world.
![]()
Select the created Plane Tracking node, and in the Inspector panel, you can see the default cc.ARPlaneTracking component that has been added. Select the Factor or Action tab to view the existing features or actions. Click "Add Factor" or "Add Action" to add new items from the feature library or action library.
![]()
![]()
Drag the virtual object that needs to be displayed under the created Plane Tracking node and adjust its size and scale accordingly. Add the Display action item in the Actions section (already added by default), and the virtual object will be displayed when a plane that meets the conditions is recognized during runtime.
![]()
![]()
Image Tracking
Image Tracking allows you to use the device's AR capabilities to recognize 2D image resources at runtime.
Right-click in the Hierarchy and select Create -> XR -> Image Tracking to create an image agent node that can describe an image entity in the physical world.
![]()
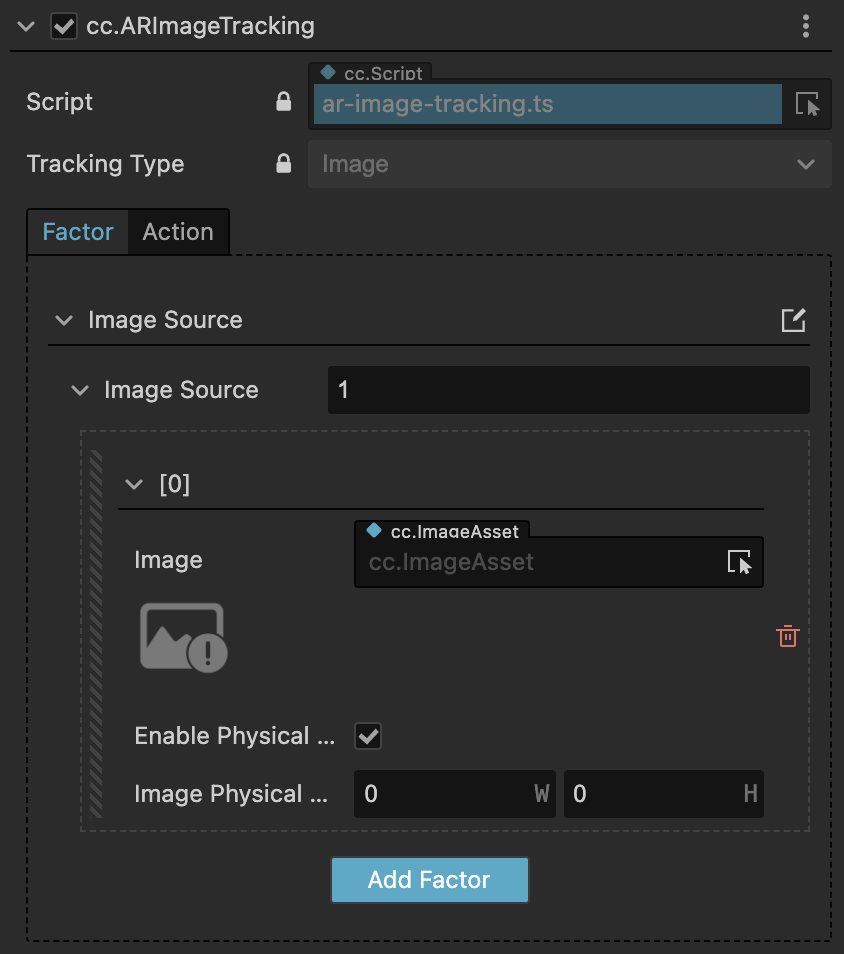
Select the created Image Tracking node, and in the Inspector panel, you can see the default cc.ARImageTracking component that has been added. In the Factor tab, under the Image Source property, add a new image resource.
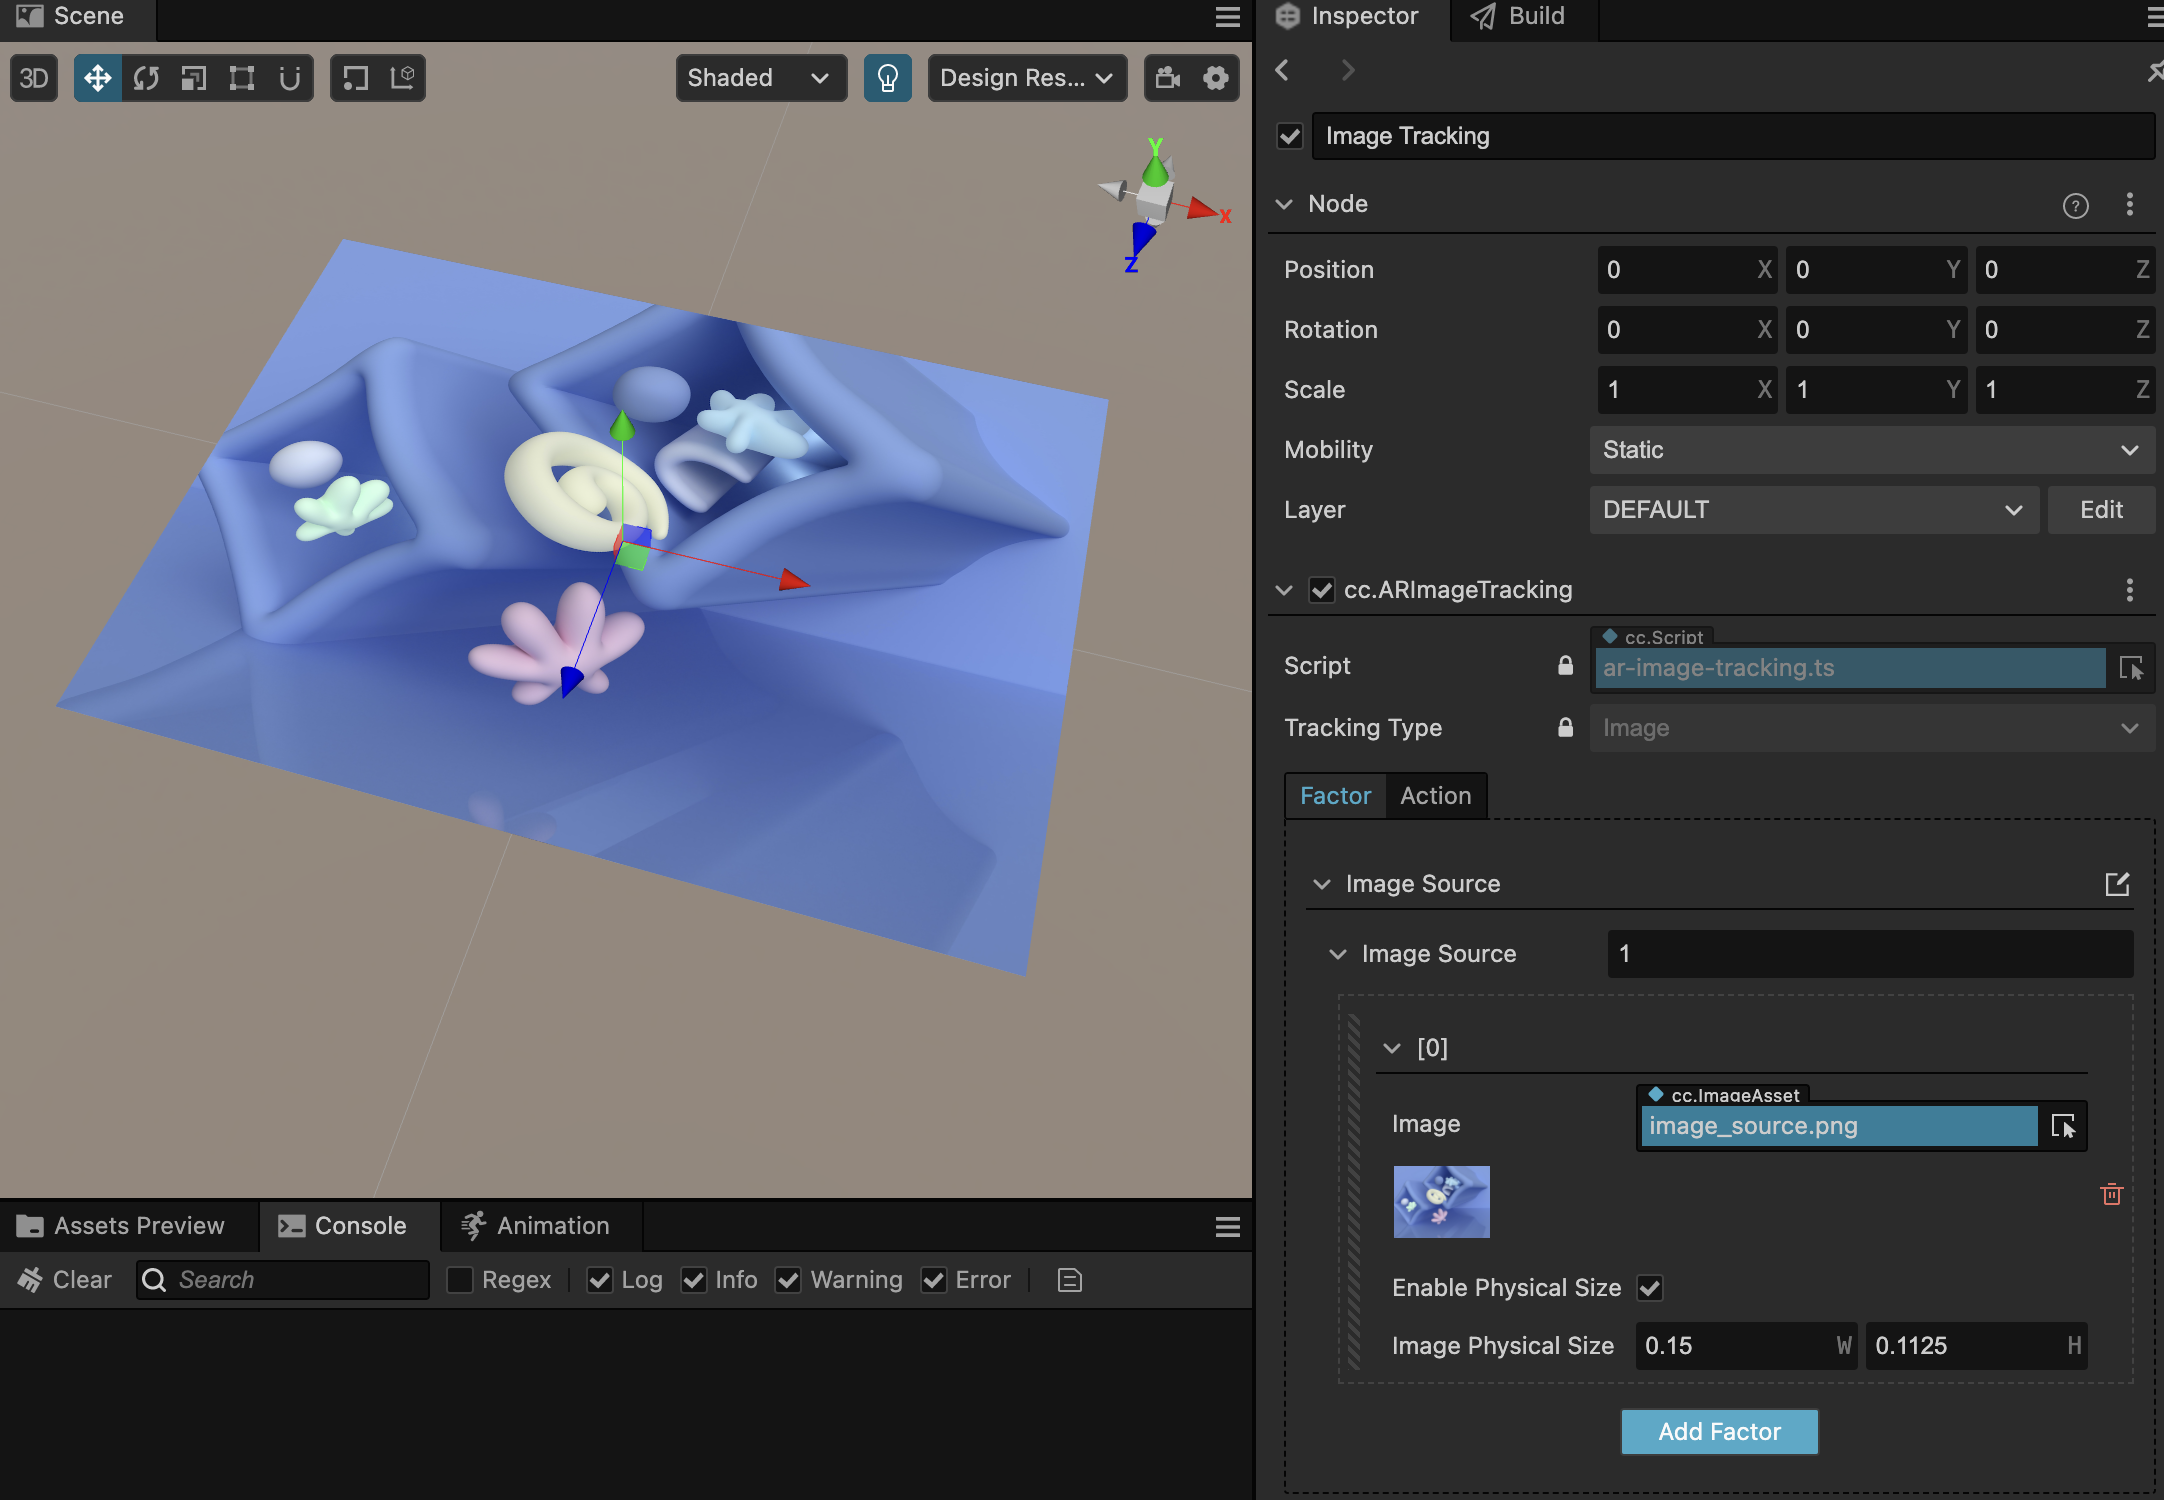
Drag and drop or directly select an image resource from the Assets window in the Image property. In the scene editor, you can see the currently referenced image and set its default physical size.
Drag the virtual object that needs to be displayed under the created Image Tracking node and adjust its size and scale accordingly. Add the Display action item in the Actions section (already added by default), and the virtual object will be displayed when the image is recognized during runtime.
![]()
![]()
Meshing(Experimental)
Currently, the Meshing feature only works on iOS devices with depth scene reconstruction capabilities (such as iPhone/iPad Pro series with LiDAR scanner). Meshing allows you to create 3D meshes based on the real environment.
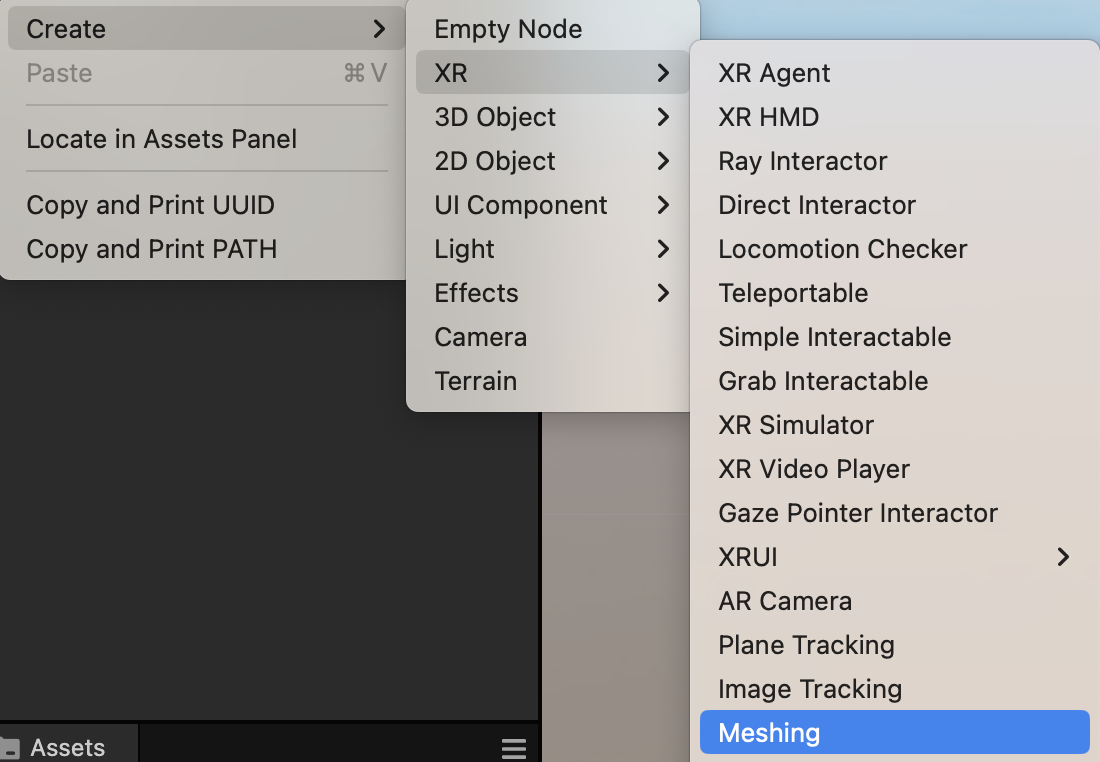
Right-click in the Hierarchy and select Create -> XR -> Meshing to create a Meshing agent node.
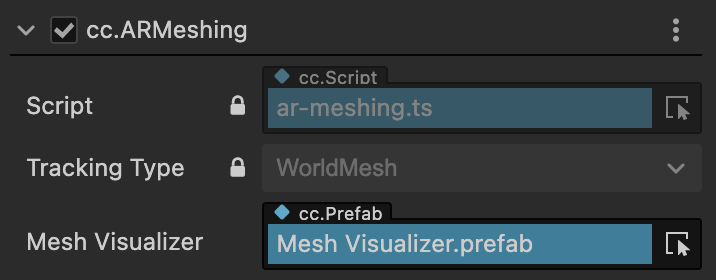
In the cc.ARMeshing component's Mesh Visualizer property, select the desired mesh visualization effect.
This will enable real-time surface meshing based on the physical environment during runtime.
Feature Library
Currently, you can add the following features:
| Feature | Attribute | Description |
|---|---|---|
| Plane Direction | Specifies the required orientation for the plane. The plane can be set to a specific direction (horizontal, vertical, or other). | |
| Plane Size | Sets the required size for the plane. When setting the size, you can choose to restrict the minimum/maximum size range of the plane. | |
| Image Source | Image | Sets the image resource for Image Tracking. |
| Enable Physical Size | When enabled, the recognized image will default to the specified physical size as the size of the real-world image, without calculating the image size based on depth features. This can speed up the recognition process. | |
| ImagePhysicalSize | Sets the physical size constraint for the calibrated image (in meters). When you change the width or height value, the other value will be automatically calculated based on the aspect ratio. |
Action Library
Currently, you can add the following actions:
| Action | Attribute | Description |
|---|---|---|
| Display | Activates the child objects if all the features of the automation behavior editor component match the real-world entities; otherwise, disables the child objects. | |
| Display Children Node | When enabled, displays the child nodes under the Tracking node by default. | |
| Stop Tracking | Disables AR tracking for this node when the specified conditions are met. | |
| Reset When Loss | Determines whether the behavior of the child nodes should be reset when tracking is lost. | |
| Align | Specifies the alignment relationship between the position of the proxy node and the position of the real-world entity. | |
| Towards | Sets the orientation of the child object. If set to Local_Up, it uses the pose of the child object directly. If set to World_Up, the child object's Y-axis will always align with the world coordinate's up direction. | |
| Face to Camera | When enabled, the child object faces the direction of the AR Camera along the Z-axis. | |
| MatchTrackingUpdate | When the real-world data matched by this node is updated, the layout and alignment effects are also refreshed. | |
| Surface Overlay | Replaces the original visualization effect with the specified prefab when the conditions are met. | |
| Surface Offset | Replaces the original visualization effect with the specified prefab when the conditions are met. | |
| Replace Visualizer | Disables and replaces the tracking visualization effect after creation. | |
| Adaptive Scale | Scales the child object based on the boundaries of the matched AR object. | |
| Max Scale | Sets the maximum limit for scaling adjustment. | |
| Match Tracking Update | Determines whether the behavior of scaling should be continuously refreshed along with tracking. | |
| Track Event | Collection of events called during the matching of tracking features. | |
| on Track Success | Event called when tracking is successful. | |
| on Track Refresh | Event called when tracking information is refreshed. | |
| on Track Loss | Event called when tracking is lost. | |
| on Track Timeout | Event called when tracking times out. You can set the time for tracking check, and if no successful tracking data is matched within this time range, the tracking failure event will be triggered. |