Use TypeScript
Proofreader: finscn
TypeScript is a free and open source programming language developed by Microsoft. It is a strictly superset of JavaScript and adds optional static types and class-based object-oriented programming. TypeScript design goal is to develop large-scale applications, and then translated into JavaScript. Since TypeScript is a superset of JavaScript, any existing JavaScript program is a valid TypeScript program.
For more information on how to use TypeScript, please visit TypeScript official website.
TypeScript and Cocos Creator
Many of Cocos Creator users used to use other strong type programming language (such as C++ / C#) to write game, so they hope to use strong type language to enhance the project in the larger scale team when developing games with Cocos Creator.
As with other JavaScript scripts, the TypeScript file (.ts) in the project assets directory will be compiled into an ES5 JavaScript script that is compatible with the browser standard once created or modified. The compiled script is stored in the library directories in the project folder.
Setup
Use TypeScript in a new project
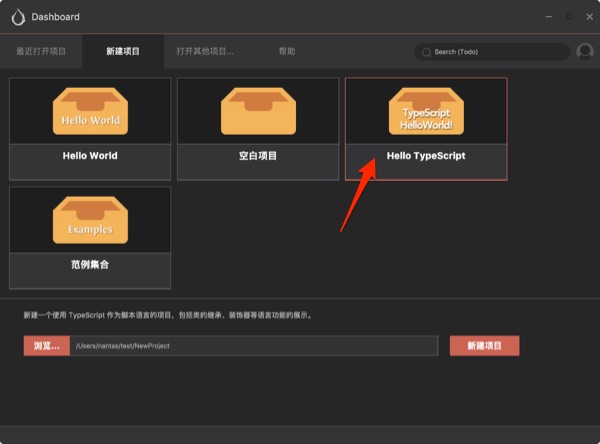
When you create a new project, select HelloWorld TypeScript from the project templates to create a HelloWorld project that includes TypeScript related settings and basic components.
When editing the TypeScript script, we recommend using Microsoft's VS Code as the code editor, and VS Code has perfect TypeScript language support.
Add a TypeScript setting to an existing project
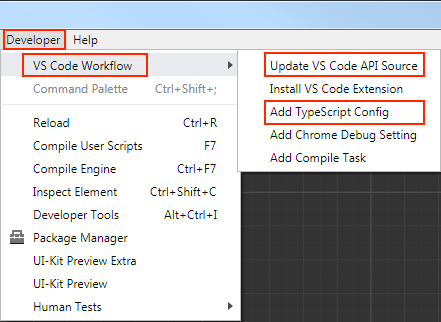
If you want to add a TypeScript script to the original project and get the full support of the IDE such as VS Code, you need to execute the Developer -> VS Code Workflow -> Update VS Code API Source and Developer -> VS Code Workflow -> Add TypeScript Config in the main menu. This will add creator.d.ts and tsconfig.json file to your project root directory. creator.d.ts declares all APIs for the engine and is used to support VS Code's intellisense and auto complete.
tsconfig.json is used to set the TypeScript project configuration and can be further customized by referring to the official tsconfig.json instructions.
Here is a tsconfig.json paradigm:
{
  "compilerOptions": {
    "module": "commonjs",
    "lib": [ "es2015", "es2017", "dom" ],
    "target": "es5",
    "experimentalDecorators": true,
    "skipLibCheck": true,
    "outDir": "temp/vscode-dist"
  },
  "exclude": [
    "node_modules",
    "library",
    "local",
    "temp",
    "build",
    "settings"
  ]
}
Create a TypeScript script in the project
As with creating a JavaScript script, you can create a new .ts file directly in the text editor, or create via Assets panel's context menu, right-click on a folder and select Create -> TypeScript.
Declare CCClass with TypeScript
The class declaration in TypeScript is similar to the ES6 Classes. But in order for the editor to correctly parse the various properties displayed in the Properties panel, we need to use the engine built-in decorator to declare the normal class as CCClass. This is similar to declaring the ES6 Classes in JavaScript as a CCClass currently. For more information on decorators, please refer to TypeScript decorator.
The following is an example of a basic TypeScript component declaration:
const {ccclass, property} = cc._decorator; // Introduce ccclass and property from the cc._decorator namespace

@ccclass // use decorator to declare CCClass
export default class NewClass extends cc.Component { // ES6 Classes declaration syntax, inherited cc.Component

    @property (cc.Label)    // use property decorator to declare attributes, parentheses are attribute types, decorator type declaration is mainly used for editor display
    label: cc.Label = null; // here is the type used to declare the type of statement, the colon is followed by the type of property, the equal sign is followed by the default value.

    // You can also use the full attribute to define the format
    @property ({
        visible: false
    })
    text: string = 'hello';

    // member method
    onLoad () {
        // init logic
    }
}
The decorator uses the @ character as the marker, the decorator is mainly used for the editor to identify the components and attributes, and the type statement in the TypeScript syntax myVar: Type allows automatic identification of the variable type when using VS Code scripting and code intellisense.
More property declaration example
Declare value types
  @property({
      type: cc.Integer
  })
  myInteger = 1;

  @property
  myNumber = 0;

  @property
  myText = "";

  @property(cc.Node)
  myNode: cc.Node = null;

  @property
  myOffset = new cc.Vec2(100, 100);
Declare arrays
  @property([cc.Node])
  public myNodes: cc.Node[] = [];

  @property([cc.Color])
  public myColors: cc.Color[] = [];
Declare get/set
  @property
  _width = 100;

  @property
  get width () {
      return this._width;
  }

  set width (value) {
      cc.log('width changed');
      this._width = value;
  }
Note: the public, private modifiers of TypeScript does not affect the default visibility of the member in the Properties panel, and the default visibility still depends on whether the member variable name begins with an underscore.
Intellisense
In accordance with the setup described in previous section, open the project in the VS Code and you can enjoy the code intellisense and auto complete in all your TypeScript coding.
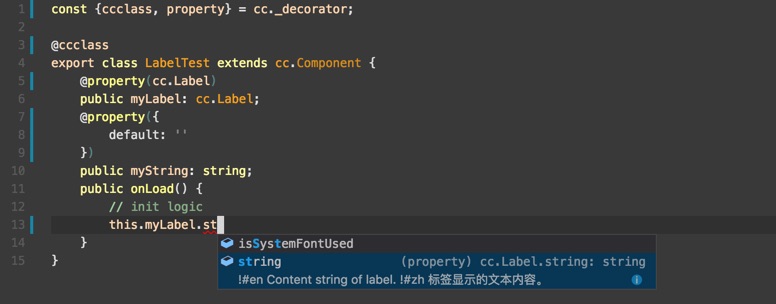
Component Member in the same file
Just enter this. will automatically prompt the other members of the component itself. Enter this.member. will prompt the member's properties or methods.
Other component properties and methods
First we declare a component:
// MyModule.ts
const {ccclass, property} = cc._decorator;

@ccclass
export class MyModule extends cc.Component {
    @property (cc.String)
    myName: string = "";

    @property (cc.Node)
    myNode: cc.Node = null;
}
And import MyModule and then declare a member variable of the MyModule type in the other component:
// MyUser.ts
const {ccclass, property} = cc._decorator;
import {MyModule} from './MyModule';

@ccclass
export class MyUser extends cc.Component {
    @property (MyModule)
    public myModule: MyModule = null;

    /*
     * // Declaring the custom class array
     * @property(MyModule)
     * public myModule: MyModule[] = [];
     *
     * @property({
     *     type: MyModule
     * })
     * public myModule: MyModule[] = [];
     */

    public onLoad () {
        // init logic
        this.myModule.myName = 'John';
    }
}
When you enter this.myModule., you will be prompt the properties declared in MyModule.ts.
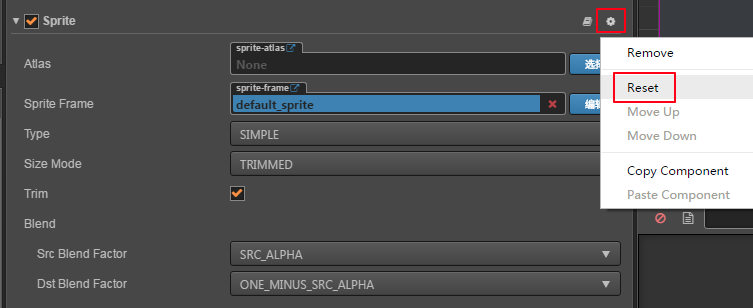
Node: If the declared property is modified to an Array type, but it does not take effect in the editor. Please Reset the component through the component menu.
The special type since v1.10
Cocos Creator made partial adjustments to the asset types since v1.10. The declaration of data type cc.Texture2D, cc.AudioClip and cc.ParticleAsset etc. in TS must be declared in the following format:
@property({
    type: cc.Texture2D,
})
texture: cc.Texture2D = null;

@property({
    type: cc.Texture2D,
})
textures: cc.Texture2D[] = [];
Using namespaces
In TypeScript, a namespace is an ordinary, named Javascript object that is located under the global namespace. It is commonly used to add namespace restrictions to variables when using global variables to avoid polluting the global space. Namespaces and modularity are completely different concepts, and namespaces cannot be exported or referenced, and are used only to provide global variables and methods that are accessed through namespaces. More detailed explanations of namespaces and modularity please refer to Namespaces and Modules.
Creator defaults all scripts in the assets directory will be compiled, and a modular package is automatically generated for each script so that the scripts can reference each other via import or require. When we want to place a script's variables and methods in the global namespace rather than in a module, we need to select this script resource and set the script import as plugin in the Properties. Scripts that are set up as Plug-ins will not encapsulated in a modularly and are not automatically compiled.
Note: in the WeChat, Baidu, Xiaomi, Alipay mini game environments, the global variables need to explicitly set properties of
windowto declare successfully, such aswindow.data = {};.
So for TypeScript scripts that contain namespaces, we can neither compile and modularize the scripts nor set them as plugin scripts (which will cause TS files not to be compiled into JS). If you need to use namespaces, we need to work with a specific workflow.
Namespaces workflow
Here is an example of the namespaces workflow.
For first time use, you need to install the TypeScript compiler, execute the following command in command line:
npm install -g typescriptOpen the tsconfig.json file in the project root directory with VS Code, and then set
outDirin thecompilerOptionsfield.{ "compilerOptions": { "outDir": "temp/vscode-dist" ...... }, ...... }In the root directory of the project (outside the assets directory), create a new folder and name it namespaces to store all of
tsscripts that contain namespace. Then create a new script foo.ts under that folder:namespace Foo { export let bar: number = 1; }Press the Ctrl/Cmd + Shift + P, enter
taskin the popup input box and selectTasks: Configure Task. Then continue to selecttsc: build - tsconfig.jsonin the popup options.Press the Ctrl/Cmd + Shift + B, enter
tscin the popup input box and selecttsc: build - tsconfig.jsonto start thetscompilation task. You can see that a vscode-dist folder has been generated under the temp directory, in that folder you can find the compiled generated script foo.js, the contents of the script now should be:var Foo; (function (Foo) { Foo.bar = 1; })(Foo || (Foo = {}));Copy the foo.js to any valid location in the assets directory of project.
Go back to the editor and select the foo.js you just copied in the Assets panel. Then check Import As Plugin in the Properties panel and click the Apply button in the upper right corner when you're done. The namespaces defined in the foo.js now works fine.
That is the complete workflow for using the TypeScript namespace in Creator.
Update engine interface declaration data
Each new version of Creator will update the engine interface statement, so after upgrading the Creator, it is recommended to update existing project creator.d.ts file to the latest. Go through the main menu Developer -> VS Code Workflow -> Update VS Code API Source to complete the update.
Support for TypeScript in Cocos Creator has taken a lot of reference from Creator TypeScript Boilerplate project settings and practices. Great appreciation to the author. In addition, this project also contains a lot of work on the use of TypeScript project and advanced features that TypeScript developers can refer to.