Using Cocos Creator With C++ and Lua Projects
Cocos Creator supports JavaScript, built in. Edit your Scenes and source code all from within. However, If you are a C++ or Lua developer, Cocos Creator allows exporting of Scenes to sour code for further development. Why isn't C++ built in, you ask? There is no need to re-invent the wheel. There are many really good development environments out there. Writing a text editor is no trivial task. For this reason, it is best to allow developers to edit source code in the editor of their choice.
What Is Supported?
Cocos2d-x v3.14 and Cocos Creator v1.4 and above are required. If you find some Nodes are not supported, upgrading Cocos2d-x and Cocos Creator may add support for them.
The following Nodes are supported.
| Node | Node | Node | Node | Node |
|---|---|---|---|---|
| Scene | Sprite | Canvas | ScrollView | Label |
| EditBox | ParticleSystem | TiledMap | Button | ProgressBar |
| RichText | SpineSkeleton | Widget | Animations | VideoPlayer |
| WebView | Slider | Toggle | ToggleGroup | PageView |
| Mask | Collider | Prefab | DragonBones |
Installing The Plugin
Adding C++ and Lua language support to Cocos Creator is easy:
- clone the Creator To Cocos2d-x repo.
from this repo, copy the creator_project/packages/creator_luacpp_support folder into your Creator project in packages. directory

In the Project menu inside Creator a new menu option will appear LuaCPP Support.

Plugin Setup
To run the plugin:
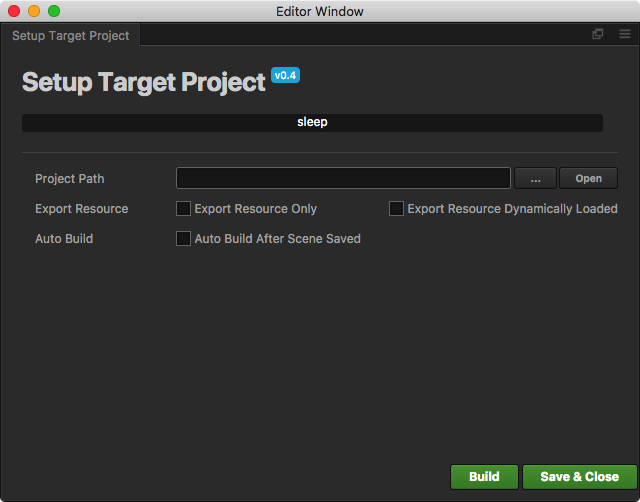
select Project -> LuaCPP Support -> Setup Target Project. It is required to tell Cocos Creator where to build all the necessary files.

select Build. Always use the Build button to build your project before running it. The result is all the needed code and resources to drop into your external build system.
C++ projects use these paths: source code: NATIVE_PROJECT_ROOT/Classes/reader resources: NATIVE_PROJECT_ROOT/Resources/creator
LUA projects use these paths: source code: NATIVE_PROJECT_ROOT/frameworks/runtime-src/Classes/reader resources: NATIVE_PROJECT_ROOT/frameworks/runtime-src/Resources/Creator
Moving from Creator to an external build system
After using the Build function the source code and resources are exported to the filesystem. From here, you can use these items in an external build system.
Header and Include search paths
It is still necessary to set some header and include search paths.
For C++:
```sh
reader
```
For Lua:
```sh
reader
reader/collider
reader/animation
reader/dragonbones/cocos2dx
reader/dragonbones/armature
reader/dragonbones/animation
reader/dragonbones/events
reader/dragonbones/factories
reader/dragonbones/core
reader/dragonbones/geom
```
Android
When developing for Android the Android.mk needs to be modified. There are a few simple lines to add,
For C++:
```sh
LOCAL_STATIC_LIBRARIES += creator_reader

# _COCOS_LIB_ANDROID_BEGIN
# _COCOS_LIB_ANDROID_END

$(call import-module, ./../../Classes/reader)  # import module path
```
For Lua:
```sh
# for lua
include $(CLEAR_VARS)
LOCAL_MODULE := creator_reader_lua
LOCAL_MODULE_FILENAME := libcreatorreaderlua
LOCAL_ARM_MODE := arm
LOCAL_SRC_FILES := $(cpp_src) \
lua-bindings/creator_reader_bindings.cpp \
lua-bindings/reader/lua_creator_reader_auto.cpp \
lua-bindings/reader/lua_creator_reader_manual.cpp \
lua-bindings/dragonbones/lua_dragonbones_manual.cpp \
lua-bindings/dragonbones/lua_dragonbones_auto.cpp

LOCAL_STATIC_LIBRARIES += creator_reader_lua

# _COCOS_LIB_ANDROID_BEGIN
# _COCOS_LIB_ANDROID_END

$(call import-module, ./../../Classes/reader)
```
Example Usage
Once everything is done, you can add code to tie everything together. It's elegant and simple:
For C++ projects, just 1 step:
// mygame.cpp
#include "reader/CreatorReader.h"

void some_function()
{
    creator::CreatorReader* reader = creator::CreatorReader::createWithFilename("creator/CreatorSprites.ccreator");

    // will create the needed spritesheets + design resolution
    reader->setup();

    // get the scene graph
    Scene* scene = reader->getSceneGraph();

    // ...and use it
    Director::getInstance()->replaceScene(scene);
}
For Lua projects, require 2 steps:
register the creator reader bindings
#include "reader/lua-bindings/creator_reader_bindings.hpp"

...

register_creator_reader_manual(L);
add code to access the exported files.
local creatorReader = creator.CreatorReader:createWithFilename('creator/CreatorSprites.ccreator')
creatorReader:setup()
local scene = creatorReader:getSceneGraph()
cc.Director:getInstance():replaceScene(scene)
How to use ColliderManager
ColliderManager is used to manage collisions. Every Scene has an instance of ColliderManager. You can use it to listen for collision events:
creator::CreatorReader* reader = creator::CreatorReader::createWithFilename("creator/CreatorSprites.ccreator");

// will create the needed spritesheets + design resolution
reader->setup();

// get the scene graph
Scene* scene = reader->getSceneGraph();

auto colliderManager = scene->getColliderManager();

colliderManager->registerCollitionCallback([=](creator::Contract::CollisionType type, creator::Collider* collider1, creator::Collider* collider2) {
        if (type == creator::Contract::CollisionType::ENTER)
            colliderManager->enableDebugDraw(true);

        if (type == creator::Contract::CollisionType::EXIT)
            colliderManager->enableDebugDraw(false);

}, "");
To read about additional features of ColliderManager, refer to the header file.