Cocos Creator
Introduction to the Build Process and FAQ
Introduction to the Build Infrastructure
The build process mainly includes the following two parts:
- General build processing
- Build processing for each platform
Due to the adjustment of the build mechanism in v3.0, the build process of different platforms is injected into the Build panel in the form of build plugins, each participating in the build process. The build options specific to each platform are displayed in the Build panel in the form of expanded options. Developers can make custom build options appear in the Build panel via the build plugin.
General Build Processing Flow
The general Build process of Cocos Creator mainly includes the following contents:
- Initialization of build options
- Build data organization
- Write the built resources to the file system
- Organize
settings.json/config.jsondata - UUID compression and file writing in
config.json
Initialization of Build options
This step is mainly for initializing the primal options passed to the build during the build to build internal options, completing the format conversion of some of the build options, initialize project configuration, initialize the asset data of the build asset database, and check the latest asset information and classify it.
Build data organization
When building, the editor will first sort out the current scenes involved in the build and assets in all Bundles folders and then search for their dependent assets through engine deserialization, and recursively find a list of all the assets that need to be packaged. After the asset list is summarized, the assets will be classified according to the Bundle configuration, and script compiling tasks, image compression tasks, and json grouping information will be collected.
Notes:
- The engine will load all user scripts before deserialization. Whether the script is successfully loaded will directly affect the deserialization. If the script is not correctly written, it will cause the build to fail.
- If a dependency asset is found missing during the asset sorting process, an error will be reported but the build will normally continue. Although the build is allowed to continue successfully, it does not mean that the problem does not need to be solved. If the missing assets are not solved, it is difficult to guarantee that the built game package has no problems.
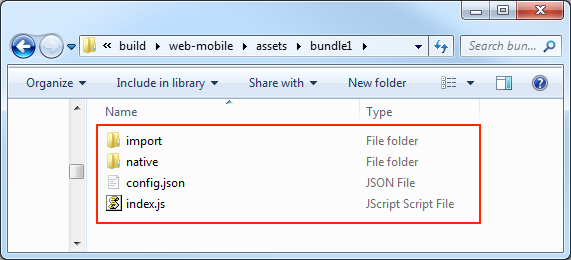
Writing the built assets to the file system
The built assets will be packaged into assets/[Bundle name] under the corresponding platform release package directory according to the configuration of the Asset Bundle after the build is completed. The directory structure is as follows:
For more information about Asset Bundle configuration, building, file description, etc., please refer to the Asset Bundle documentation.
After organizing the basic build tasks, the build will loop through all the Bundles, executing the asset packaging tasks that each Bundle needs to handle in turn to generate these Bundle asset packages.
Each Bundle goes through the following asset handling process:
Script Building: scripts within the editor are divided into plug-in scripts and non-plugin scripts, with different rules for handling different kinds.
Plug-in scripts: directly copy the source files according to the original directory structure to the
srcdirectory under the release package directory generated after the build, the plug-in script does not support any script form that needs to be compiled, such asTypeScriptorJavaScript (ES6). The asset information of the plug-in script will be written into the jsList array insettings.Non-plugin scripts: packaged into
project.jsand placed in the correspondingsrcdirectory. Checking thesourceMapoption will generate the corresponding.mapfile, and determine whether the script is compressed according to thedebugoption.
Auto Atlas Processing: queries the Auto Atlas asset list within the project, packaging the SpriteFrame small images under the atlas into a large image, generating serialized files, etc. according to the configuration of the Auto Atlas resource. This step will also modify the
jsongrouping information, asset grouping information, and add texture compression tasks.Texture Compression: according to the organized image compression task, the image assets are compressed and written into the build folder.
Engine Script Compilation: according to the configuration in Main Menu -> Project Settings -> Feature Cropping, remove the unused engine modules and pack them into the
cocos-jsdirectory. Checking thesourceMapoption in the Build panel will generate the corresponding.mapfile, and determine whether the script is compressed according to thedebugoption.The main steps of engine compilation include:
Get engine module information in project settings.
Check whether the compilation options of the engine in the cache are consistent with the current options to be compiled, and if they are, use the cache directly.
If compilation is needed, execute the task of packaging the engine, then copy the compiled js file and save the engine's cache judgment information file.
When compiling the engine, output log information can be viewed:
Regarding the reuse rules of engine files, it is necessary to elaborate:
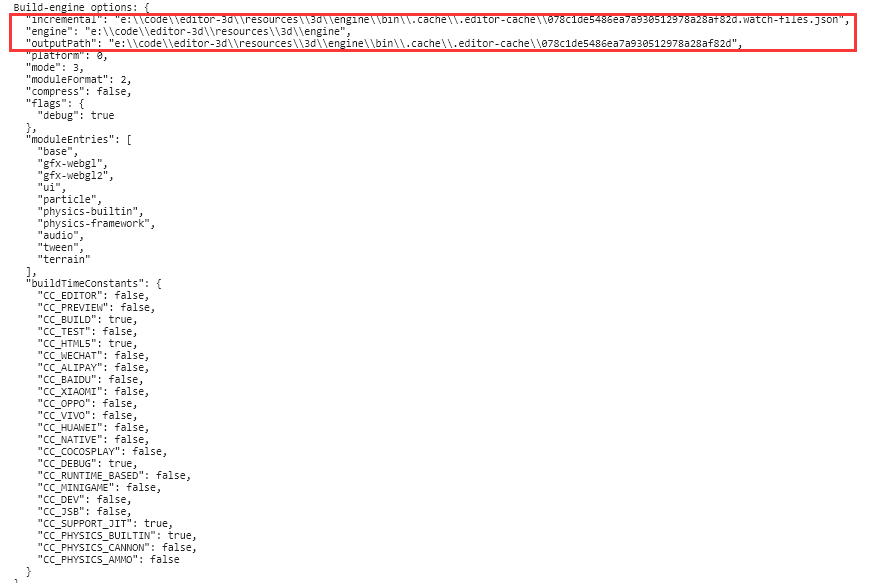
The packaged engine file will be placed in the editor's global temporary directory (useBuild.globalTempDirto look up the cache address during the build process). The cache file is stored as the name according to the hash value generated by the parameters that will affect the engine compilation.bashglobal-temp-folder |--CocosCreator |--x.xx(3.0.0) |--builder |--engine |--1dc4a547f9...63a43bb8965.watch-files.json |--1dc4a547f9...63a43bb8965 (engine folder) |--1dc4a547f9...63a43bb8965.meta (folder) ...As long as any relevant engine build parameters are changed, the engine will be recompiled. Parameters that specifically affect the use of the build engine cache are:
- debug: whether to open the debug mode
- includeModules: engine module settings
- sourceMaps: whether to enable sourceMaps
- platform: build platform
- Engine modification time
- Whether to check the Separate Engine in the Build panel (only WeChat Mini Game)
- Use engine path, engine version number
JSON build: When serializing
JSON, it will be merged and written into the file system (in the folderassets/xxxBundle/import) according to theJSONgrouping and theBundleto which it belongs. If it is in release mode, it will also compress the UUID in the serialized JSON.Common Asset Copy: Some raw assets will be directly copied from the
libraryto the built folderassets/xxxBundle/native.md5 processing: Add the
.md5suffix to all the assets, project scripts and engine files in theassetsfolder, and organize the data to be recorded in thesettings.json.application.jstemplate file generation: dynamically generates theapplication.jsfile according to user options and generate it to the release package directorysrcgenerated after the build.
Organizing settings.json/config.json and configuring JSON data
It is mainly to prepare the necessary configuration information for the game launch based on the asset data compiled previously.
settings.json
settings.json records the basic configuration information of the whole game package, which will directly affect the initialization of the game package.
The description of the settings.json configuration is as follows:
js
{
    debug: boolean; // Whether it is in debug mode, depends on the settings in the Build panel.
    designResolution: ISettingsDesignResolution; // Canvas resolution setting, depends on the settings of the Project Data page in the Project Settings panel.
    jsList: string[];
    launchScene: string; // URL of the initial scene.
    moduleIds: string[]; // Information about all user script components.
    platform: string;
    renderPipeline: string; // renderPipeline information, depends on the settings of the Project Data page in the Project Settings panel.
    physics?: IPhysicsConfig; // Physics module settings (only generated when the physics engine module is checked).
    BundleVers: Record<string, string>; // Bundle's md5 file value.
    subpackages: string[]; // subpackage information.
    remoteBundles: string[]; // Record the collection of remote Bundle.
    server: string; // Record the remote server address (note: before v3.4 this item was stored in the `application.js` file).
    hasResourcesBundle: boolean; // Does it contain the built-in Bundle "resources".
    hasStartSceneBundle: boolean; // Does it contain the built-in Bundle "start-scene".
    customJointTextureLayouts?: ICustomJointTextureLayout[];
    macros?: Record<string, any>; // Engine macro configuration values in the Project Settings panel.
}
config.json
Each Bundle asset package has a config.json, which records basic information such as assets and scripts for the entire Bundle, which will directly affect the loading of the Bundle package.
The description of the config.json configuration is as follows:
js
{
    importBase: string; // The name of the import directory in the Bundle, usually 'import'.
    nativeBase: string; // The name of the native directory in native, usually 'native'.
    name: string; // The name of the Bundle, the Bundle can be loaded by the Bundle name
    deps: string[]; // Other Bundle names that this Bundle depends on.
    scenes: Array<{url: string, uuid: string}>; // The array of scene information contained in the Bundle.
    rawAssets: { [index: string]: { [uuid: string]: string[] } };
    // Store the URL and type of the asset loaded under 'resources'
    // Example: "bba00d3a-2f17-4511-b47c-0d584b21b763@6c48a": ["test/right/texture", "cc.Texture2D", "bba0...@6c48a"]
    // "bba0...@6c48a": ["test/right/texture", 1, 1]
    packs: Record<string, IUuid[] | number[]>; // json group information.
    versions: {
        import: Array<string | number>;
        native: Array<string | number>;
     }; // Only available after md5Cache is checked, the array part is stored in the format of [uuid_1, md5_1, uuid_2, md5_2, ...], where uuid_1 is a simple number indicating that the storage is the uuid index in the uuids array.
    uuids: string[]; // uuid array, only in release mode.
    types?: string[]; // Resource type array, only in release mode.
    encrypted?: boolean; // Marks whether the script in the Bundle is encrypted, active on the native platform.
    isZip?: boolean; // Is it in ZIP mode.
    zipVersion?: string; // MD5 Hash value of ZIP package.
}
The structure here only lists the structure of settings.json and config.json in a general sense. In fact, these parameters will vary after different platform builds.
Compressing config.json
Before generating the config.json file, the UUID information in the file will be compressed according to whether it is in release mode or not, understanding this rule will be helpful to find the location of the file after the asset is built.
The UUIDs used in the Bundle will be sorted during the build, and those that appear twice or more will be stored in the uuids array, and the location of the previously used UUID will be replaced with the index.
All types that appear twice and more are also stored in the types array, and the previously used position is replaced with the index.
Build assets
This step generates project asset files other than scripts, since scripts are compiled and processed separately as special files. The assets are re-serialized after deserialization is performed during the packaging process to reduce the package size after packaging. Multiple serialized JSONs are combined into a single file based on the JSON grouping information collated from the previous data, e.g. the serialized files of the texture asset are all packaged into a single JSON file.
Building of each platform
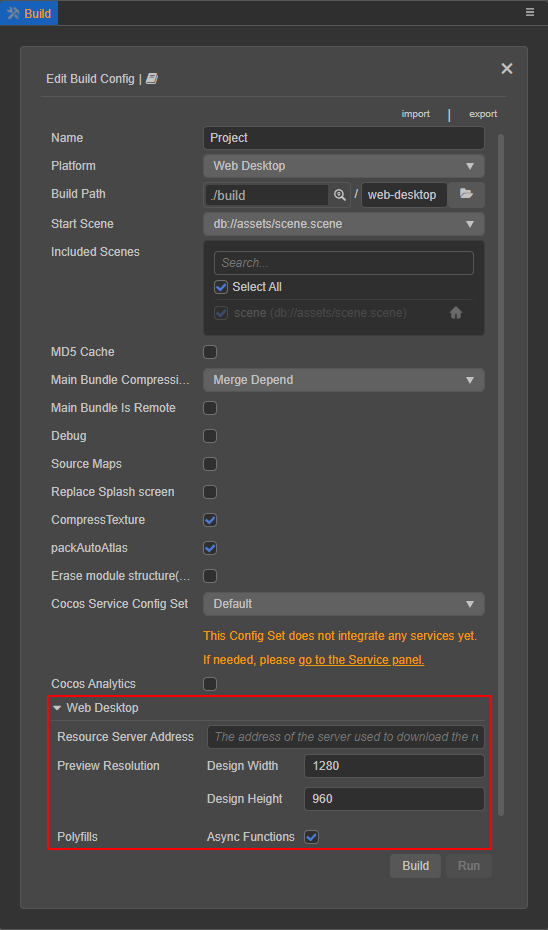
The Build process provides hook functions that build the lifecycle, which is convenient for developers to participate in the building during different processing periods of the building and affect the building result. At the same time, the build also provides a way for developers to directly add some custom build options. The corresponding new parameters can be displayed directly in the Build panel through simple configuration. For details, please refer to the Extending Build Process documentation. The build options injected by the build plugin will be stored in options.packages[pkgName], the current way of writing option parameters built through the command line also needs to follow this rule. The rules for the corresponding parameters can be referenced by clicking Export Build Config at the top right of the Build panel.
Compilation/generation process of each platform
The build process of all platforms that require support for separate compilation and generation have been split. Some developers may wonder why the current mini game platform has a new Make button. In fact this part of the logic has always existed before, but it is merged in the build process and cannot be controlled separately.
The build of the editor is similar to the function of an export game package for the corresponding platform, which is mainly to complete the interface of the engine to each platform and the compatibility of the basic format of the game package, which does not mean that all the work is completed. Each platform usually has its own compilation process, such as the compilation and upload function of the developer tools that come with the WeChat Mini Game platform, and the compilation, running and debugging functions of the relevant IDE for each native platform. If the developer needs to customize the packaging process for a specific platform, the editor needs to support the process of splitting in order to better access.
FAQ Guide
The entire build process is in a single worker, to view the complete log information of the build process or view the complete call stack when an error occurs, click on the main menu, then Developer -> Open Build DevTools. In fact, a lot of log information will be output when building, but in order not to interfere with users, by default only errors, warnings and some important log messages are printed to the editor's Console panel.
Note: before building please make sure that the scene participating in the building can be previewed normally. Loss of assets in some scenes or other script problems can be exposed during the preview stage. Building under the condition that the preview is normal can save time and troubleshoot better.
Asset loading 404 errors
In case of a 404 error, please copy the UUID in the log that reported the error resource loss and search for the corresponding resource in Assets panel to check whether the resources that the resource depends on are normal. Resource loading 404 errors usually occur under the following situations:
Resources that are not placed in the Bundle are dynamically loaded in the script.
Reason: Through the above introduction, we know that only the resources and their dependent resources in the Bundle directory, as well as the resources and their dependent resources participating in the build scene will be packaged into the final build folder, and only the resource URL directly put into the
Bundlefolder will be written to theconfig.json. If a resource is used in the script but the resource is not placed in any Bundle directory, a 404 error will appear when it is loaded.Solution: Move the used resources to the Bundle folder.
There is a problem importing the loaded resource, and the data cannot be generated normally to the library
Reason: All the original data is obtained by reading the asset files in the
libraryduring the build. If the import fails, the correct corresponding asset information will not be obtained.Solution: Find the corresponding asset through Assets panel, right-click, and select Reimport Asset in the menu.
Asset Loss
Reason: As mentioned in the previous construction process, asset construction will go through the reverse sequence to find dependent assets, and the most frequent problem is that the dependent assets are accidentally during the project iteration process delete and cause asset loss. The loss of these assets may not usually be noticed, but once the build is performed, it will be exposed.
Solution: Use the code editor to find out which assets the
UUIDis referenced, and modify the corresponding assets.
Script asset loading error
As mentioned in the previous section of Building Data Sorting, the script environment needs to be configured when building. If the error message is related to the script, please refer to the error content to modify the script. If it is unknown which script is reporting the error, find the UUID of the corresponding script in the error message call stack, and then find the location in the Assets panel.
How to find the big picture after the small picture is automatically combined
The Auto Atlas will print out the UUID information of the original small image and the synthesized large image during the build process, which can be found in the build devtools, and then use the UUID of the composite large image found to generate the XXXBundle/native after packaging. You can view it in the directory. If there are too many combined images, open the build log file and search for the UUID.

How to decompress UUIDs
In release mode, the packaged asset JSON file and the UUID in config.json are compressed and need to be unzipped to find the corresponding assets in the original project. There are some built-in tools and methods in the build process. On the global variable Build, directly click Developer -> Build DevTools in the main menu, the original UUID can be queried in the console by entering the following command:
js
Build.Utils.decompressUuid('425o80X19KipOK7J1f5hsN');
// 42e68f34-5f5f-4a8a-938a-ec9d5fe61b0d
Engine compilation failed
If the engine fails to compile, please check if the installation package is complete, if the modified built-in engine code is correct, and if you are using a custom engine, if the path is correct, etc.
Other errors
If errors are encountered that cannot be resolved, please send feedback to the Cocos Forum with the version of Creator, build options configuration, build log file from the build task, and a demo that reproduces the issue.