Cocos Creator
Access Nodes and Components
You can modify Nodes and Components in the Inspector panel, and also dynamically using scripts. The advantage of dynamic modification is that it can continuously modify properties and transition properties within a period of time to achieve gradual effects. Scripts can also respond to player input, modify, create and destroy Nodes or Components, and implement various game logic. To achieve these effects, developers need to obtain the Node or Component that needs to be modified in the script.
Document topics
- Obtain the node where the component is located.
- Obtain other components.
- Use Inspector panel to set up nodes and components.
- Find child nodes.
- Global node search.
- Access values in existing variables.
Obtain the node where the component is located
It's easy to get the node where the component is. Just access the this.node variable in the component method:
ts
    start(){
        let node = this.node;
        node.setPosition(0.0,0.0,0.0);
    }
Obtaining other components
It will often be need to get other components on the same node. Use the getComponent API, which will help to find the component that is needed.
ts
import { _decorator, Component, LabelComponent } from 'cc';
const { ccclass, property } = _decorator;

@ccclass("test")
export class test extends Component {
    private label: any = null

    start(){
        this.label = this.getComponent(LabelComponent);
        let text = this.name + 'started';
        // Change the text in Label Component
        this.label.string = text;
    }
}
It is also possible to pass in a class name for getComponent. For user-defined components, the class name is the file name of the script and is case sensitive. For example, the component declared in SinRotate.ts, the class name is SinRotate.
ts
let rotate = this.getComponent("SinRotate");There is also ther getComponent method on the node, and their functions are the same:
ts
    start() {
        console.log( this.node.getComponent(LabelComponent) === this.getComponent(LabelComponent) );  // true
    }
If the component that is needed is not found on the node, getComponent will return null. If you try to access the value of null, a TypeError error will be thrown at runtime. If you are not sure whether the component exists, please remember to check:
ts
import { _decorator, Component, LabelComponent } from 'cc';
const { ccclass, property } = _decorator;

@ccclass("test")
export class test extends Component {
    private label: any =null;

    start() {
        this.label = this.getComponent(LabelComponent);
        if (this.label) {
            this.label.string = "Hello";
        } else {
            console.error("Something wrong?");
        }
    }
}
Get other nodes and their components
It is usually not enough to only have access to the node's own components, and scripts usually require interaction between multiple nodes. For example, a cannon that automatically aims at the player needs to constantly obtain the latest position of the player. Cocos Creator provides some different methods to obtain other nodes or components.
Use the Inspector panel to set the node
The most straightforward way is to set the objects you need in the Inspector panel. Take node as an example, this only needs to declare an property with type Node in the script:
ts
// Cannon.ts

import { _decorator, Component, Node } from 'cc';
const { ccclass, property } = _decorator;

@ccclass("Cannon")
export class Cannon extends Component {
    // Declare Player properties
    @property({type:Node})
    private player = null;
}
This code declares a player property in properties, the default value is null, and its object type is specified as Node. This is equivalent to declaring public Node player = null; in other languages. After the script is compiled, this component looks like this in the Inspector panel:
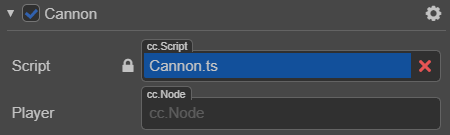
Then you can drag any node on the Hierarchy panel to the Player control:

The Player property will be set successfully, and can be accessed directly in a script. Example:
ts
// Cannon.ts

import { _decorator, Component, Node } from 'cc';
const { ccclass, property } = _decorator;

@ccclass("Cannon")
export class Cannon extends Component {

    @property({type:Node})
    private player = null;

    start() {
        console.log('The player is ' + this.player.name);
    }
}
Use the Inspector panel to set up components
In the above example, if the type of the property is declared as a Player component, when the Player node is dragged to the Inspector panel, the Player property will be set to the Player component in this node. This way developers don't need to call getComponent() themselves.
ts
// Cannon.ts

import { _decorator, Component } from 'cc';
const { ccclass, property } = _decorator;
import { Player } from "Player";

@ccclass("Cannon")
export class Cannon extends Component {
    @property({type:Player})
    private player = null;

    start(){
        let PlayerComp = this.player;
    }
}
The default value of the property can be changed from null to array [], so that multiple objects in the Inspector panel can be set at the same time. However, if dynamically obtaining other objects at runtime is needed, it is also necessary to use the search method described below.
Find child nodes
Sometimes, there are many objects of the same type in the game scene, such as turrets, enemies, and special effects, and they usually have a global script to manage them uniformly. Using the Inspector panel to associate them with this script one by one, the work will be very tedious. In-order to better manage these objects uniformly, they can be put under a unified parent object, and then obtain all the child objects through the parent object:
ts
// CannonManager.ts

import { _decorator, Component, Node } from 'cc';
const { ccclass, property } = _decorator;

@ccclass("CannonManager")
export class CannonManager extends Component {

    start() {
        let cannons = this.node.children;
        //...
    }

}
Using getChildByName:
ts
this.node.getChildByName("Cannon 01");If the child node has a deeper level, find can be used, and will search step by step according to the path passed in:
ts
find("Cannon 01/Barrel/SFX", this.node);Global name lookup
When find only passes in the first parameter, it will be searched step by step from the scene root node:
ts
this.backNode = find("Canvas/Menu/Back");Accessing values in existing variables
If you have saved references to nodes or components in one place, you can also access them directly.
Accessing via module
Use import to implement script cross-file operations. Example:
ts
// Global.ts, now the filename matters
import { _decorator, Component, Node } from 'cc';
const { ccclass, property } = _decorator;

@ccclass("Global")
export class Global extends Component {

    public static backNode:any=null;
    public static backLabel:any=null;
}
Each script can use import{} from + file name (without path) to get the object of the other party's exports. Example:
ts
// Back.ts
import { _decorator, Component, Node, LabelComponent } from 'cc';
const { ccclass, property } = _decorator;
// this feels more safe since you know where the object comes from
import{Global}from "./Global";

@ccclass("Back")
export class Back extends Component {
    onLoad(){
        Global.backNode=this.node;
        Global.backLabel=this.getComponent(LabelComponent);
    }
}
ts
// AnyScript.ts
import { _decorator, Component, Node } from 'cc';
const { ccclass, property } = _decorator;
// this feels more safe since you know where the object comes from
import{Global}from "./Global";

@ccclass("AnyScript")
export class AnyScript extends Component {
    start () {
        const text = "Back";
        Global.backLabel.string=text;
    }
}