Cocos Creator
Effect Syntax Guide
Cocos Effect is a single-source embedded domain-specific language, based on YAML and GLSL. The YAML part declares the general framework, while GLSL part specifies the actual shader. Together they form a complete specification for the rendering process.
If you want to implement a custom shading effect in the engine, you need to write your own custom Effect. We recommend editing effect files using Visual Studio Code with the official Cocos Effect plugin from the marketplace.
Note: this document is targeted at Technical Artists or Graphics developers. If you are a design artist who needs specific shader customizations, please contact your Technical Artist or Programmer for support.
Framework Syntax
Using builtin-unlit.effect as an example, it looks something like this:
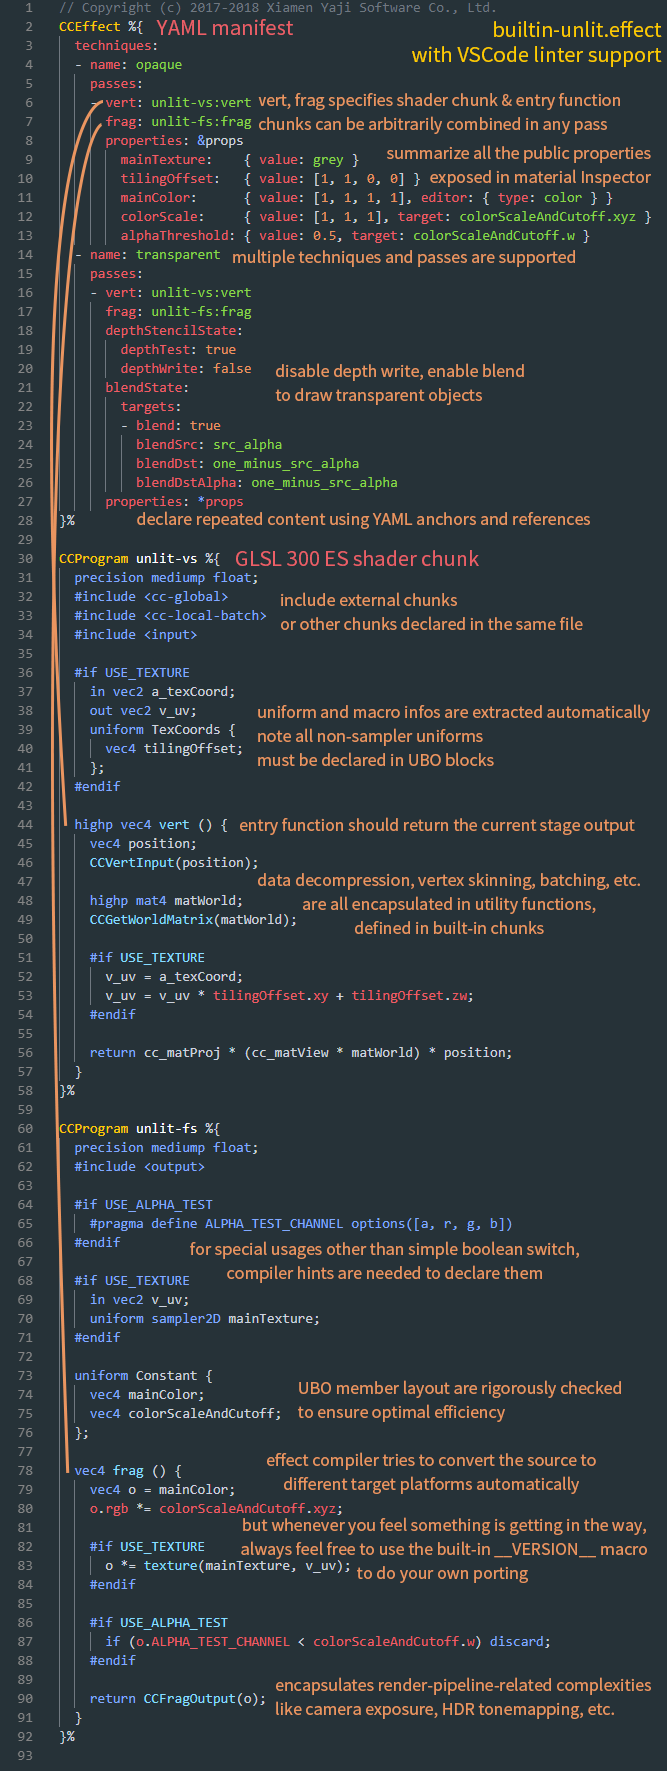
Effect Name
Effect name is automatically generated based on the filename and path of the effect, the path is a relative path based on the assets/effects directory, the filename does not include an extension.
Effect names can be directly used at runtime to acquire/use the EffectAsset:
js
const effect = EffectAsset.get('builtin-unlit'); // this is the EffectAsset resource instance
const mat = new Material();
mat.initialize({ effectName: 'builtin-standard' }); // now `mat` is a valid standard materialNote: the builtin effects of the editor are located directly inside the
assets/effectsfolder in the internal database, so the effect names don't contain a path.
Select the material in the Assets panel, and then you can see all currently available effect names in the Effect property drop-down list in the Inspector panel.
About YAML
YAML is a human-readable data-serialization language, with a flexible, minimal syntax and easily configurable, which makes it an ideal choice. However, the syntax maybe somewhat unique, at first for those who are unfamiliar with the language. For an introduction to the most commonly used syntaxes and language features, please refer to the YAML 101 documentation.
Configurable Pass Parameters
The shader entries are the only required fields, namely vert and frag, in the format of shaderChunkName:entryFunctionName.
Normally the main function shouldn't be specified in shader, for version-specific wrappers will be inserted at compile-time.
assigning the return value of the specified function to the output of current shader stage. (gl_Position or the final output color).
You can find all of the optional parameters in the pass parameter list documentation.
Shader Chunks
Syntactically shader chunks are a superset of GLSL, all the extended features will be processed immediately at resource compile-time. It can either be written inside the CCProgram block in .effect file, or directly in a separate .chunk file.
We recommend limiting the syntax within GLSL version 300 ES range to maintain best portability, although you can always write your own porting using GLSL built-in macro __VERSION__.
This section will introduce the 'domain-specific' extended features, all of which will be processed immediately at resource compile-time. Also feel free to look around the built-in effects, which are always excellent concrete examples.
On top of GLSL, the following c-style extensions are naturally introduced:
Chunk Include
Just like the include directive in C/C++, you can include other shader chunks:
c
#include <cc-global>
#include "../headers/my-shading-algorithm.chunk"
Relevant details:
- The
.chunkextension can be omitted; quotation marks and angle brackets means the same. - Every included header is guaranteed to be expanded only once; so every module could (and in fact should) include all its dependencies, even if there are overlaps.
- Dead code elimination is done at compile-time too, so including lots of unused utility functions shouldn't be of concern.
- There are two ways to reference a external chunk file: using the relative path to current file ('relative path'), or the relative path to
assets/chunksfolder of current project ('project absolute path'). If the specified file interpreted under both rules are present, the latter is preferred. - When including files from other databases (like the internal database), only project absolute path is supported. When there are multiple databases have the same specified file, the priority is: User Project DB > Plugin DB > Internal DB.
- The built-in chunks are located directly inside
assets/chunksin the internal database. Include these without path prefix. - All
CCProgramblocks in the same effect file can include each other.
Pre-processing Macros
Currently the effect system tends to take advantage of the language built-in pre-processing macros to create shader variants. The effect compiler will collect the macros that appear in shaders, and declarations will be inserted accordingly at runtime.
For the most part, use them without thinking about the effect compiler, while material inspector will automatically integrate both macros and shader properties into a natural editing interface.
Relevant details:
- To type check as many branches as possible at effect compile-time, the strategy currently taken is to set all macros to
1(or its given default value) before doing the actual check; so make sure this combination works (or if not, maybe you need numerical macros, specified in the next section). - All the macros that are not enabled at runtime will be explicitly given a value of 0, so please avoid using
#ifdefor#if defined(except the GLSL built-in macros, like extension indicators withGL_prefix), for they would alway be true. - Hash values will be calculated for each macro combination at runtime. For a single shader, the process is the most efficient when there are less than 2^32 combinations (a standard integer range), that means 32 boolean macros switches (or less if there are numerical macros). Try to keep in this range to maintain optimal performance.
Macro Tags
Although the effect compiler will try to be smart and collect all pre-processing branches, sometimes there are more complicated cases:
glsl
// macro defined within certain numerical 'range'
#if LAYERS == 4
  // ...
#elif LAYERS == 5
  // ...
#endif
// multiple discrete 'options'
float metallic = texture(pbrMap, uv).METALLIC_SOURCE;
For these special usages, you'll have to explicitly declare the macro, using macro tags:
| Tag | Description | Default Value | Usage |
|---|---|---|---|
| range | A two-element array, specifying minimum and maximum value, both inclusive | [0, 3] | For macros with bounded range. The bound should be as tight as possible |
| options | An arbitrary-length array, specifying every possible options | nothing | For macros with discrete, explicit choices |
Declarations for the above case are:
glsl
#pragma define LAYERS range([4, 5])
#pragma define METALLIC_SOURCE options([r, g, b, a])
The first line declares a macro named LAYERS, with possible range of [4, 5].
The second line declares a macro named METALLIC_SOURCE, with four possible options: 'r', 'g', 'b', 'a'.
Note: every tag accepts a single parameter, in the syntax of YAML.
Functional Macros
Due to lack of native support in WebGL platform, functional macros are provided as an effect compile-time feature, all references will be expanded in the output shader.
This is an good match for inlining some simple utility functions, or similar code repeating several times.
In fact, many built-in utility functions are functional macros:
glsl
#define CCDecode(position) \
  position = vec4(a_position, 1.0)
#define CCVertInput(position) \
  CCDecode(position);         \
  #if CC_USE_SKINNING         \
    CCSkin(position);         \
  #endif                      \
  #pragma // empty pragma trick to get rid of trailing semicolons at effect compile time
Meanwhile, same as the macro system in C/C++, the mechanism does nothing on checking the Hygienic Macro WikiPedia Entry. Any issues will have to be dealt with by developers manually:
glsl
// please do be careful with unhygienic macros like this
#define INCI(i) do { int a=0; ++i; } while(0)
// when invoking
int a = 4, b = 8;
INCI(b); // correct, b would be 9 after this
INCI(a); // wrong! a would still be 4
Vertex Input[^1]
To encapsulate in-shader data pre-processing like data decompression and vertex skinning, utility function CCVertInput is provided.
For all shaders used to draw mesh assets, you need something like this:
glsl
#include <input>
vec4 vert () {
  vec3 position;
  CCVertInput(position);
  // ... do your thing with `position` (models space, after skinning)
}
If normals are required, use the standard version:
glsl
#include <input-standard>
vec4 vert () {
  StandardVertInput In;
  CCVertInput(In);
  // ... now use `In.position`, etc.
}
This will acquire position, normal and tangent data, all after vertex skinning.
Other vertex data (uv, color, etc.) can be declared directly.
To support dynamic instancing & batching, use CCGetWorldMatrix:
glsl
#include <cc-local-batch>

vec4 vert () {
  // ...
  // unlit version (when normal is not needed)
  mat4 matWorld;
  CCGetWorldMatrix(matWorld);
  // standard version
  mat4 matWorld, matWorldIT;
  CCGetWorldMatrixFull(matWorld, matWorldIT);
  // ...
}
You can find the complete built-in shader uniform list in this documentation.
Fragment Output[^1]
To encapsulate render pipeline complexities, use CCFragOutput.
For unlit shaders:
glsl
#include <output>
vec4 frag () {
  vec4 o = vec4(0.0);
  // ... do the computation
  return CCFragOutput(o);
}
The code can work in both the HDR and LDR pipelines.
If lighting is involved, combine with CCStandardShading to form a surface shader structure:
glsl
#include <shading-standard>
#include <output-standard> // note the header file change
void surf (out StandardSurface s) {
  // fill in your data here
}
vec4 frag () {
  StandardSurface s; surf(s);
  vec4 color = CCStandardShading(s);
  return CCFragOutput(color);
}
Under the framework writing your own surface shader or even shading algorithm becomes straightforward.
Note: the
CCFragOutputfunction should not be overridden, unless using custom render pipelines.
Custom Instancing Attribute
Dynamic instancing is a very flexible batching framework, which allows user-defined instanced properties on top of the built-in ones. If you want to define them in shader, all the related processing code need to be wrapped inside the agreed upon macro USE_INSTANCING:
glsl
#if USE_INSTANCING // when instancing is enabled
  #pragma format(RGBA8) // normalized unsigned byte
  in vec4 a_instanced_color;
#endifNotes:
- The actual data format can be specified using compiler hint
formattag, which accepts a single parameter in the form ofGFXFormatenum name[^2]. 32-bytes float type will be assumed if the tag is omitted.- All instanced properties are input attributes of the vertex shader, so if some property is needed in fragment shader, you need to pass it as variables.
- Make sure the code works for all branches, regardless of the actual state of
USE_INSTANCING.
The instanced property value will be initialized to all zeros by default. Use the setInstancedAttribute on MeshRenderer to assign new values:
ts
const comp = node.getComponent(MeshRenderer);
comp.setInstancedAttribute('a_instanced_color', [100, 150, 200, 255]); // should match the specified formatNote: the instanced properties will be reset to all zeros whenever creating a new PSO (the most common case is when assigning a new material).
WebGL 1 fallback Support
The effect compiler provides fallback conversion from GLSL 300 ES to GLSL 100 automatically, for WebGL 1.0 only support GLSL 100 syntax. this should be transparent to developers for the most time.
Currently the automatic conversion only supports some basic usage, and if some post-100 features or extensions were used, (texelFetch, textureGrad, etc.) Developers have to do your own porting using the language built-in \_\_VERSION__ macro:
glsl
vec4 fragTextureLod (samplerCube tex, vec3 coord, float lod) {
  #if __VERSION__ < 130
    #ifdef GL_EXT_shader_texture_lod
      return textureCubeLodEXT(tex, coord, lod);
    #else
      return textureCube(tex, coord, lod); // fallback to bias
    #endif
  #else
    return textureLod(tex, coord, lod);
  #endif
}
The effect compiler will finally split these compile-time constant branches into different output versions.
About UBO Memory Layout
First the conclusion, the final rules are, every non-sampler uniform should be specified in UBO blocks, and for every UBO block:
- There should be no vec3 typed members.
- For array typed members, size of each element should be no less than a vec4.
- Any member ordering that introduces a padding will be rejected.
These rules will be checked rigorously at effect compile-time and throws detailed, implicit padding related compile error.
This might sound overly-strict at first, but it's for a few good reasons:
First, UBO is a much better basic unit to efficiently reuse data, so discrete declaration is no longer an option.
Second, currently many platforms, including WebGL 2.0 only support one platform-independent memory layout, namely std140, and it has many restrictions[^3]:
All vec3 members will be aligned to vec4
glsluniform ControversialType { vec3 v3_1; // offset 0, length 16 [IMPLICIT PADDING!] }; // total of 16 bytesAny array member with element size less than a vec4 is aligned to vec4 element-wise
glsluniform ProblematicArrays { float f4_1[4]; // offset 0, stride 16, length 64 [IMPLICIT PADDING!] }; // total of 64 bytesAll UBO members are aligned to the size of itself[^4]:
glsluniform IncorrectUBOOrder { float f1_1; // offset 0, length 4 (aligned to 4 bytes) vec2 v2; // offset 8, length 8 (aligned to 8 bytes) [IMPLICIT PADDING!] float f1_2; // offset 16, length 4 (aligned to 4 bytes) }; // total of 32 bytes uniform CorrectUBOOrder { float f1_1; // offset 0, length 4 (aligned to 4 bytes) float f1_2; // offset 4, length 4 (aligned to 4 bytes) vec2 v2; // offset 8, length 8 (aligned to 8 bytes) }; // total of 16 bytes
This means lots of wasted space, and some driver implementation might not completely conform to the standard[^5], hence all the strict checking procedure help to clear some pretty insidious bugs.
The actual uniform type can differ from the public interfaces the effect exposes to artists and runtime properties. Through the property target system, every single channel can be manipulated independently, without restriction of the original uniform.
[^1]: Shaders for systems with procedurally generated mesh, like particles, sprites, post-effects, etc. may handle things a bit differently. [^2]: Integer-typed attributes are not supported on WebGL 1.0 platform, so use the default float type if targeting this platform. [^3]: OpenGL 4.5, Section 7.6.2.2, page 137 [^4]: In the example code, UBO IncorrectUBOOrder has a total size 32. Actually this is still a platform-dependent data, due to what it seems like an oversight in the GLSL specification. More discussions can be found here. [^5]: Interface Block - OpenGL Wiki: https://www.khronos.org/opengl/wiki/Interface_Block_(GLSL)#Memory_layout