Cocos Creator
Build Options
General Build Options
For the general build options in the Build panel are as follows:
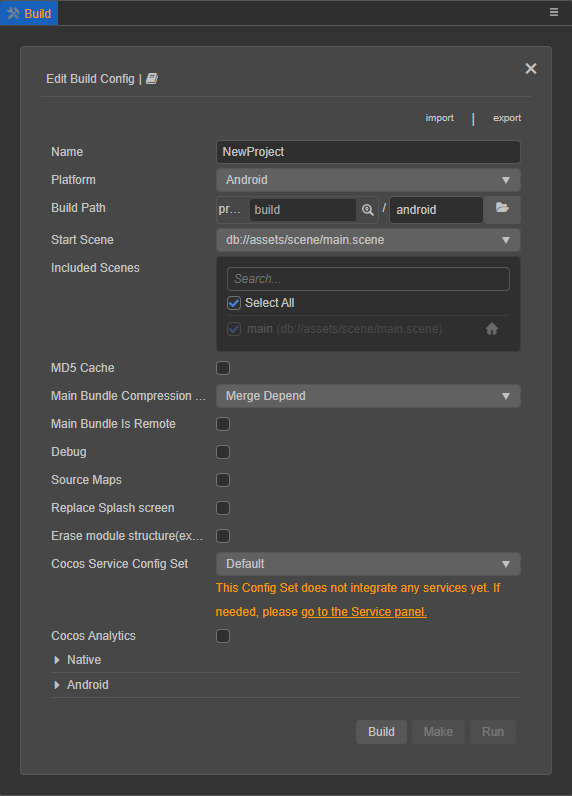
Build Path
There are two input boxes in the Build Path:

The first input box is used to specify the build path of the project. The path can be entered directly in the input box or selected via the magnifying glass button next to it. Starting from v3.1, support to switch the following two paths to use:

- file: The specified build path is an absolute path, which is the way used in previous versions.
- project: The specified build path is a relative path, and the selected path can only be in the project directory. When using this path, some path-related configurations (e.g. Icon) in the build options are recorded as relative paths, making it easier for team members to share configurations across devices.
The default build path is the
buildfolder in the project directory. If a version control system such as Git or SVN is used, thebuildfolder can be ignored in version control.Note: Spaces, illegal characters and Chinese are not allowed in the Build Path.
The second input box is used to specify the name of the build task when the project is built and the name of the release package generated after the build. The default is the name of the current build platform, and for each additional build of the same platform, the -001 suffix will be added to the original one, and so on.
After the build is completed, click the folder icon behind the input box to open the project release package directory.
Start Scene
It is necessary to set the first scene to enter after opening the game. One way is to search for the desired scene in the list of Included Scenes, move the mouse to the desired scene bar, and then click the button that appears on the right to set it as the start scene.
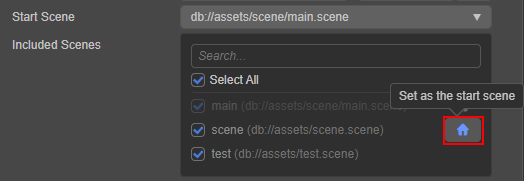
Scenes that Participate in Build (Included Scenes)
During the build process, all the assets and scripts in the bundle will be packaged except for the resources folder in the project directory and the assets and scripts in the bundle. Other assets are packaged on demand according to the scenes involved in the build and the asset referenced in the bundle. Therefore, removing the check box for scenes that do not need to be released can reduce the size of the project release package generated after the build.
MD5 Cache
Adding MD5 information to all the asset file names after building can solve the problem of CDN or browser asset caching.
After enabling, if the asset cannot be loaded, it means that the renamed new file cannot be found. This is usually caused by some third-party assets not being loaded through the assetManager. In this case, you can use the following method to convert the URL before loading, and the converted path can be loaded correctly.
typescript
const uuid = assetManager.utils.getUuidFromURL(url);
url = assetManager.utils.getUrlWithUuid(uuid);Note: after MD5 Cache is enabled on the native platform, if assets cannot be loaded, it is usually caused by some third-party assets used in C++ not being loaded through the
assetManager. It can also be solved by converting the URL with the following code:cppauto cx = ScriptingCore::getInstance()->getGlobalContext(); JS::RootedValue returnParam(cx); ScriptingCore::getInstance()->evalString("cc.assetManager.utils.getUrlWithUuid(cc.assetManager.utils.getUuidFromURL('url'))", &returnParam); string url; jsval_to_string(cx, returnParam, &url);
Main Bundle Compression Type
Set the compression type of the main bundle. For details, please refer to the Asset Bundle — compression type documentation.
Main Bundle is Remote
This option is optional and needs to be used in conjunction with the Resources Server Address option.
After checking, the main package will be configured as a remote package, and its related dependent assets will be built to the built-in Asset Bundle — main under the remote directory of the release package. The developer needs to upload the entire remote folder to the remote server.
Debug Mode
If this option is unchecked, the build is running in release mode, compressing and obfuscating asset UUID, built engine scripts and project scripts, and subcontracting the JSON of similar assets to reduce the number of asset loadings.
If this option is checked, the build is running in debug mode. At the same time, the Source Maps option can be checked, which is more convenient for locating problems.
Source Maps
Check this option to generate sourcemap. The engine files and project scripts will be compressed by default during the build.
As JavaScript is becoming more and more complex, most of the source code (development code) has to be compiled and converted before it can be put into the production environment, which makes the actual running code different from the source code. This makes it impossible to locate the source code during debugging. The Source Map can map the converted code to the source code, that is, the converted code corresponds to the location of the source code before the conversion. In this way, when a problem occurs, it is possible to directly view and debug the source code, making it easier to locate the problem. For details, please refer to the Use source maps documentation.
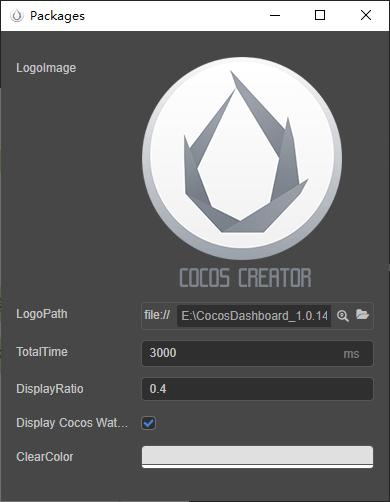
Replace Splash Screen
When the mouse is moved to this option, the Edit Icon button will appear. Click this button to open the splash screen setting panel, and the data will be saved in real time after editing.
Erase module structure (experimental)
If this option is checked, the script import speed is faster, but module features such as import.meta, import(), etc. cannot be used.
Cocos Service Config Set
This option is used to display all the services integrated in the Service panel for the current project.
Related Build Options for Each Platform
Due to the adjustment of the current build mechanism, the processing of different platforms is injected into the Build panel in the form of a plugin. After selecting the platform to build in the Platform option of the Build panel, notice the expanded options of the corresponding platform. The name of the expanded option is the platform plug-in name, in the editor main menu Extensions -> Extension Manager -> Internal to see various platform plug-ins.
For the relevant build options of each platform, please refer to:
Creator supports custom extension build plugins, handled in the same way as platform plugins. For details, please refer to the Extension Build Process documentation.
Configuration of Other Options Involved in the Build
The configuration of Project -> Project Settings in the menu bar of the editor will affect the result of the project build. For details, please refer to the Project Settings documentation.