Cocos Creator
Publish to Cocos Play
Note: some platforms only have Chinese documentation available when visiting the platform's website. It may be necessary to use Google Translate in-order to review the documentation.
Cocos Creator officially supports the release of games to the Cocos Play.
Publish Cocos Play with Cocos Creator
Prerequisites
- Download and install the Cocos Play Self-test Tools on your Android device (recommended Android Phone 6.0 or above).
Build
Use Cocos Creator 3.0 to open a project. Select Cocos Play in the Platform dropdown of the Build panel, and then click Build.
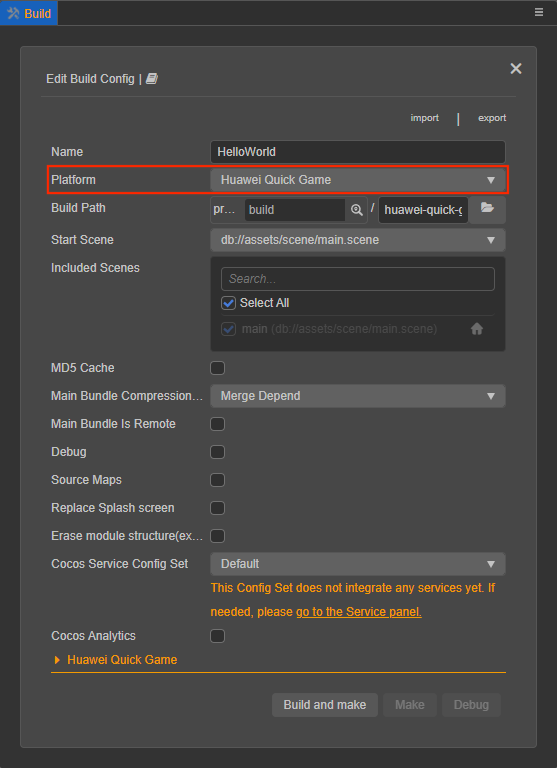
The specific filling rules for the relevant parameter configuration are as follows:
tinyPacketMode
This item is optional. The in-package volume of the game contains code and assets that cannot exceed 10M, and assets can be loaded via network requests. tinyPacketMode is to help developers keep the script files in the game package, other assets are uploaded to the remote server, and downloaded from the remote server as needed. Cocos Creator has already helped the developer with the download, cache, and version management of remote assets. The developer needs to do is the following steps:
When building, check the tinyPacketMode and fill in the tinyPacketModeServer.
First game asset package into the game package, this item is optional.
In the
tinyPacketMode, due to too many assets on the launch scene, downloading and loading assets for a long time may result in a short black screen when entering the game for the first time. If First game asset package into the game package is checked, you can reduce the black screen time when you first enter the game. However, it should be noted that theres/importasset does not support split asset downloading at this time, and the entireimportdirectory is also packaged into the first package.Developers can choose whether to check this item according to their needs. Then click on Build.
After the build is complete, click the Open button after the Build Path to upload the
resdirectory under the release path to the server. For example, if the default release path isbuild, the Build Task Name iscocos-play, you need to upload the/build/cocos-play/resdirectory.
At this point, the
resdirectory will no longer be included in the built-up cpk, and the assets in theresdirectory will be downloaded from the filled tinyPacketMode Server Path through the network request.The build parameters when Publish from the command line:
jstinyPackageMode: false, tinyPackageServer: '', packFirstScreenRes: false,After the build is completed, click the folder icon button below the cocos-play build task to open the
buildrelease path. If the Build Task Name iscocos-play, you can see that acocos-playfolder is generated in thebuilddirectory. This folder is the exported Cocos Play game project and cpk, the cpk package is in thebuild/cocos-playdirectory.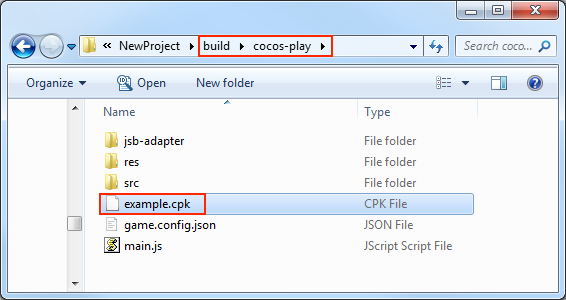
Access testing
Developers must use the Cocos Play Self-test Tools to test access without problems before submitting to the platform for review. The size of the package is not required for the self-test, but if it is to be submitted for review, the package size cannot exceed 10M.
The Self-test Tools can launch the game and provide features such as game login, payment, etc. By reading the game configuration parameters, you can determine the type of game to start and how the game will start.
For details, please refer to the Self-test Tools documentation.
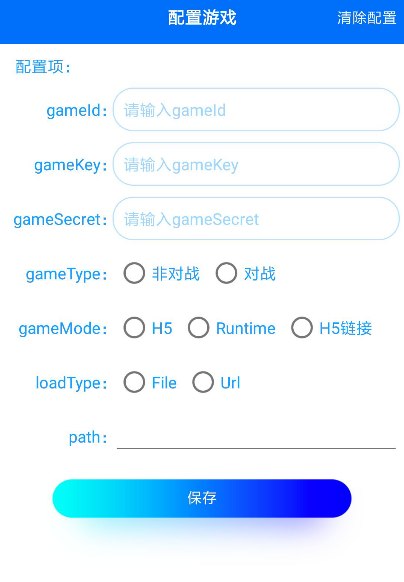
Open the previously installed Self-test Tools, then click the Configure Game button at the top left of the Self-test Tools to enter the game configuration page. Configure parameters as required and click Save.
Properties
| Property | Function Explanation |
|---|---|
| gameId | Game ID, which can be obtained from the background. |
| gameKey | Game key, which can be obtained from the background. |
| gameSecret | Game secret key, which can be obtained from the background. |
| gameType | Game type, including Versus and non-Versus. You can see how to use it in the Start Game section below. |
| gameMode | Game mode, please select Runtime. |
| lodeType | Game load type, which is how the game starts. Includes both File and Url. Please refer to the Start Game section below. |
| path | Game load address, needs to be used with lodeType. Please refer to the Start Game section below. |
Start Game
There are two ways to start the game through the Self-test Tools.
Load the game package as a file from the specified location (The game lodeType is File).
- Copy the
.cpkfile generated after the build to the device directory, if it is copied to the internal storage directory of device, create a new folder (named cocosplay) in the internal storage directory and copy the.cpkto the cocosplay folder. - Select File in the lodeType of the game configuration page.
- Fill in the path to the cocosplay folder where the
.cpkfile is placed in thepathoption. Such as/cocosplay/game.cpk. - Click on Save after the configuration is complete, then click on Start Game to open the game.
- Copy the
Open the game as a web page from the specified URL (The game lodeType is Url).
- Upload the
.cpkfile to the server. - Select Url in the lodeType of the game configuration page.
- Fill in path, such as: http://192.168.0.1:8080/game.cpk.
- Click on Save after the configuration is complete, then click on Start Game to open the game.
- Upload the
Reference documentation
Note: some platforms only have Chinese documentation available when visiting the platforms website. It may be necessary to use Google Translate in-order to review the documentation.