Cocos Creator
Toolbar
The Toolbar is located directly above the main editor window and contains seven groups of control buttons or messages that are used to provide editing functionality for specific panels or to facilitate our implementation of development workflows.
Arrange Nodes Using Gizmos
The core function of the Scene panel is to edit and arrange the visible elements of the scene in a WYSIWYG manner, mainly by arranging the nodes in the scene the way we want them to be arranged, using a series of Transform Gizmos in the upper left corner of the main window toolbar.
The Gizmos include Move, Rotate, Scale, and Rect, and hovering over any of these tools will display a prompt.

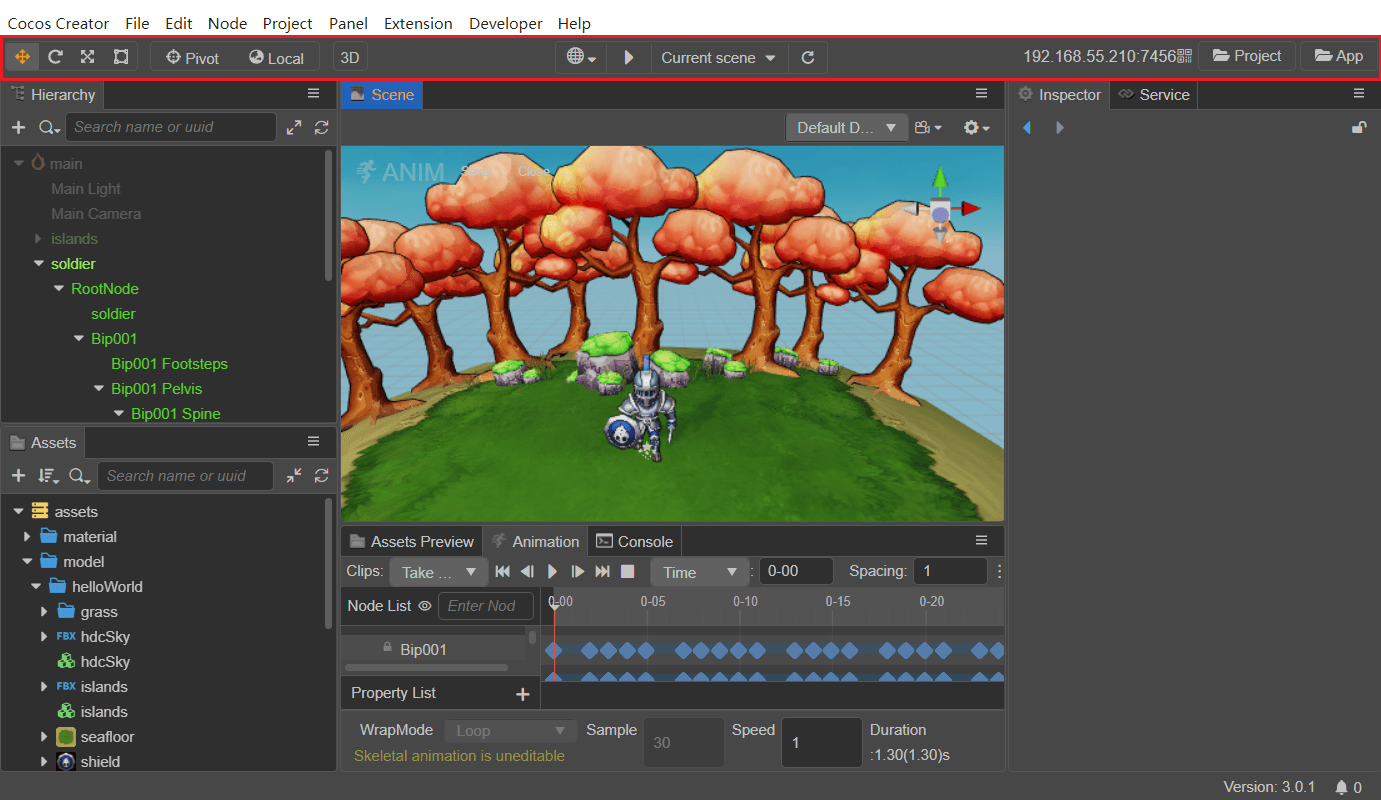
Move Gizmo
The Move Gizmo is the default transform gizmo that is activated when the editor is opened. It can also be activated by clicking the first button in the toolbar in the upper left corner of the main window, or by pressing the shortcut W while editing a scene.

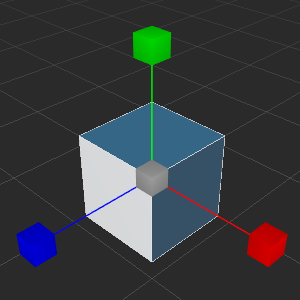
When selecting any node, notice a movement control handle consisting of red, green, and blue arrows and red, green, and blue squares in the center of the node in the Scene panel.
The control handles are controllers that can be interacted with by the mouse in a particular editing state in the Scene panel. These controllers are only used to assist in editing and will not be displayed while the game is running.
When the Move Gizmo is active:
- Holding the red/green/blue arrows and dragging the mouse will move the node in the X, Y and Z directions respectively.
- Holding the red/green/blue square and dragging the mouse will move the node in the Y-Z plane, X-Z plane, X-Y plane, respectively.
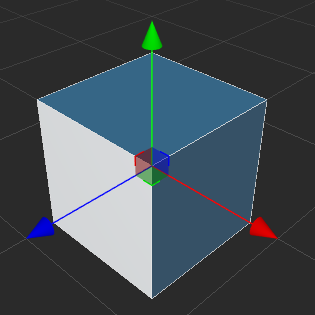
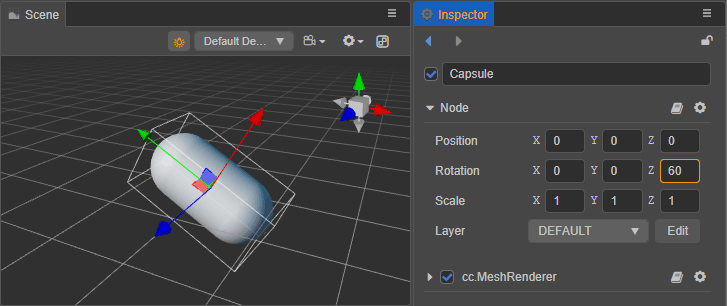
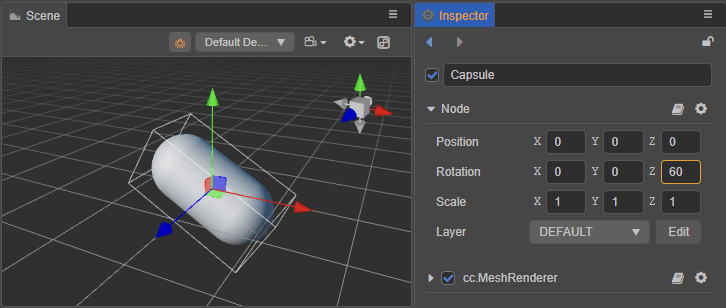
Rotate Gizmo
Click the second button on the toolbar in the upper left corner of the main window, or press the E shortcut key while editing the scene to switch to the Rotate Gizmo.

The handle of the Rotate Gizmo consists of three orthogonal red, green and blue circles (in 2D view it consists of an arrow and a circle). When you drag the mouse on any of the red/green/blue circles, the nodes will rotate around the X, Y and Z axes respectively.
When the mouse hovers over any circle, the circle will be displayed in yellow, click on it to select it, and a yellow arrow will be displayed to indicate which axis the current node is rotated by. Drag any point on the circle to rotate the node, and before releasing the mouse, notice the rotation angle on the control handle.
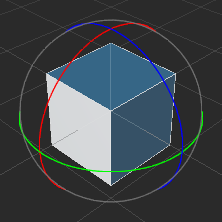
Scale Gizmo
Click the third button on the toolbar in the upper left corner of the main window, or press the R shortcut while editing a scene to switch to the Scale Gizmo.

The scale gizmo consists of three axes with red, green and blue squares at the head and a gray square at the center. When the mouse is hovered over any of the squares, it appears yellow and can be selected and dragged by clicking on.
- Holding the red/green/blue square and dragging the mouse will scale the node in the X, Y and Z axis directions respectively.
- Dragging the mouse on a gray square will scale the node in X, Y, and Z directions at the same time.
Rect Gizmo
Click the fourth button on the toolbar in the upper left corner of the main window, or press the T shortcut while editing a scene to switch to the Rect Gizmo. Note that the Rect Gizmo is only available for UI nodes.

The Rect Gizmo consists of four vertex control points, four edge control points, and one center control point.
When the Rect Gizmo is active:
- Dragging either vertex control point of the control handle can modify both the
Positionproperty of the UI node and theContentSizeproperty in the UITransform component while keeping the position of the diagonal vertices unchanged. - Dragging either side of the control handle modifies both the
Position(XorYproperty) of the UI node and theContentSizeproperty (widthorheightproperty) of the UITransform component, while keeping the position of the opposite side unchanged. - Dragging the center control point of a control handle allows to modify both the
Positionproperty of the UI node and theAnchorPointproperty of the UITransform component while keeping the size of the UI node unchanged.
In the layout of UI elements, it is often necessary to use the Rect Gizmo to directly control the position and length of the node's four edges precisely. For image elements where the original image aspect ratio must be maintained, the Rect Gizmo is not usually used to resize.
Transform Gizmo Control Point Setting
The transform gizmo control point is used to set the position of the gizmo and to control the orientation of the handles.

Transform Gizmo Position:
- Pivot: the transform gizmo will be displayed in the location of the 2D object AnchorPoint or in the 3D object's world coordinate system.
- Center: the transform gizmo will be displayed at the center of the node. If multiple nodes are selected at the same time, the center of all nodes will be displayed.
Direction of the control handle of the transform gizmo:
Local: the control handle of the transform gizmo is based on the direction of rotation of the node, as follows:
Global: the direction of the control handles in the transform gizmo is based on the world coordinate system, and is not affected by the node rotation, as follows:
Toggle Edit Mode
Click the 3D/2D button in the figure below to switch the Scene panel to 2D edit mode or 3D edit mode. For details, please refer to the Scene - View Introduction documentation.

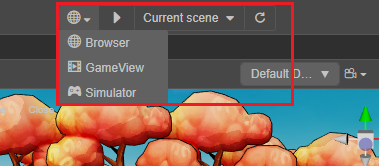
Play on Device
This option is used to preview the running effect of the project, please refer to the Project Preview & Debugging documentation.
Mobile Preview Address
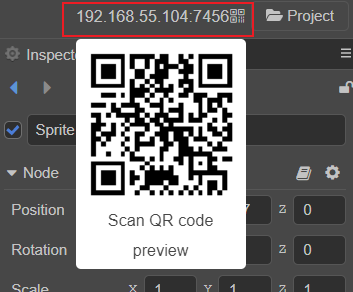
This shows the LAN address of the desktop computer running Cocos Creator. Mobile devices connected to the same LAN can access this address to preview and debug the game. Hovering over the LAN address will bring up a QR code, which can also be accessed by scanning the QR code to preview and debug the game.
Open the Project/App Directory
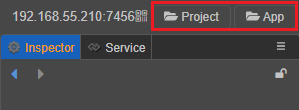
- Project: opens the folder where the project is located
- App: opens the installation path of the program