Cocos Creator
Quick start: making your first game.
The power of the Cocos Creator editor is that it allows developers to quickly prototype games.
Let's follow a guided tutorial to make a magical game named Mind Your Step. This game tests the player's reaction ability, and chooses whether to jump one step or two steps according to traffic conditions.
You can try out the completed the game here.

New Project
If you still don’t know how to download and run Cocos Creator, please review the Installation and Starting documentation.
To start a new project:
Start Cocos Creator and then create a new project named MindYourStep. If you don’t know how to create a project, please read the Hello World! documentation.
After creating a new project, you should see the following editor interface:

Creating a game scene
In Cocos Creator, Scene is the center for organizing game content during development and the container for presenting all game content to players. The game scene will generally include the following components:
- Scene objects
- Roles
- User interface elements
- Game logic, in the form of scripts, attached to Scene Nodes as Components
When the player runs the game, the game scene will be loaded. After the game scene is loaded, scripts of the included components will be automatically run. Apart from assets, game scenes are the foundation of all content creation. Now, to create a new Scene:
In the Asset panel, click to select the assets directory, click the + button in the upper left corner, select the folder, and name it Scenes. Example:
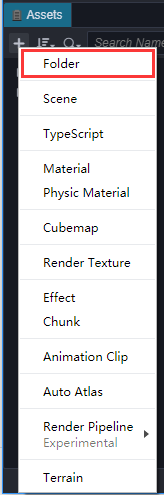
Click the Scenes directory first (the following pictures create some common folders in advance), click the right mouse button, and select Scene Files from the pop-up menu. Example:
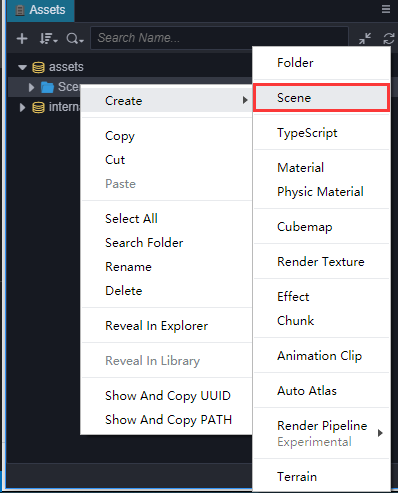
We created a Scene file named New Scene. After the creation, the name of the scene file New Scene will be in the edit state. Rename it from New Scene to Main.
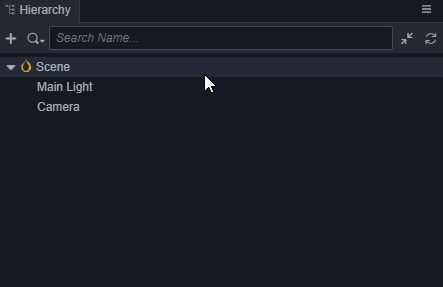
Double-click Main to open this Scene in Scene panel and Hierarchy panel.
Adding a road
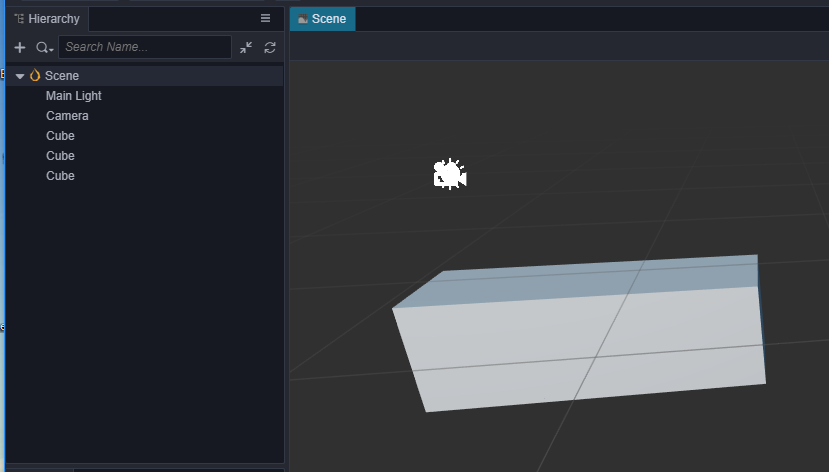
Our main character needs to run from left to right on a road composed of cubes (blocks). Let's make the road by using a built-in cube.
Right click on Scene Node in the Hierarchy panel, then choose Create -> 3D Object -> Cube
Clone the cube to make two more cube with the shortcut key Ctrl+D.
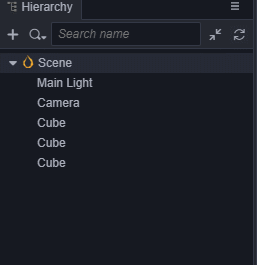
Assign the Cubes each a unique position:
- First one at position (0, -1.5, 0).
- Second one at position (1, -1.5, 0).
- Third one at position (2, -1.5, 0).
The result is as follows:
Add a main character
Create a main character node
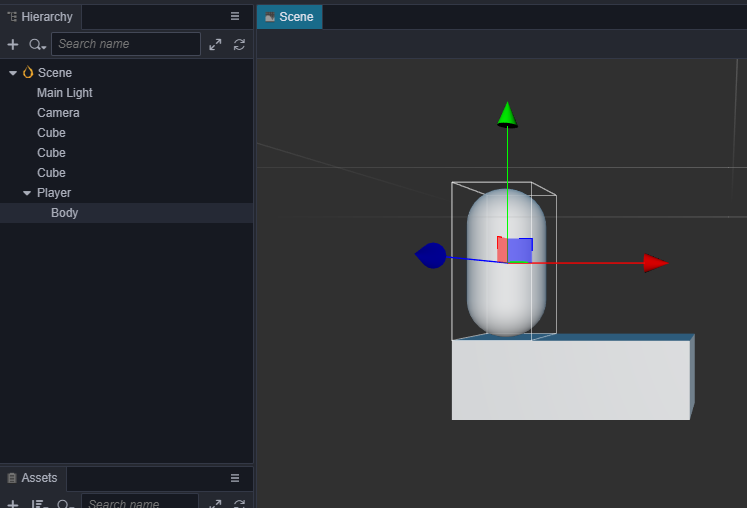
First, create an empty node named Player.
Second, create a Model Component named Body under the Player node. For convenience, let's use the built-in Capsule model as the body of our main character.
The advantage of being divided into two nodes is that we can use the script to control the Player node to move the main character in the horizontal direction, and do some vertical animations on the Body node (such as falling after jumping in place), the two are superimposed to form a jumping animation.
Third, set the Player node to the (0, 0, 0) position so that it can stand on the first square.
The effect is as follows:
Writing a script for the main character
It is necessary for the main character to be affected when the mouse moves. To do this a custom script needs to be written.
Creating a script
If you have not yet created a
Scriptsfolder, right-click the assets folder in the Assets panel, select New -> Folder, and rename the newly created folder toScripts.Right-click the
Scriptsfolder and select New -> TypeScript to create a new, blank TypeScript script. For TypeScript information, you can view the TypeScript Official Website.Change the name of the newly created script to
PlayerControllerand the double-click the script to open the code editor (in, for example, VSCode).
Note: the name of the script in Cocos Creator 3.0 is the name of the component. This name is case sensitive! If the capitalization of the component name is incorrect, the component cannot be used correctly by the name!
Writing script code
There are already some pre-set code blocks in the PlayerController script. Example:
ts
import { _decorator, Component } from 'cc';
const { ccclass, property } = _decorator;

@ccclass("PlayerController")
export class PlayerController extends Component {
    /* class member could be defined like this */
    // dummy = '';

    /* use `property` decorator if your want the member to be serializable */
    // @property
    // serializableDummy = 0;

    start () {
        // Your initialization goes here.
    }

    // update (deltaTime: number) {
    //     // Your update function goes here.
    // }
}
This code is the structure needed to write a component. Scripts with this structure are Components in Cocos Creator. They can be attached to nodes in a Scene and provide various functionality for controlling nodes. For detailed information review the Script documentation.
Monitoring of mouse events needs to be added in the script to let the Player node move. Modify the code in PlayerController as follows:
ts
import { _decorator, Component, Vec3, systemEvent, SystemEvent, EventMouse, Animation } from 'cc';
const { ccclass, property } = _decorator;

@ccclass("PlayerController")
export class PlayerController extends Component {
    /* class member could be defined like this */
    // dummy = '';

    /* use `property` decorator if your want the member to be serializable */
    // @property
    // serializableDummy = 0;

    // for fake tween
    private _startJump: boolean = false;
    private _jumpStep: number = 0;
    private _curJumpTime: number = 0;
    private _jumpTime: number = 0.1;
    private _curJumpSpeed: number = 0;
    private _curPos: Vec3 = new Vec3();
    private _deltaPos: Vec3 = new Vec3(0, 0, 0);
    private _targetPos: Vec3 = new Vec3();
    private _isMoving = false;

    start () {
        // Your initialization goes here.
        systemEvent.on(SystemEvent.EventType.MOUSE_UP, this.onMouseUp, this);
    }

    onMouseUp(event: EventMouse) {
        if (event.getButton() === 0) {
            this.jumpByStep(1);
        } else if (event.getButton() === 2) {
            this.jumpByStep(2);
        }

    }

    jumpByStep(step: number) {
        if (this._isMoving) {
            return;
        }
        this._startJump = true;
        this._jumpStep = step;
        this._curJumpTime = 0;
        this._curJumpSpeed = this._jumpStep / this._jumpTime;
        this.node.getPosition(this._curPos);
        Vec3.add(this._targetPos, this._curPos, new Vec3(this._jumpStep, 0, 0));

        this._isMoving = true;
    }

    onOnceJumpEnd() {
        this._isMoving = false;
    }

    update (deltaTime: number) {
        if (this._startJump) {
            this._curJumpTime += deltaTime;
            if (this._curJumpTime > this._jumpTime) {
                // end
                this.node.setPosition(this._targetPos);
                this._startJump = false;
                this.onOnceJumpEnd();
            } else {
                // tween
                this.node.getPosition(this._curPos);
                this._deltaPos.x = this._curJumpSpeed * deltaTime;
                Vec3.add(this._curPos, this._curPos, this._deltaPos);
                this.node.setPosition(this._curPos);
            }
        }
    }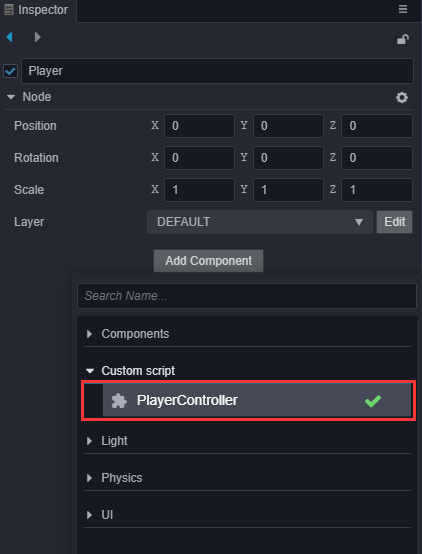
}Next, attach the PlayerController component to the Player node. Select the Player node in the Hierarchy panel, then click the Add Component button in the Inspector panel, select Custom Script Component- > PlayerController to the Player node to add the PlayerController component.
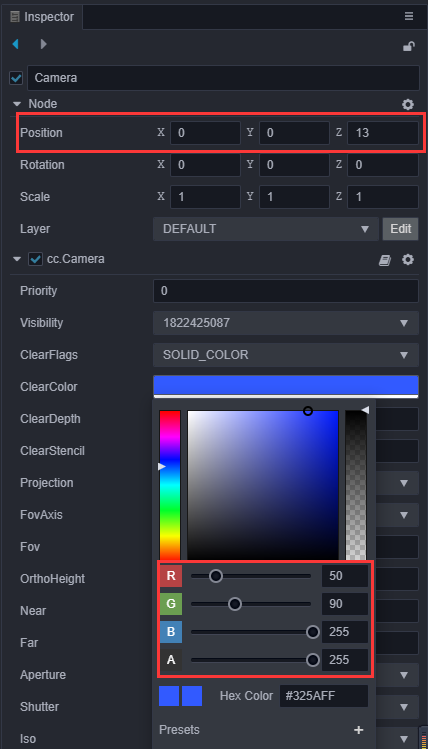
In-order to see the object at runtime, we need to adjust some parameters of the Camera in the scene, set the position to (0, 0, 13), and set the ClearColor to (50, 90, 255, 255):
Now, click the Play button. Once running, click the left and right mouse buttons on the opened web page, you can see the following screen:

For additional details please refer to the Project Preview Debugging documentation.
Adding character animations
The Player can be moved in a horizontal direction. This is a start, but not good enough. Player must become more life-like. This effect can be achieved by adding a vertical animation to the character.
Note: before proceeding, please read the Animation Editor documentation.
After reading and understanding the capabilities of the Animation Editor character animations can be implemented!
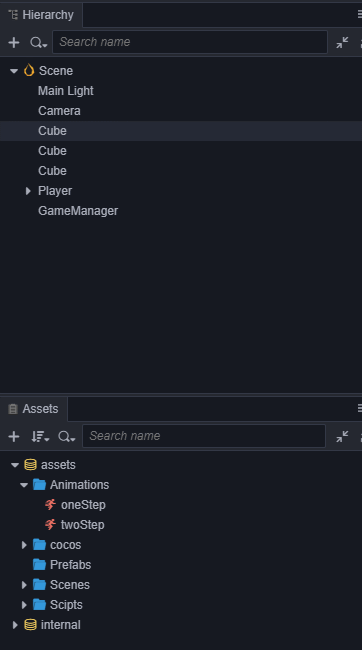
Locate the Animation panel, at the bottom of the editor alongside the Assets Preview and the Console panels. Select the
Bodynode in the Scene and click to add an Animation Component and then click again tp create a new Animation Clip. Give this new Animation Clip a name ofoneStep.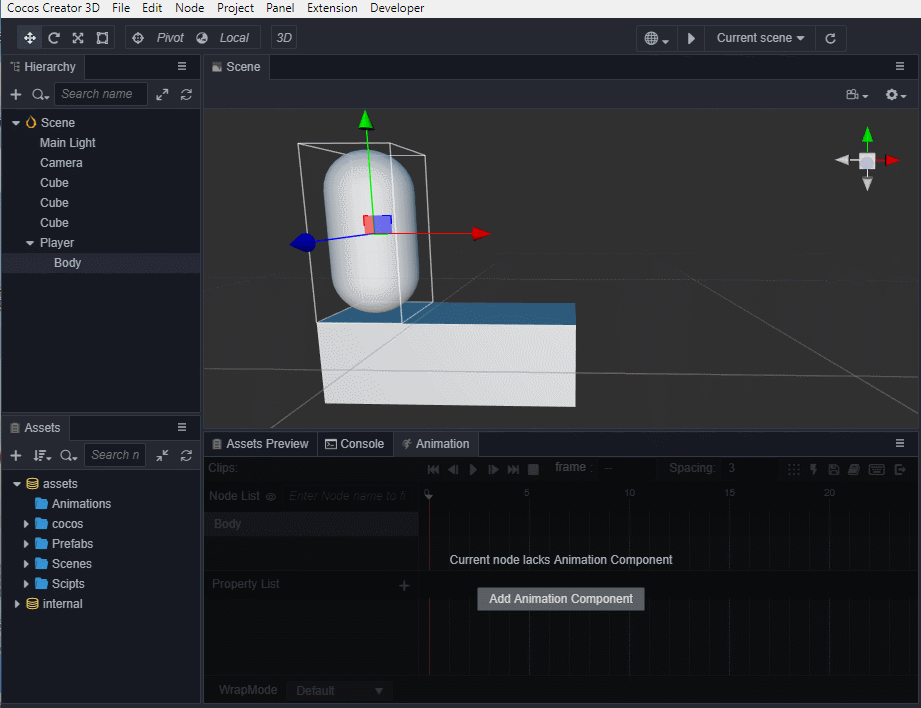
Enter animation editing mode in-order to add the position attribute. Next, add three key frames with position values of (0, 0, 0), (0, 0.5, 0), (0, 0, 0).
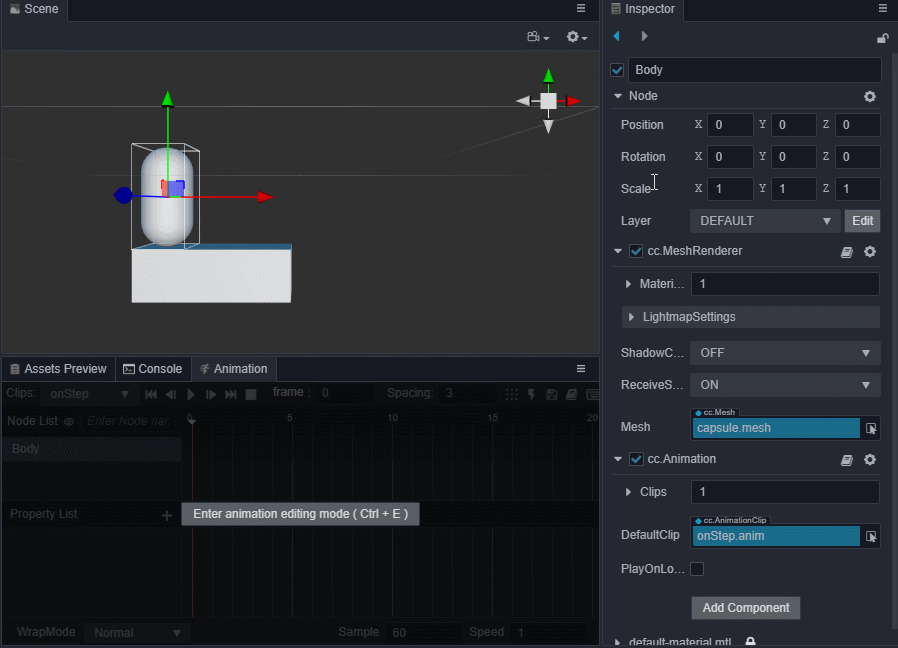
Note: remember to save the animation before exiting the animation editing mode, otherwise the animation will be lost.
Animation Clips can also be created using the Asset panel. Next, Create a Clip named
twoStepand add it to the Animation component onBody.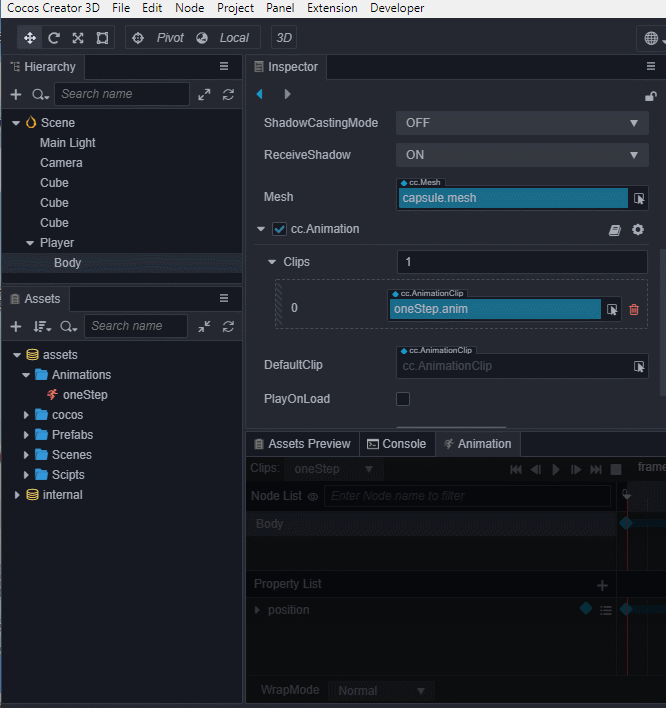
Note: the panel layout was adjusted for recording convenience.
Enter the animation editing mode, select and edit the
twoStepclip. Similar to the second step, add three key frames at positions (0, 0, 0), (0, 1, 0), (0, 0, 0).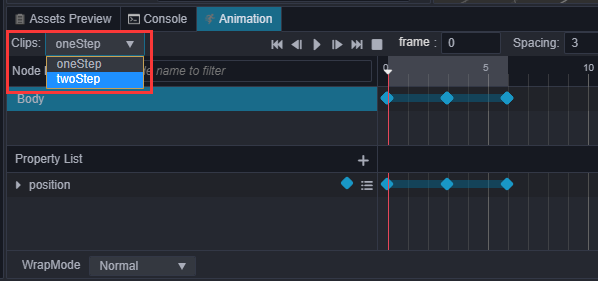
Reference the Animation component in the
PlayerControllerComponent, as different animations need to be played according to the number of stepsPlayerjumped.First, reference the Animation component on the
Bodyin thePlayerControllercomponent.ts@property({type: Animation}) public BodyAnim: Animation|null = null;Then in the Inspector panel, drag the
Animationto theBodyvariable.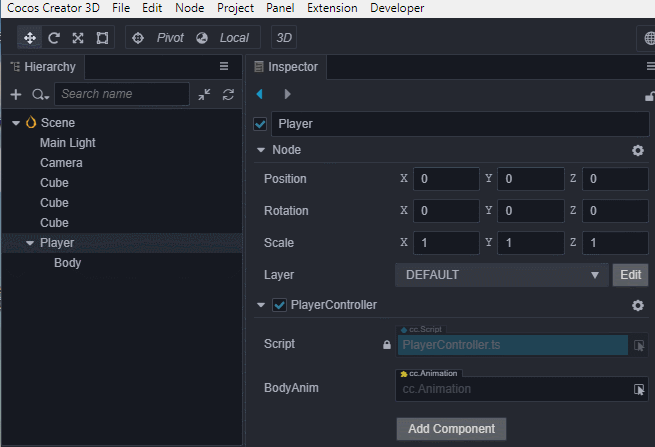
Add the animation playback code to the jump function
jumpByStep:tsif (this.BodyAnim) { if (step === 1) { this.BodyAnim.play('oneStep'); } else if (step === 2) { this.BodyAnim.play('twoStep'); } }Click the Play button. When playing, click the left and right mouse buttons, you can see the new jump effect in action:

Upgrading the road
In-order to make the gameplay longer and more enjoyable, we need a long stretch of road to let the Player run all the way to the right. Copying a bunch of cubes in the Scene and editing the position of each cube to form the road is not a wise practice. We can, however, complete this by using a script to automatically create the road pieces.
A "Game Manager" can help
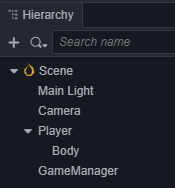
Most games have a manager, which is mainly responsible for the management of the entire game life-cycle. You can put the code for the dynamic creation of the road in this same manager. Create a node named GameManager in the Scene. Next, create a TypesScript file named GameManager in assets/Scripts and add it to the GameManager node.
Making a Prefab
For a node that needs to be generated repeatedly, it can be saved as a Prefab (prefabricated) resource. This means it can be used as a template when we dynamically generate other nodes of this same type.
Note: before proceeding, please read the Prefab Resources documentation.
It is necessary to make the basic element cube of the road into a Prefab, after which all three cubes in the Scene can be deleted.
Adding the automatic road creation
A very long road is needed. The ideal method is to dynamically increase the length of the road, so that the Player can run forever. First, generate a fixed-length road with a length that is arbitrary. To do so, replace the code in the GameManager script with the following code:
ts
import { _decorator, Component, Prefab, instantiate, Node, CCInteger} from 'cc';
const { ccclass, property } = _decorator;
enum BlockType{
BT_NONE,
BT_STONE,
};
@ccclass("GameManager")
export class GameManager extends Component {
@property({type: Prefab})
public cubePrfb: Prefab|null = null;
@property({type: CCInteger})
public roadLength: Number = 50;
private _road: number[] = [];
start () {
this.generateRoad();
}
generateRoad() {
this.node.removeAllChildren();
this._road = [];
// startPos
this._road.push(BlockType.BT_STONE);
for (let i = 1; i < this.roadLength; i++) {
if (this._road[i-1] === BlockType.BT_NONE) {
this._road.push(BlockType.BT_STONE);
} else {
this._road.push(Math.floor(Math.random() * 2));
}
}
for (let j = 0; j < this._road.length; j++) {
let block: Node = this.spawnBlockByType(this._road[j]);
if (block) {
this.node.addChild(block);
block.setPosition(j, -1.5, 0);
}
}
}
spawnBlockByType(type: BlockType) {
if (!this.cubePrfb) {
return null;
}
let block: Node|null = null;
switch(type) {
case BlockType.BT_STONE:
block = instantiate(this.cubePrfb);
break;
}
return block;
}
// update (deltaTime: number) {
// // Your update function goes here.
// }
}Assign the Cube prefab that made previously to the CubePrfb property in GameManager Inspector.
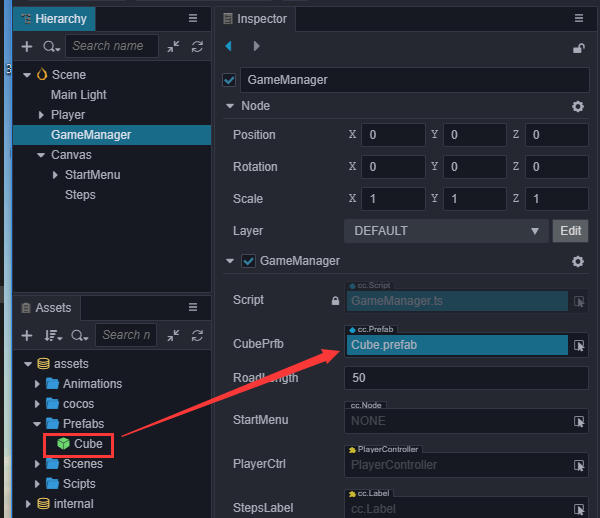
The length of the road can be changed by modifying the value of roadLength in the Properties panel for the GameManager.
When previewing, the road is now automatically generated, however, because the Camera does not follow the Player, the road behind cannot be seen. Changing the Camera in the Scene to be a child node of the Player can help solve this.
Now, the Camera will follow the Player's movement.
Adding a start menu
The start menu is an indispensable part of most any game. Add the game name, game introduction, production staff and other information here. Creating a simple start menu starts with some basic steps:
Add a button called
Play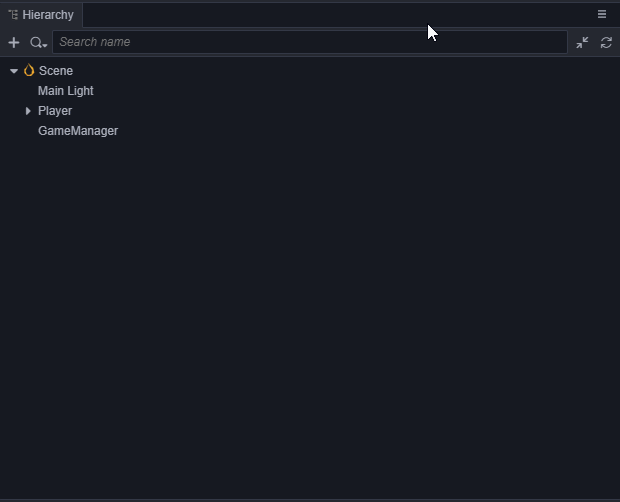
This operation creates a
Canvasnode, aPlayButtonnode, and aLabelnode. Because the UI component needs to be displayed under the parent node withCanvas, the editor will automatically add one when it finds that there is not a node with this component in the current Scene. After creating the button, change theStringproperty ofcc.Labelon theLabelnode fromButtontoPlay.Create an empty node named
StartMenuunderCanvasand dragPlayButtonunder it. We can switch to the 2D editing view for UI editing operations by clicking the 2D/3D button on the toolbar.Note: 2D View is this toolbar button
 .
.Note: before proceeding, please read the Scene Editing documentation.
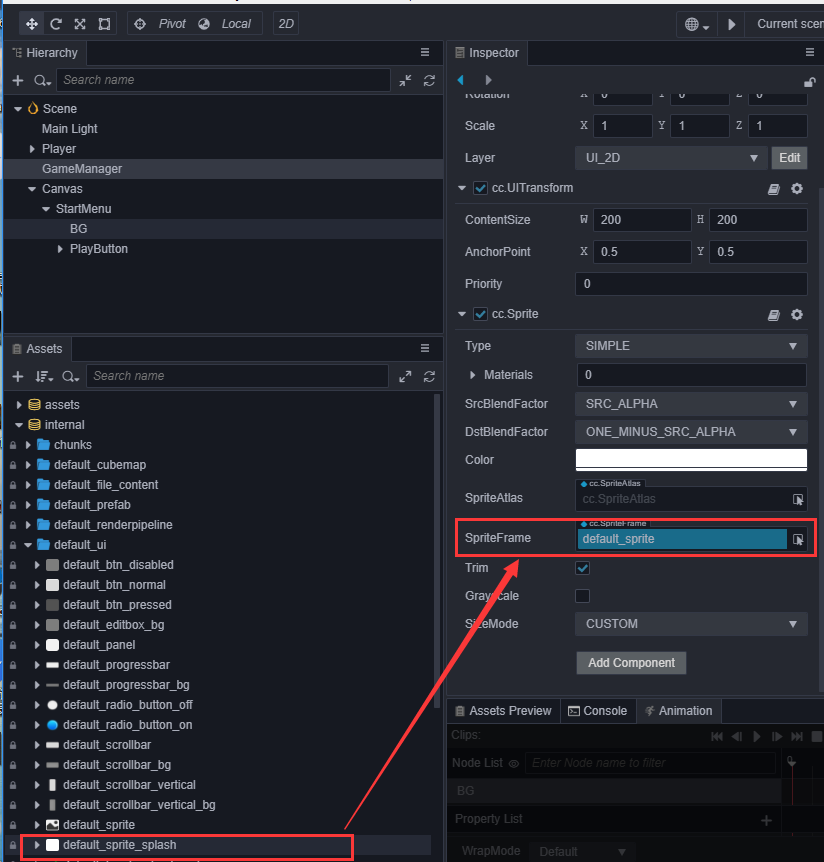
Add a background frame by creating a
Spritenode namedBGunderStartMenu. AdjustBG's position to above thePlayButton, setting the W(width) and H(height) ofContentSizeto (200, 200), and setting its SpriteFrame tointernal/default_ui/ default_sprite_splash.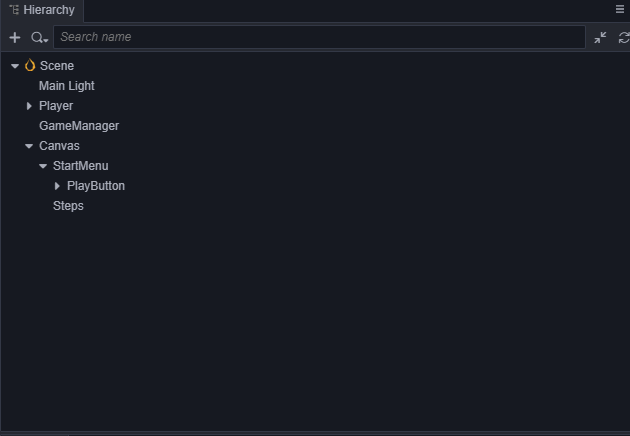
Add a Label called
Titlefor the title of the start menu.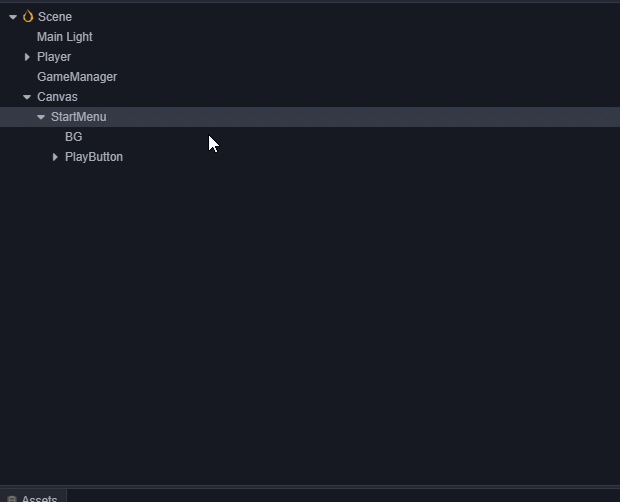
Modify the text for
Titleand adjust it's position, text size and color.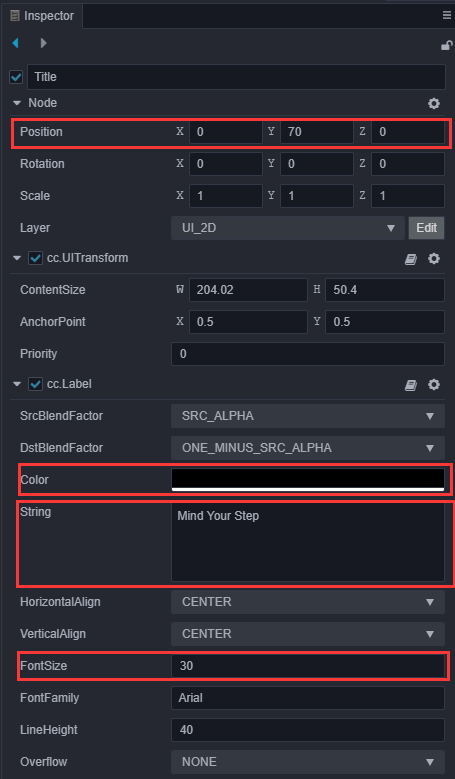
Adjust the position of the
PlayButton. The layout of a simple start menu is complete.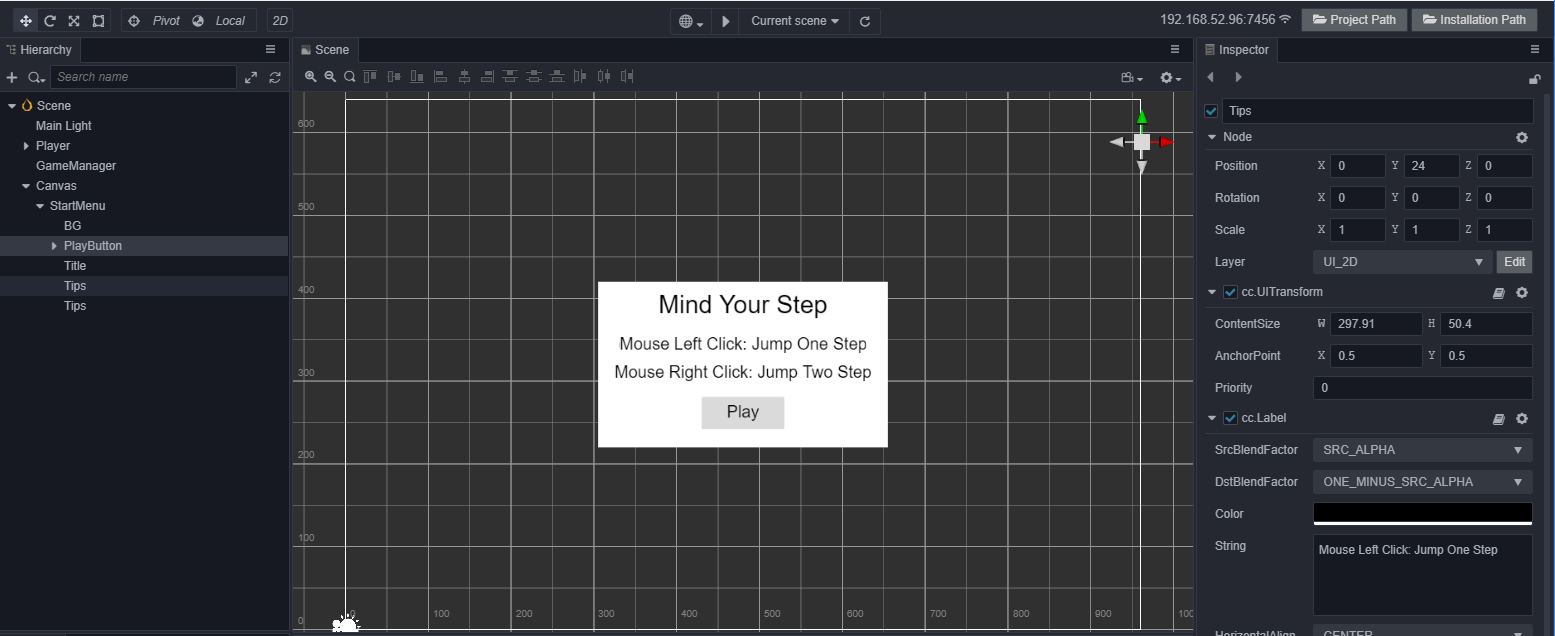
Add game state logic, generally it can be divided into three states:
- Init: display the game menu and initialize some resources.
- Playing: hide the game menu, players can operate the game.
- End: end the game and display the ending menu.
Use an enum type to represent these states.
tsenum BlockType{ BT_NONE, BT_STONE, }; enum GameState{ GS_INIT, GS_PLAYING, GS_END, };Add a private variable that represents the current state to the
GameManagerscripttsprivate _curState: GameState = GameState.GS_INIT;In-order not to let the user operate the character at the beginning, but to allow the user to operate the character while the game is in progress, we need to dynamically turn on and off the character's monitoring of mouse messages. This can be done with the following changes to
PlayerController:tsstart () { // Your initialization goes here. //systemEvent.on(SystemEvent.EventType.MOUSE_UP, this.onMouseUp, this); } setInputActive(active: boolean) { if (active) { systemEvent.on(SystemEvent.EventType.MOUSE_UP, this.onMouseUp, this); } else { systemEvent.off(SystemEvent.EventType.MOUSE_UP, this.onMouseUp, this); } }Next, reference
PlayerControllerin theGameManagerscript. Drag thePlayervariable in the Inspector panel.ts@property({type: PlayerController}) public playerCtrl: PlayerController = null;In-order to dynamically open/close the open menu, the
StartMenuneeds to be referenced in theGameManager. Drag theStartMenuof the scene into this variable in the Inspector panel.ts@property({type: Node}) public startMenu: Node = null;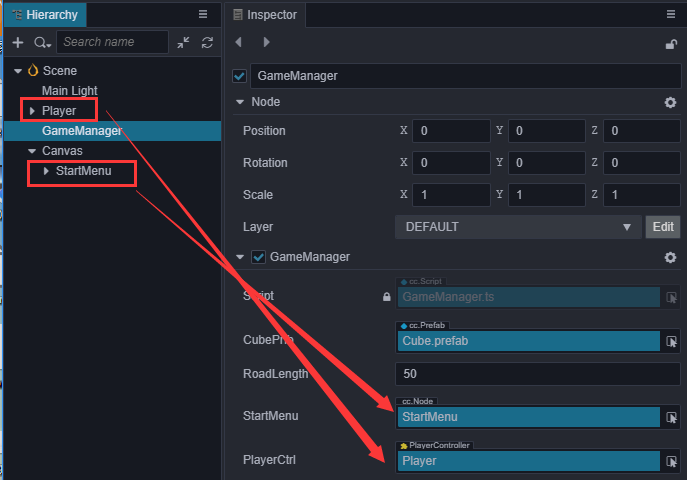
Modify the code in the
GameManger:tsstart () { this.curState = GameState.GS_INIT; } init() { if (this.startMenu) { this.startMenu.active = true; } this.generateRoad(); if (this.playerCtrl) { this.playerCtrl.setInputActive(false); this.playerCtrl.node.setPosition(Vec3.ZERO); } } set curState (value: GameState) { switch(value) { case GameState.GS_INIT: this.init(); break; case GameState.GS_PLAYING: if (this.startMenu) { this.startMenu.active = false; } // Directly setting active will directly start monitoring // mouse events, and do a little delay processing setTimeout(() => { if (this.playerCtrl) { this.playerCtrl.setInputActive(true); } }, 0.1); break; case GameState.GS_END: break; } this._curState = value; }Add event monitoring to the
Playbutton. In-order to start the game after clicking thePlaybutton, the button needs to respond to click events. Add code that responds to the button click in theGameManagerscript, and click to enter the game'sPlayingstate:tsonStartButtonClicked() { this.curState = GameState.GS_PLAYING; }Next, add the response function of Click Events in the Inspector panel for the
Playbutton.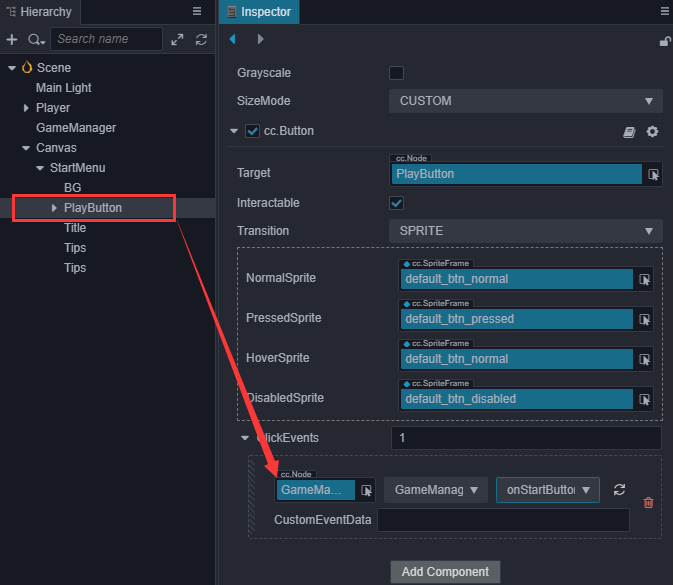
Now, preview the scene by clicking the Play button to start the game.
Adding game end logic
The game character is just running forward, with no purpose. Adding game rules to make the game play more challenging would make the game more playable and give it a purpose.
The character needs to send a message at the end of each jump. This message should record how many steps the character jumped and its current position. This can be done in
PlayerController.tsprivate _curMoveIndex = 0; // ... jumpByStep(step: number) { // ... this._curMoveIndex += step; }Send a message at the end of each jump:
tsonOnceJumpEnd() { this._isMoving = false; this.node.emit('JumpEnd', this._curMoveIndex); }Monitor the character's jumping end event in
GameManager, and judge the winning or losing of the game, according to the rules.Increase the failure and ending logic to judge how the game is being played.If
Playerjumps to an empty square or exceeds the maximum length value, the game will end:tscheckResult(moveIndex: number) { if (moveIndex <= this.roadLength) { // Jump to the empty square if (this._road[moveIndex] == BlockType.BT_NONE) { this.curState = GameState.GS_INIT; } } else { // skipped the maximum length this.curState = GameState.GS_INIT; } }Monitor the character's jump message and call a function to decide:
tsstart () { this.curState = GameState.GS_INIT; this.playerCtrl?.node.on('JumpEnd', this.onPlayerJumpEnd, this); } // ... onPlayerJumpEnd(moveIndex: number) { this.checkResult(moveIndex); }If you preview playing the game now, there will be a logic error when restarting the game. This is because we did not reset the
_curMoveIndexproperty value inPlayerControllerwhen the game restarts. To fix this, add a reset function inPlayerController.tsreset() { this._curMoveIndex = 0; }Call
reset()in theinitfunction ofGameManagerto reset the properties ofPlayerController.tsinit() { // ... this.playerCtrl.reset(); }
Step counting display
We can display the current number of steps jumped in the interface. Perhaps watching the continuous growth of steps during the jump will be very fulfilling to the player.
Create a new label named
Stepsunder Canvas, adjust the position, font size and other properties.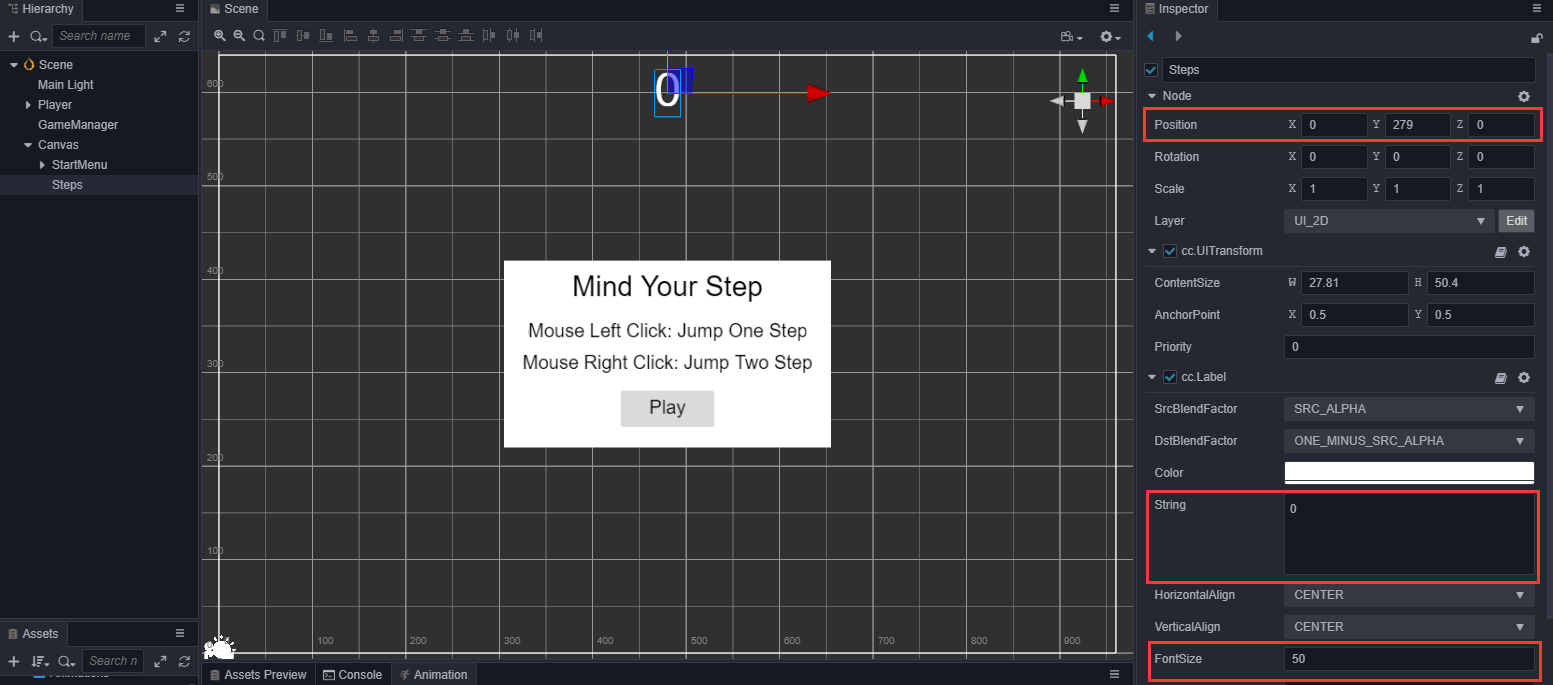
Reference the
Stepslabel inGameManagerts@property({type: Label}) public stepsLabel: Label|null = null;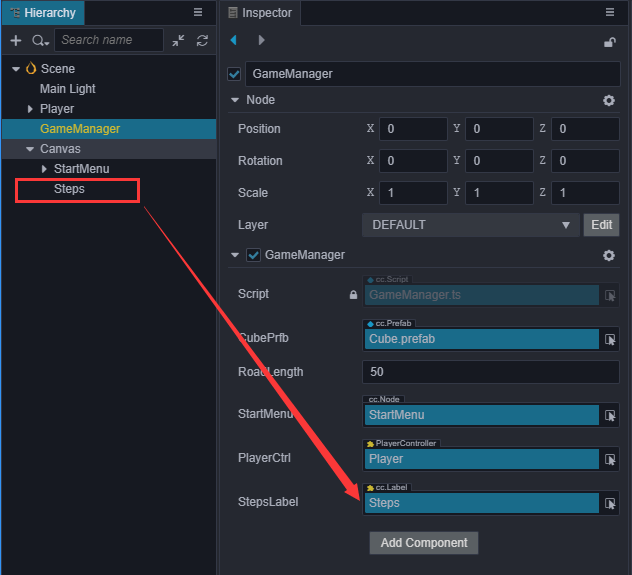
Update the current
Stepdata to appear in newStepsLabel. A game ending interface has yet to be created, for now, reset the number of steps to 0 when restarting playing.tsset curState (value: GameState) { switch(value) { case GameState.GS_INIT: this.init(); break; case GameState.GS_PLAYING: if (this.startMenu) { this.startMenu.active = false; } if (this.stepsLabel) { // reset the number of steps to 0 this.stepsLabel.string = '0'; } // set active directly to start listening for mouse events directly setTimeout(() => { if (this.playerCtrl) { this.playerCtrl.setInputActive(true); } }, 0.1); break; case GameState.GS_END: break; } this._curState = value; }Update the
StepsLabel in a function that responds to the character jumping. It should make sense that recording the number ofStepswould take place after each and every jump for accuracy.tsonPlayerJumpEnd(moveIndex: number) { this.stepsLabel.string = '' + moveIndex; this.checkResult(moveIndex); }
Lights and shadows
Where there is light, there will be a shadow. Light and shadows create a 3D world where light and dark intersect. Next, let's add a simple shadow to the character.
Turning on shadows
In the Hierarchy panel, click the
Scenenode at the top, checkEnabledin theshadowsproperty, and modify theDistanceandNormalparameters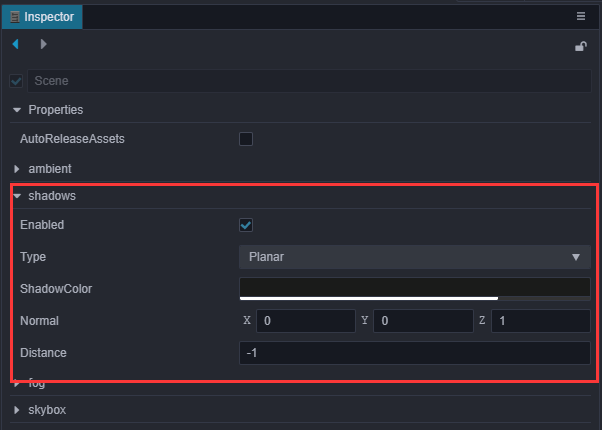
Click the
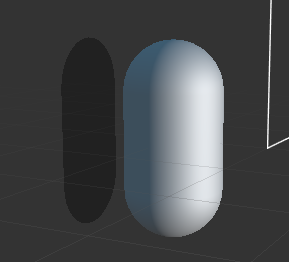
Bodynode, under thePlayernode, and setShadowCastingModeunderMeshRenderertoON.
A patch of shadow can be seen in the in the Scene editor. However, this shadow cannot be seen when previewing because it is covered by the capsule body that is directly behind the model.
Adjusting the light
When creating a new scene, a DirectionalLight will be added by default, and the shadow will be calculated from this parallel light. The direction of this parallel light can be adjusted in-order to display the shadow in another position.
In the Hierarchy panel, click to select the Main Light node and adjust the Rotation parameter to (-10, 17, 0).
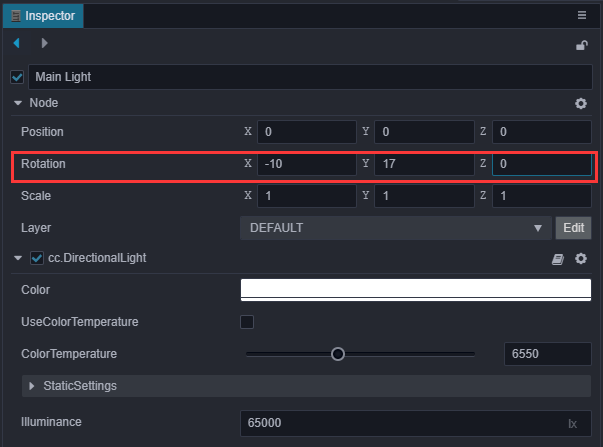
Preview the game and you can see this effect:

Adding a character model
Using the capsule body as the character is a bit shabby, we can change this to make a Cocos character.
Importing model resources
Copy the cocos folder under the assets directory in Project Engineering to the assets directory of your own project.
Adding to the scene
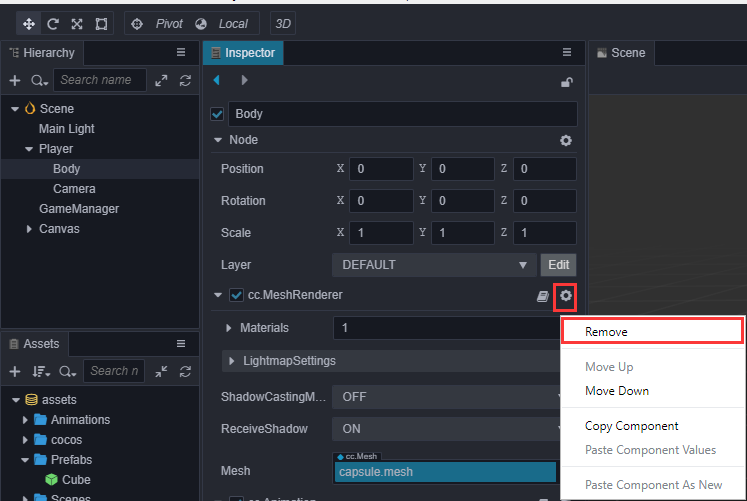
A prefab called Cocos has been included in the cocos file, drag it to the Body node under Player in the scene.
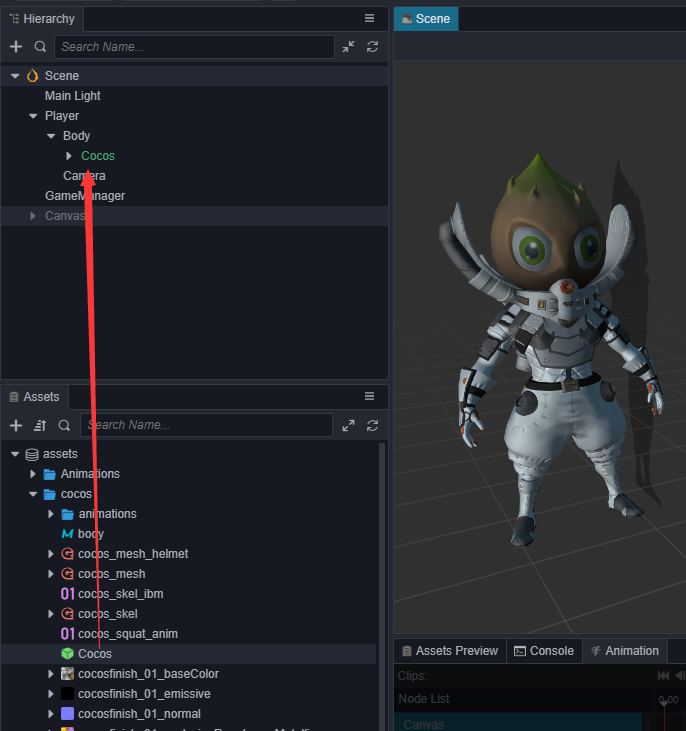
Remove the Capsule model at the same time.
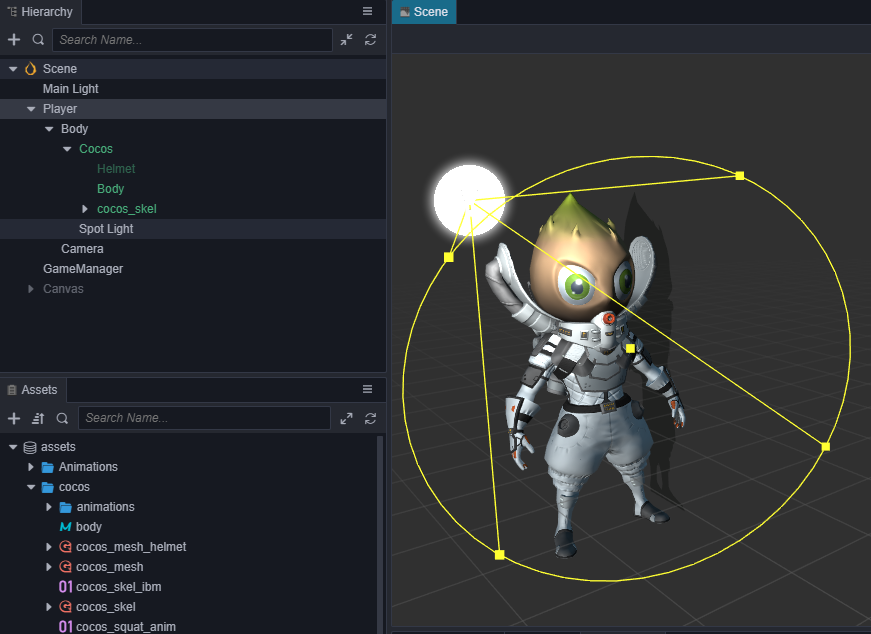
The model is a little dark and a spotlight can be added to highlight its shiny brain.
Adding a jumping animation
When previewing the game, the character will initially have a standby animation, but a jumping animation needs to be used during a jump.
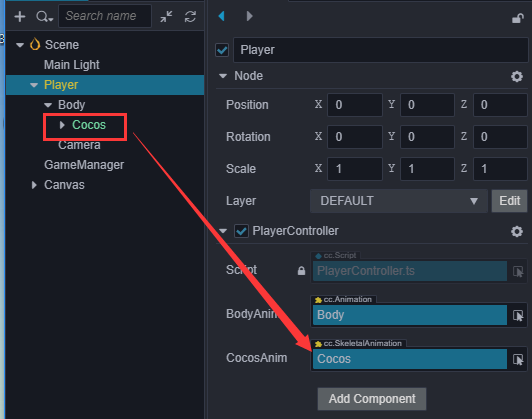
First, add a variable in the PlayerController class that references the model animation:
ts
@property({type: SkeletalAnimation})
public CocosAnim: SkeletalAnimation|null = null;Then, in the Inspector, drag the Cocos node into this variable.
The jump animation needs to be used in the jumpByStep function.
ts
jumpByStep(step: number) {
if (this._isMoving) {
return;
}
this._startJump = true;
this._jumpStep = step;
this._curJumpTime = 0;
this._curJumpSpeed = this._jumpStep / this._jumpTime;
this.node.getPosition(this._curPos);
Vec3.add(this._targetPos, this._curPos, new Vec3(this._jumpStep, 0, 0));
this._isMoving = true;
if (this.CocosAnim) {
// The jumping animation takes a long time, here is accelerated playback
this.CocosAnim.getState('cocos_anim_jump').speed = 3.5;
// Play jumping animation
this.CocosAnim.play('cocos_anim_jump');
}
if (this.BodyAnim) {
if (step === 1) {
//this.BodyAnim.play('oneStep');
} else if (step === 2) {
this.BodyAnim.play('twoStep');
}
}
this._curMoveIndex += step;
}In the onOnceJumpEnd function, change to the standby state and play the standby animation.
ts
onOnceJumpEnd() {
this._isMoving = false;
if (this.CocosAnim) {
this.CocosAnim.play('cocos_anim_idle');
}
this.node.emit('JumpEnd', this._curMoveIndex);
}When previewing, the results are as follows:
Final Code
The final code for PlayerController.ts should look like this:
ts
import { _decorator, Component, Vec3, systemEvent, SystemEvent, EventMouse, Animation, SkeletalAnimation } from 'cc';
const { ccclass, property } = _decorator;
@ccclass("PlayerController")
export class PlayerController extends Component {
@property({type: Animation})
public BodyAnim: Animation|null = null;
@property({type: SkeletalAnimation})
public CocosAnim: SkeletalAnimation|null = null;
// for fake tween
private _startJump: boolean = false;
private _jumpStep: number = 0;
private _curJumpTime: number = 0;
private _jumpTime: number = 0.3;
private _curJumpSpeed: number = 0;
private _curPos: Vec3 = new Vec3();
private _deltaPos: Vec3 = new Vec3(0, 0, 0);
private _targetPos: Vec3 = new Vec3();
private _isMoving = false;
private _curMoveIndex = 0;
start () {
}
reset() {
this._curMoveIndex = 0;
}
setInputActive(active: boolean) {
if (active) {
systemEvent.on(SystemEvent.EventType.MOUSE_UP, this.onMouseUp, this);
} else {
systemEvent.off(SystemEvent.EventType.MOUSE_UP, this.onMouseUp, this);
}
}
onMouseUp(event: EventMouse) {
if (event.getButton() === 0) {
this.jumpByStep(1);
} else if (event.getButton() === 2) {
this.jumpByStep(2);
}
}
jumpByStep(step: number) {
if (this._isMoving) {
return;
}
this._startJump = true;
this._jumpStep = step;
this._curJumpTime = 0;
this._curJumpSpeed = this._jumpStep / this._jumpTime;
this.node.getPosition(this._curPos);
Vec3.add(this._targetPos, this._curPos, new Vec3(this._jumpStep, 0, 0));
this._isMoving = true;
if (this.CocosAnim) {
// The jumping animation takes a long time, here is accelerated playback
this.CocosAnim.getState('cocos_anim_jump').speed = 3.5;
// Play jumping animation
this.CocosAnim.play('cocos_anim_jump');
}
if (this.BodyAnim) {
if (step === 1) {
//this.BodyAnim.play('oneStep');
} else if (step === 2) {
this.BodyAnim.play('twoStep');
}
}
this._curMoveIndex += step;
}
onOnceJumpEnd() {
this._isMoving = false;
this.CocosAnim.play('cocos_anim_idle');
this.node.emit('JumpEnd', this._curMoveIndex);
}
update (deltaTime: number) {
if (this._startJump) {
this._curJumpTime += deltaTime;
if (this._curJumpTime > this._jumpTime) {
// end
this.node.setPosition(this._targetPos);
this._startJump = false;
this.onOnceJumpEnd();
} else {
// tween
this.node.getPosition(this._curPos);
this._deltaPos.x = this._curJumpSpeed * deltaTime;
Vec3.add(this._curPos, this._curPos, this._deltaPos);
this.node.setPosition(this._curPos);
}
}
}
}The final code for GameManager.ts should look like this:
ts
import { _decorator, Component, Prefab, instantiate, Node, Label, CCInteger, Vec3 } from 'cc';
import { PlayerController } from "./PlayerController";
const { ccclass, property } = _decorator;
enum BlockType{
    BT_NONE,
    BT_STONE,
};

enum GameState{
    GS_INIT,
    GS_PLAYING,
    GS_END,
};
@ccclass("GameManager")
export class GameManager extends Component {
@property({type: Prefab})
public cubePrfb: Prefab|null = null;
@property({type: CCInteger})
public roadLength: Number = 50;
private _road: number[] = [];
@property({type: Node})
public startMenu: Node|null = null;
@property({type: PlayerController})
public playerCtrl: PlayerController|null = null;
private _curState: GameState = GameState.GS_INIT;
@property({type: Label})
public stepsLabel: Label|null = null;
start () {
this.curState = GameState.GS_INIT;
this.playerCtrl?.node.on('JumpEnd', this.onPlayerJumpEnd, this);
}
init() {
if (this.startMenu) {
this.startMenu.active = true;
}
this.generateRoad();
if (this.playerCtrl) {
this.playerCtrl.setInputActive(false);
this.playerCtrl.node.setPosition(Vec3.ZERO);
this.playerCtrl.reset();
}
}
set curState (value: GameState) {
switch(value) {
case GameState.GS_INIT:
this.init();
break;
case GameState.GS_PLAYING:
if (this.startMenu) {
this.startMenu.active = false;
}
if (this.stepsLabel) {
// reset the number of steps to 0
this.stepsLabel.string = '0';
}
// set active directly to start listening for mouse events directly
setTimeout(() => {
if (this.playerCtrl) {
this.playerCtrl.setInputActive(true);
}
}, 0.1);
break;
case GameState.GS_END:
break;
}
this._curState = value;
}
generateRoad() {
this.node.removeAllChildren();
this._road = [];
// startPos
this._road.push(BlockType.BT_STONE);
for (let i = 1; i < this.roadLength; i++) {
if (this._road[i-1] === BlockType.BT_NONE) {
this._road.push(BlockType.BT_STONE);
} else {
this._road.push(Math.floor(Math.random() * 2));
}
}
for (let j = 0; j < this._road.length; j++) {
let block: Node = this.spawnBlockByType(this._road[j]);
if (block) {
this.node.addChild(block);
block.setPosition(j, -1.5, 0);
}
}
}
spawnBlockByType(type: BlockType) {
if (!this.cubePrfb) {
return null;
}
let block: Node|null = null;
switch(type) {
case BlockType.BT_STONE:
block = instantiate(this.cubePrfb);
break;
}
return block;
}
onStartButtonClicked() {
    this.curState = GameState.GS_PLAYING;
}
checkResult(moveIndex: number) {
if (moveIndex <= this.roadLength) {
if (this._road[moveIndex] == BlockType.BT_NONE) {
// ump to the empty square
this.curState = GameState.GS_INIT;
}
} else {
// skipped the maximum length
this.curState = GameState.GS_INIT;
}
}
onPlayerJumpEnd(moveIndex: number) {
if (this.stepsLabel) {
this.stepsLabel.string = '' + moveIndex;
}
this.checkResult(moveIndex);
}
// update (deltaTime: number) {
// // Your update function goes here.
// }
}The end!
Congratulations on completing your first game made with Cocos Creator!
The complete project can be downloaded on our GitHub. The hope is this quick start tutorial will help you understand the Cocos Creator game development process, basic concepts and workflow.
Next, you can continue to improve all aspects of the game. Here are some ideas for improvement:
- Increase the difficulty of the game, when the character stays in place for 1 second it fails.
- Change to infinite runway, dynamically delete the runway that has been run, and extend the runway behind.
- Add game sound effects.
- Add an end menu interface to the game, and count the number of jumping steps and time spent by the player.
- Replace characters and runways with prettier assets.
- Can add some pickable items to guide players to "make mistakes"
- Add some particle special effects, such as trailing when the character moves, dust when landing
- Add two operation buttons for touch screen devices instead of left and right mouse button operation
Lastly, why not share this game with your friends? You can publish the completed game to a server of your choice using the Publishing Workflow documentation.