
- 中文
- Cocos Creator
- Cocos2d-x
- AnySDK
-
Cocos Creator 1.9Version: 1.9
Create a list of dynamically generated content
We can build and edit static UI interfaces with Scene panel easily, but in real world game project it's not enough. We'll need dynamically generated UI elements with data, such as character selection, inventory and level selection.
Prepare data
Let's take an inventory interface as example, we need following data structure to generate an item dynamically:
- Item id
- Icon id, we can put up a icon id to spriteFrame reference dictionary or array
- Item name
- Item price
- ...
We will introduce how to define a data class and generate those data in Properties panel. If you're not familiar with Cocos Creator's component system, please start with Workflow of script development chapter.
Custom data class
For most game project, you can get inventory data from game server. For the simplicity let's define a data class for data structure and input. Let's add a new script ItemList.js and add the following properties:
var Item = cc.Class({
    name: 'Item',
    properties: {
        id: 0,
        itemName: '',
        itemPrice: 0,
        iconSF: cc.SpriteFrame
    }
});

cc.Class({
    extends: cc.Component,
    properties: {
        items: {
            default: [],
            type: Item
        }
    },
});
We defined an Item class at the top of the script for storing and easily updating data needed by item. Please notice this class does not extends cc.Component, so it can be defined as a property type for any component. You can learn more details about data class here Declare class.
After the Item class definition, we defined a component class. Each script file can only contains one component definition and the component name will be the same as the file name. So the component we define is ItemList. In this component we have a list property which type is Item. This way we can populate the list with data input in Properties panel.
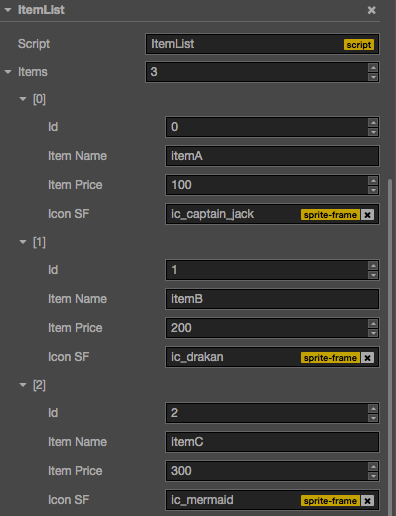
Now let's create an empty node and add ItemList component. We can find Items property in Properties panel. To populate data, let's give the list a length. Type 3 in the field and you can input data like these:
We have our data ready for now, you can also type in more data entries as you wish. If you're making a game with lots of data, please consider using more specialized data source like Excel and database. It's easy to convert such data sources to JSON for the engine.
Make the view for data: Prefab as template
Let's now move on to the 'view' to visualize data, we can use Prefab to do this job. Let's create a prefab that looks like this:

The children icon, name, price will be used to display icon, item name and price from data.
Data binding
You can freely customize the prefab as you need, the picture above only shows an example. Now we need a component script to bind the data to the components that show them. Create a new script ItemTemplate.js and add it to the prefab root node. The script contains:
cc.Class({
    extends: cc.Component,
    properties: {
        id: 0,
        icon: cc.Sprite,
        itemName: cc.Label,
        itemPrice: cc.Label
    }
});
Let's drag all those nodes onto the property fields of ItemTemplate component.

Notice we will assign value for id property through script, no data binding needed.
Update template display with script
Let's modify ItemTemplate.js script to add function to update the render components with input data. Let's add the following to the end of script (inside class definition):
    properties: {
    ...
    },
    // data: {id,iconSF,itemName,itemPrice}
    init: function (data) {
        this.id = data.id;
        this.icon.spriteFrame = data.iconSF;
        this.itemName.string = data.itemName;
        this.itemPrice.string = data.itemPrice;
    }
init method takes a data object and use the data to update each render component on bound nodes. Now we can save Item node as a Prefab asset and use it as the template of our item entries.
Instantiate template with data
Let's go back to ItemList.js script and add reference to our Prefab and them instantiate it with data.
    properties: {
        //...
        itemPrefab: cc.Prefab
    },

    onLoad () {
        for (var i = 0; i < this.items.length; ++i) {
            var item = cc.instantiate(this.itemPrefab);
            var data = this.items[i];
            this.node.addChild(item);
            item.getComponent('ItemTemplate').init({
                id: data.id,
                itemName: data.itemName,
                itemPrice: data.itemPrice,
                iconSF: data.iconSF
            });
        }
    }
In onLoad method we go through each data entry of items list, instantiate itemPrefab for each data entry and call init method of ItemList component to update its display.
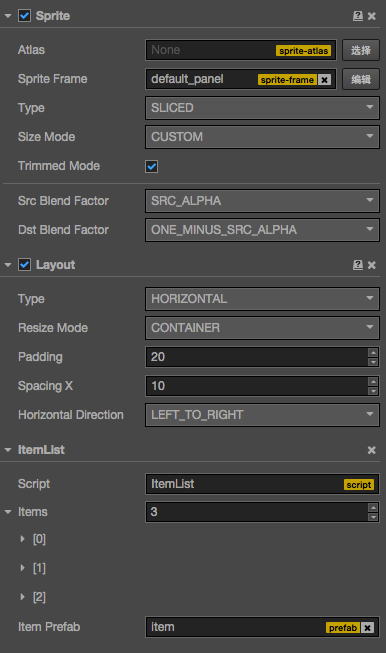
We can also add a Layout component to node that holds ItemList, and set the properties like these:
Type:HORIZONTALResize Mode:CONTAINER
Don't forget to drag and drag item Prefab to itemPrefab property field of ItemList component. You can also add a Sprite component to the node as the background.
We have completed all the work. Now itemList node should look like this:
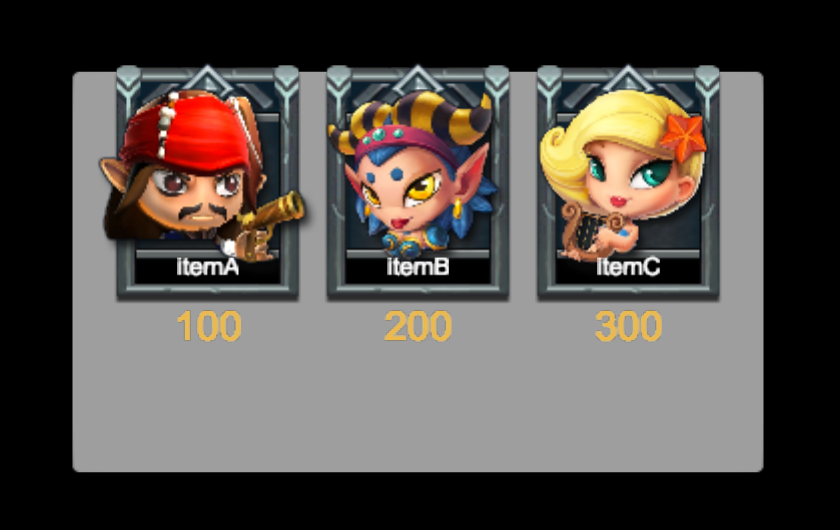
Preview
Running preview of the scene will get the result like this (the actual look depends on how your template was setup and your data):
The Layout component added in previous step is not necessary. We can use it to help putting multiple items in a container in order but you can also use your own logic to do that. You can also add a ScrollView setup to display large amount of content in a limited space. For details of those layout method please read Auto Layout Container and ScrollView Component.