材质系统总览
材质系统控制着每个模型最终的着色流程与顺序,在引擎内相关类间结构如下:
EffectAsset
EffectAsset 是由用户书写的着色流程描述文件,详细结构及书写指南可以参考 Effect 语法。
这里主要介绍引擎读取 EffectAsset 资源的流程:
在编辑器导入 EffectAsset 时,会对用户书写的内容做一次预处理,替换 GL 字符串为管线内常量,提取 shader 信息,转换 shader 版本等。
以 builtin-unlit.effect 为例,编译输出的 EffectAsset 结构大致如下:
{
  "name": "builtin-unlit",
  "techniques": [{
    "name": "opaque",
    "passes": [{
      "program": "builtin-unlit|unlit-vs:vert|unlit-fs:frag",
      "properties": {
        "mainTexture": {
          "value": "grey",
          "type": 28
        },
        "tilingOffset": {
          "value": [1, 1, 0, 0],
          "type": 16
        },
        "mainColor": {
          "value": [1, 1, 1, 1],
          "editor": { "type": "color" },
          "type": 16
        },
        "colorScale": {
          "value": [1, 1, 1],
          "type": 15,
          "handleInfo": ["colorScaleAndCutoff", 0, 15]
        },
        "alphaThreshold": {
          "value": [0.5],
          "editor": { "parent": "USE_ALPHA_TEST" },
          "type": 13,
          "handleInfo": ["colorScaleAndCutoff", 3, 13]
        },
        "color": {
          "editor": { "visible": false },
          "type": 16, "handleInfo": ["mainColor", 0, 16]
        },
        "colorScaleAndCutoff": {
          "type": 16,
          "editor": { "visible": false, "deprecated": true },
          "value": [1, 1, 1, 0.5]
        }
      },

      "migrations": {
        "properties": {
          "mainColor": { "formerlySerializedAs": "color" }
        }
      }
    }]
  }],

  "shaders": [{
      "name": "builtin-unlit|unlit-vs:vert|unlit-fs:frag",
      "hash": 2093221684,
      "glsl4": {
        "vert": "// glsl 460 vert source, omitted here for brevity",
        "frag": "// glsl 460 frag source, omitted here for brevity",
      },
      "glsl3": {
        "vert": "// glsl 300 es vert source, omitted here for brevity",
        "frag": "// glsl 300 es frag source, omitted here for brevity",
      },
      "glsl1": {
        "vert": "// glsl 100 vert source, omitted here for brevity",
        "frag": "// glsl 100 frag source, omitted here for brevity",
      },
      "attributes": [
        { "tags": ["USE_BATCHING"], "name": "a_dyn_batch_id", "type": 13, "count": 1, "defines": ["USE_BATCHING"], "location": 1 },
        { "name": "a_position", "type": 15, "count": 1, "defines": [], "location": 0 },
        { "name": "a_weights", "type": 16, "count": 1, "defines": ["USE_SKINNING"], "location": 2 },
        { "name": "a_joints", "type": 16, "count": 1, "defines": ["USE_SKINNING"], "location": 3 },
        { "tags": ["USE_VERTEX_COLOR"], "name": "a_color", "type": 16, "count": 1, "defines": ["USE_VERTEX_COLOR"], "location": 4 },
        { "tags": ["USE_TEXTURE"], "name": "a_texCoord", "type": 14, "count": 1, "defines": ["USE_TEXTURE"], "location": 5 }
      ],
      "varyings": [
        { "name": "v_color", "type": 16, "count": 1, "defines": ["USE_VERTEX_COLOR"], "location": 0 },
        { "name": "v_uv", "type": 14, "count": 1, "defines": ["USE_TEXTURE"], "location": 1 }
      ],
      "builtins": {
        "globals": {
          "blocks": [
            { "name": "CCGlobal", "defines": [] }
          ],
          "samplers": []
        },
        "locals": {
          "blocks": [
            { "name": "CCLocalBatched", "defines": ["USE_BATCHING"] },
            { "name": "CCLocal", "defines": [] },
            { "name": "CCSkinningTexture", "defines": ["USE_SKINNING", "ANIMATION_BAKED"] },
            { "name": "CCSkinningAnimation", "defines": ["USE_SKINNING", "ANIMATION_BAKED"] },
            { "name": "CCSkinningFlexible", "defines": ["USE_SKINNING"] }
          ],
          "samplers": [
            { "name": "cc_jointsTexture", "defines": ["USE_SKINNING", "ANIMATION_BAKED"] }
          ]
        }
      },
      "defines": [
        { "name": "USE_BATCHING", "type": "boolean", "defines": [] },
        { "name": "USE_SKINNING", "type": "boolean", "defines": [] },
        { "name": "ANIMATION_BAKED", "type": "boolean", "defines": ["USE_SKINNING"] },
        { "name": "CC_SUPPORT_FLOAT_TEXTURE", "type": "boolean", "defines": ["USE_SKINNING", "ANIMATION_BAKED"] },
        { "name": "USE_VERTEX_COLOR", "type": "boolean", "defines": [] },
        { "name": "USE_TEXTURE", "type": "boolean", "defines": [] },
        { "name": "FLIP_UV", "type": "boolean", "defines": ["USE_TEXTURE"] },
        { "name": "CC_USE_HDR", "type": "boolean", "defines": [] },
        { "name": "USE_ALPHA_TEST", "type": "boolean", "defines": [] },
        { "name": "ALPHA_TEST_CHANNEL", "type": "string", "defines": ["USE_ALPHA_TEST"], "options": ["a", "r", "g", "b"] }
      ],
      "blocks": [
        {
          "name": "TexCoords",
          "defines": ["USE_TEXTURE"],
          "binding": 0,
          "members": [
            { "name": "tilingOffset", "type": 16, "count": 1 }
          ]
        },
        {
          "name": "Constant",
          "defines": [],
          "binding": 1,
          "members": [
            { "name": "mainColor", "type": 16, "count": 1 },
            { "name": "colorScaleAndCutoff", "type": 16, "count": 1 }
          ]
        }
      ],
      "samplers": [
        { "name": "mainTexture", "type": 28, "count": 1, "defines": ["USE_TEXTURE"], "binding": 30 }
      ]
    }
  ]
}
这里的信息量不小,但大多数时候这些细节都不需要普通开发者关心,重要的是:
- 对任意目标平台,所有着色必要的基础信息全部都在这里提前准备好,以保证跨平台和最高的运行效率。
- 同时在最后构建时会针对当前平台剔除所有冗余的信息,以保证最好的空间利用率。
Material
Material 资源可以看成是 EffectAsset 在场景中的资源实例,它本身的可配置参数包括:
- effectAsset 或 effectName:effect 资源引用,指定使用哪个 EffectAsset 所描述的流程进行渲染。(必备)
- technique:指定使用 EffectAsset 中的第几个 technique,默认为第 0 个。
- defines:宏定义列表,指定开启哪些宏定义,默认全部关闭。
- states:管线状态重载列表,指定对渲染管线状态(深度模板透明混合等)有哪些重载,默认与 effect 声明一致。
代码示例:
const mat = new Material();
mat.initialize({
  effectName: 'pipeline/skybox',
  defines: {
    USE_RGBE_CUBEMAP: true
  }
});
有了这些信息后,Material 就可以被正确初始化,正确初始化的标志是生成渲染使用的 Pass 对象数组,可用于具体模型的渲染。
根据所使用 EffectAsset 的信息,可以进一步设置每个 Pass 的 uniform 等参数。
mat.setProperty('cubeMap', someCubeMap);
console.log(mat.getProperty('cubeMap') === someCubeMap); // true
这些属性都是在材质资源对象本身内部生效,并不涉及场景。
要将 Material 应用到特定的模型上,需要将其挂载到一个 RenderableComponent 上,所有需要设定材质的 Component(MeshRenderer、SkinnedMeshRenderer 等)都继承自它。
const comp = someNode.getComponent(MeshRenderer);
comp.material = mat;
comp.setMaterial(mat, 0); // 与上一行作用相同
根据子模型的数量,Renderable 也可以引用多个 Material 资源:
comp.setMaterial(mat, 1); // 赋给第二个 submodel
同一个 Material 也可挂载到任意多个 Renderable 上,一般在编辑器中通过拖拽的方式即可自动赋值。
const comp2 = someNode2.getComponent(MeshRenderer);
comp2.material = mat; // the same material above
而当场景中某个模型的 Material 需要自定义一些属性时,会在从 Renderable 获取 Material 时自动做拷贝实例化,创建对应的 MaterialInstance,从而实现独立的定制。
const comp2 = someNode2.getComponent(MeshRenderer);
const mat2 = comp2.material; // 拷贝实例化,mat2 是一个 MaterialInstance,接下来对 mat2 的修改只会影响 comp2 的模型
Material 与 MaterialInstance 的最大区别在于,MaterialInstance 从一开始就永久地挂载在唯一的 Renderable 上,且只会对这个模型生效,而 Material 则无此限制。
对于一个已初始化的材质,如果希望修改最初的基本信息,可以直接再次调用 initialize 函数,重新创建渲染资源。
mat.initialize({
  effectName: 'builtin-standard',
  technique: 1
});
特别地,如果只是希望修改 defines 或 states,引擎提供了更高效的直接设置接口,只需提供相对当前值的重载即可:
mat2.recompileShaders({
  USE_EMISSIVE: true
});
mat2.overridePipelineStates({
  rasterizerState: {
    cullMode: GFXCullMode.NONE
  }
});
注意:这些接口只能调用 MaterialInstance 实例,而不能调用 Material 资源。
每帧动态更新 uniform 值是非常常见的需求,在类似这种需要更高效接口的情况下,可以手动调用对应 pass 的接口:
// 初始化时保存以下变量
const pass = mat2.passes[0];
const hColor = pass.getHandle('albedo');
const color = new Color('#dadada');

// 每帧更新时:
color.a = Math.sin(director.getTotalFrames() * 0.01) * 127 + 127;
pass.setUniform(hColor, color);
Builtins
编辑器内置了几种常见类型的材质,包括无光照的 unlit、基于物理光照的 standard、skybox、粒子、sprite 等。
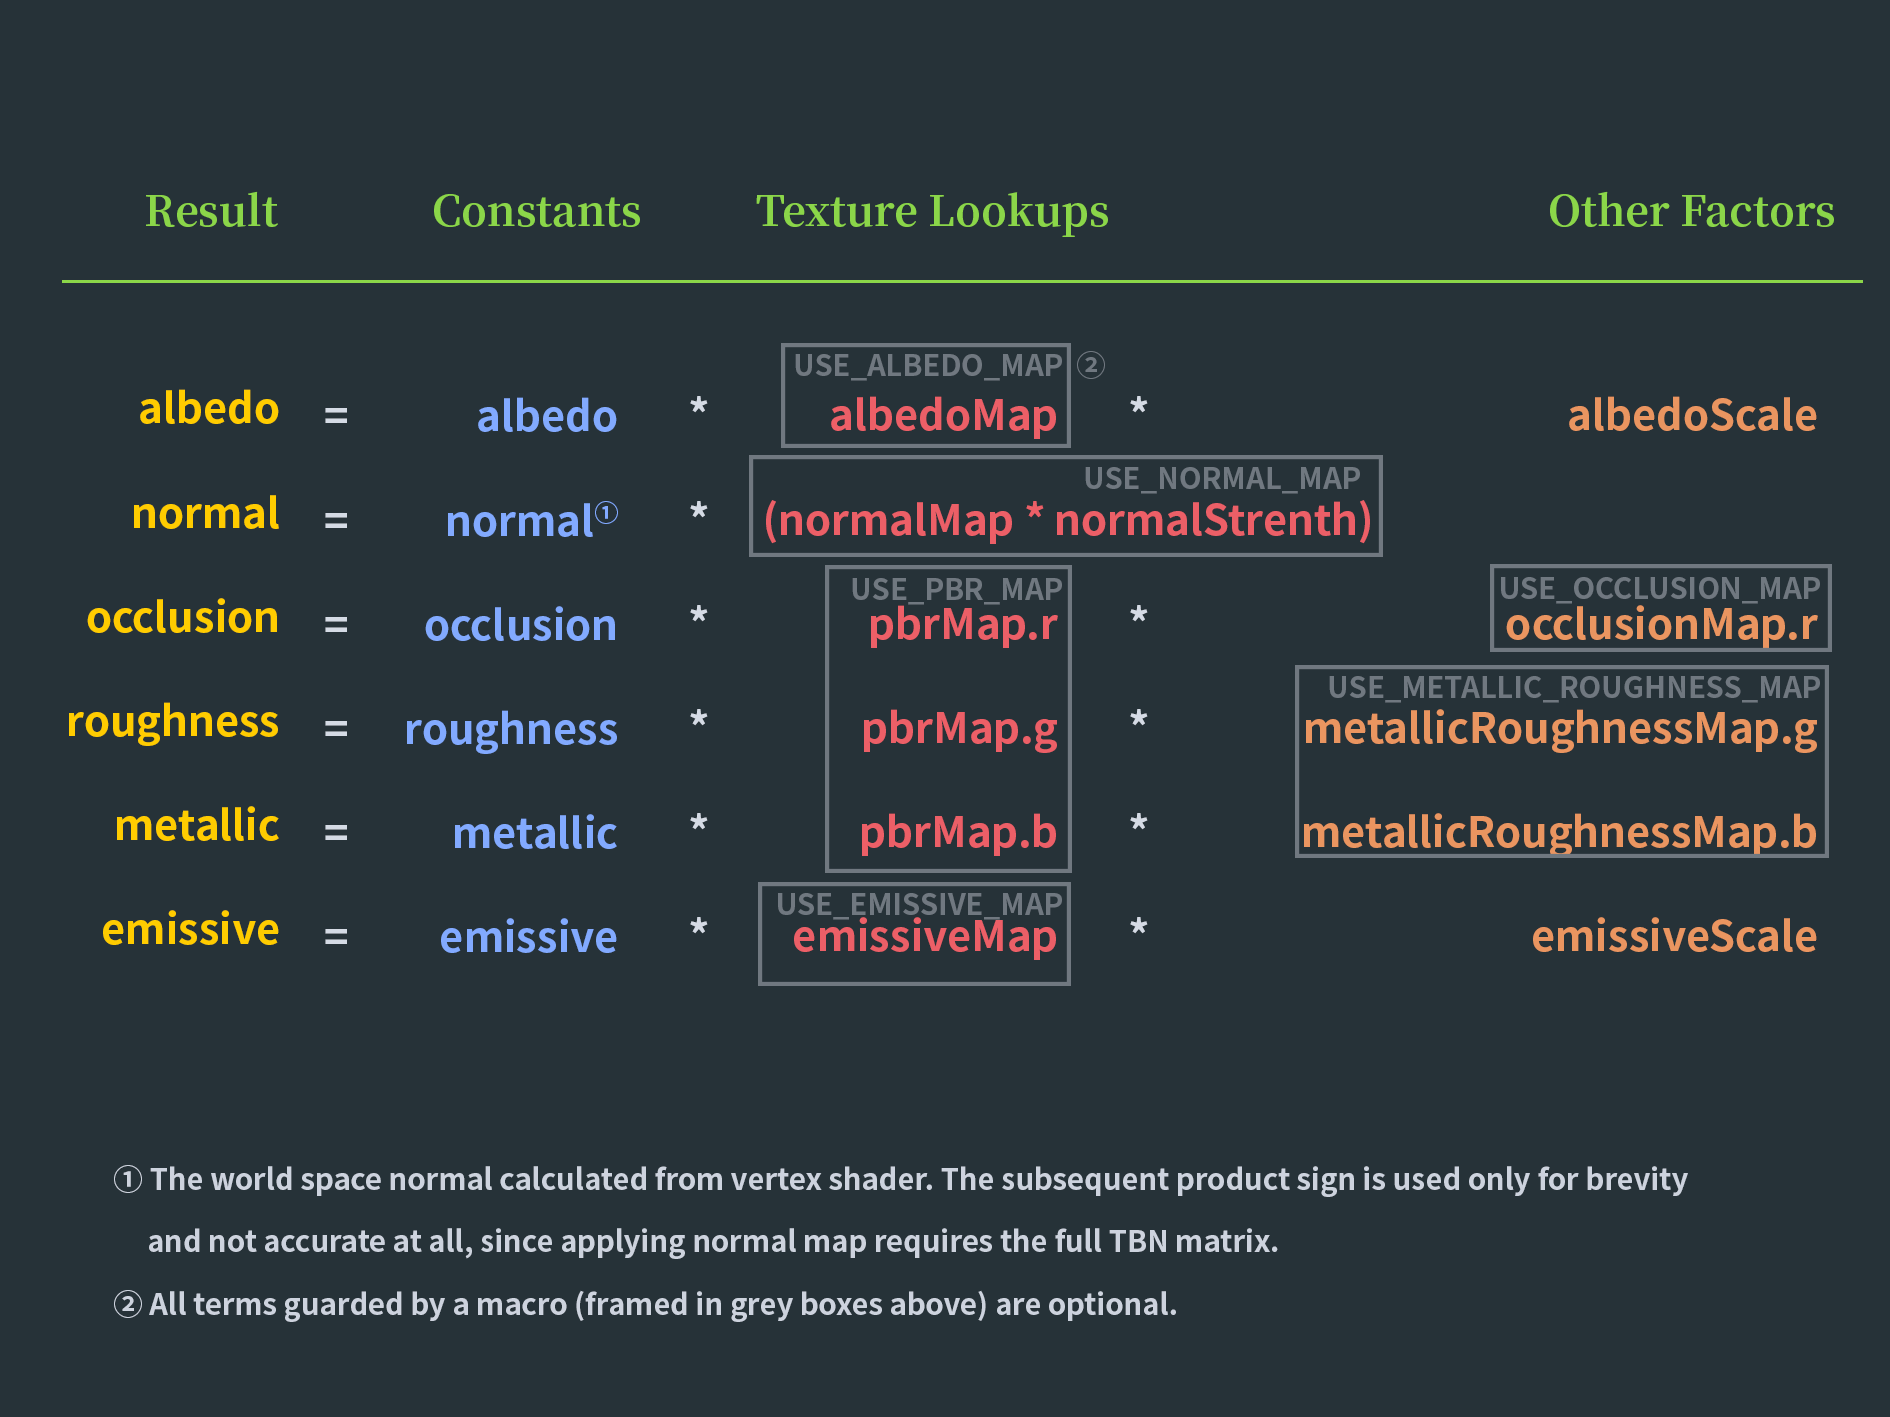
作为参考,下图是 builtin-standard 材质各着色参数的组装流程:

以下是对应参数和宏定义的完整列表:
| 参数 | 说明 |
|---|---|
| tilingOffset | 模型 UV 的平铺和偏移量,xy 对应平铺,zw 对应偏移 |
| albedo/mainColor | 漫反射颜色,指定模型的主要基色 |
| albedoMap/mainTexture | 漫反射贴图,如果有指定,这项会和漫反射颜色相乘 |
| albedoScale | 模型的漫反射强度,用于控制漫反射颜色对于最终颜色的影响权重 |
| alphaThreshold | 启用 alpha test 后的测试阈值。输出的 alpha 值低于此值的像素会被 discard 掉 |
| normalMap | 法线贴图,用于增加表面细节 |
| normalStrenth | 法线贴图强度,控制凹凸质感的强弱 |
| pbrMap R(AO) G(Roughness) B(Metallic) |
PBR 材质参数贴图:环境遮挡、粗糙度和金属度 采样结果会和常数项相乘 |
| metallicRoughnessMap G(Roughness) B(Metallic) |
独立的粗糙度和金属度贴图 采样结果会和常数项相乘 |
| occlusionMap | 独立的环境遮挡贴图 采样结果会和常数项相乘 |
| occlusion | 环境遮挡常数 |
| roughness | 粗糙度常数 |
| metallic | 金属度常数 |
| emissive | 自发光颜色,独立于光照计算,由模型本身直接发散出的颜色 |
| emissiveMap | 自发光贴图 如果有指定,这项会和自发光颜色相乘,因此需要把自发光颜色(默认是黑色)调高才会有效果 |
| emissiveScale | 自发光强度 用于控制自发光颜色对于最终颜色的影响权重 |
相对应的,还有控制这些参数的宏定义:
| 宏定义 | 说明 |
|---|---|
| USE_BATCHING | 是否启用动态 VB 合并式合批 |
| USE_INSTANCING | 是否启用动态 instancing |
| HAS_SECOND_UV | 是否存在第二套 UV |
| ALBEDO_UV | 指定采样漫反射贴图使用的 uv,默认为第一套 |
| EMISSIVE_UV | 指定采样自发光贴图使用的 uv,默认为第一套 |
| ALPHA_TEST_CHANNEL | 指定透明测试的测试通道,默认为 A 通道 |
| USE_VERTEX_COLOR | 如果启用,顶点色会与漫反射项相乘 |
| USE_ALPHA_TEST | 是否开启透明测试(镂空效果) |
| USE_ALBEDO_MAP | 是否使用漫反射贴图 |
| USE_NORMAL_MAP | 是否使用法线贴图 |
| USE_PBR_MAP | 是否使用 PBR 参数三合一贴图(按 glTF 标准,RGB 通道必须分别对应遮挡、粗糙和金属度) |
| USE_METALLIC_ROUGHNESS_MAP | 是否使用金属粗糙二合一贴图(按 glTF 标准,GB 通道必须分别对应粗糙和金属度) |
| USE_OCCLUSION_MAP | 是否使用遮挡贴图(按 glTF 标准,只会使用 R 通道) |
| USE_EMISSIVE_MAP | 是否使用自发光贴图 |
