Cocos Creator
监听和发射事件
监听事件
事件处理大多数是在节点(Node)中完成的。对于组件,可以通过访问节点 this.node 来注册和监听事件。监听事件可以通过 this.node.on() 函数来注册,方法如下:
ts
// 该事件监听每次都会触发,需要手动取消注册
xxx.on(type, func, target?);
其中 type 为事件注册字符串,func 为执行事件监听的回调,target 为事件接收对象。如果 target 没有设置,则回调里的 this 指向的就是当前执行回调的对象。
值得一提的是,事件监听函数 on 第三个参数 target,主要是绑定响应函数的调用者。以下两种调用方式,效果上是相同的
ts
// 使用函数绑定
this.node.on(Node.EventType.MOUSE_DOWN, function ( event ) {
  this.enabled = false;
}.bind(this));

// 使用第三个参数
this.node.on(Node.EventType.MOUSE_DOWN, (event) => {
  this.enabled = false;
}, this);
除了使用 on 监听,我们还可以使用 once 方法。once 监听在监听函数响应后就会关闭监听事件。
事件取消
当我们不再关心某个事件时,我们可以使用 off 方法关闭对应的监听事件。
off 方法的使用方式有两种:
ts
// 取消对象身上所有注册的该类型的事件
xxx.off(type);
// 取消对象身上该类型指定回调指定目标的事件
xxx.off(type, func, target);需要注意的是,off 方法的参数必须和 on 方法的参数一一对应,才能完成关闭。
我们推荐的书写方法如下:
ts
import { _decorator, Component, Node } from 'cc';
const { ccclass } = _decorator;

@ccclass("Example")
export class Example extends Component {
    onEnable () {
        this.node.on('foobar', this._sayHello, this);
    }

    onDisable () {
        this.node.off('foobar', this._sayHello, this);
    }

    _sayHello () {
        console.log('Hello World');
    }
}
事件派发
触发事件有两种方式:emit 和 dispatchEvent。两者的区别在于,后者可以做事件传递。我们先通过一个简单的例子来了解 emit 事件
ts
// 事件派发的时候可以指定派发参数,参数最多只支持 5 个事件参数
xxx.emit(type, ...args);
事件参数说明
在触发事件时,我们可以在 emit 函数的第二个参数开始传递我们的事件参数。同时,在 on 注册的回调里,可以获取到对应的事件参数。
ts
import { _decorator, Component, Node } from 'cc';
const { ccclass } = _decorator;

@ccclass("Example")
export class Example extends Component {
    onLoad () {
        this.node.on('foo', (arg1, arg2, arg3) => {
            console.log(arg1, arg2, arg3);  // print 1, 2, 3
        });
    }

    start () {
        let arg1 = 1, arg2 = 2, arg3 = 3;
        // At most 5 args could be emit.
        this.node.emit('foo', arg1, arg2, arg3);
  }
}
需要说明的是,出于底层事件派发的性能考虑,这里最多只支持传递 5 个事件参数。所以在传参时需要注意控制参数的传递个数。
派发事件
上文提到了 dispatchEvent 方法,通过该方法派发的事件,会进入事件派发阶段。在 Cocos Creator 的事件派发系统中,我们采用冒泡派发的方式。冒泡派发会将事件从事件发起节点,不断地向上传递给它的父级节点,直到到达根节点或者在某个节点的响应函数中做了中断处理 event.propagationStopped = true。
在 v3.0 中,我们移除了 Event.EventCustom 类,如果要派发自定义事件,需要先实现一个自定义的事件类,该类继承自 Event 类,例如:
ts
// Event 由 cc 模块导入
import { Event } from 'cc';

class MyEvent extends Event {
    constructor(name: string, bubbles?: boolean, detail?: any) {
        super(name, bubbles);
        this.detail = detail;
    }
    public detail: any = null;  // 自定义的属性
}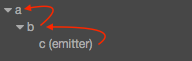
以上图为例,当我们从节点 c 发送事件 “foobar”,倘若节点 a,b 均做了 “foobar” 事件的监听,则事件会经由 c 依次传递给 b,a 节点。如:
ts
// 节点 c 的组件脚本中
this.node.dispatchEvent( new MyEvent('foobar', true, 'detail info') );
如果我们希望在 b 节点截获事件后就不再传递事件,我们可以通过调用 event.propagationStopped = true 函数来完成。具体方法如下:
ts
// 节点 b 的组件脚本中
this.node.on('foobar', (event: MyEvent) => {
  event.propagationStopped = true;
});注意:在发送用户自定义事件的时候,请不要直接创建
cc内的Event对象,因为它是一个抽象类。
事件对象
在事件监听回调中,开发者会接收到一个 Event 类型的事件对象 event,propagationStopped 就是 Event 的标准 API,其它重要的 API 包含:
| API 名 | 类型 | 意义 |
|---|---|---|
| type | String | 事件的类型(事件名)。 |
| target | Node | 接收到事件的原始对象。 |
| currentTarget | Node | 接收到事件的当前对象,事件在冒泡阶段当前对象可能与原始对象不同。 |
| getType | Function | 获取事件的类型。 |
| propagationStopped | Boolean | 是否停止传递当前事件。 |
| propagationImmediateStopped | Boolean | 是否立即停止当前事件的传递,事件甚至不会被分派到所连接的当前目标。 |
系统内置事件
以上是通用的事件监听和发射规则,在 Cocos Creator 中,我们默认支持了一些系统内置事件,可以参考我们后续的文档来查看如何使用:
鼠标、触摸:可参考 系统与节点事件文档
键盘、重力感应:可参考 全局系统事件文档