Cocos Creator
Editing Animation Clips
Once an Animation Clip is attached on to an Animation Component of a node, click Enter animation editing mode or use the shortcut Ctrl/Cmd + E to enter Animation Editing Mode and add keyframe data to the Animation Clip to animate the node. Please refer to the Animation panel documentation before editing animation clips.
An Animation Clip may contain multiple nodes (nodes and their children), and multiple animation properties can be attached to each node. By moving, rotating, or scaling the nodes, keyframes are added to the animation property corresponding to the currently selected node. All the keyframes added to the animation property are displayed in the corresponding animation property as a list pattern of linear trajectories, which are called animation curves.
Creating an Animation Curve
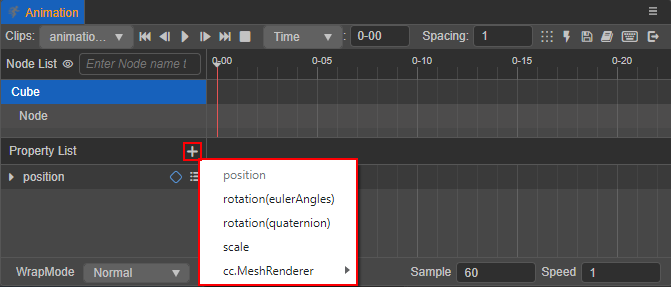
Before adding keyframes, it is necessary to know about animation properties. The animation properties include the node's own position, rotation, scale, and other properties, and also include the custom properties in the component Component. The properties included in the component are preceded by the name of the component, e.g.: cc.Sprite.spriteFrame.
Click the + button in the upper-right corner of the Property List area to add animation properties as needed, depending on the node type. Added animation properties are grayed out and cannot be added repeatedly.
Once the animation properties are added, keyframes can be added to the properties track on the right. When the node and its animation properties are shown in blue in the list, it is determined that the node's properties are the target object for the current keyframe creation. Then, when the corresponding property is modified in the Animation / Inspector / Scene panel, a solid blue diamond will be created on the right side of the animation property where the time control line is located, which is the keyframe (The selected keyframe data can also be modified by this method).
For more information on the design of Animation Curves and how to control them via scripts, please refer to the Using Animation Curve documentation.
Editing Sprite animations
Next, let's take a look at the process of creating a Sprite animation as an example.
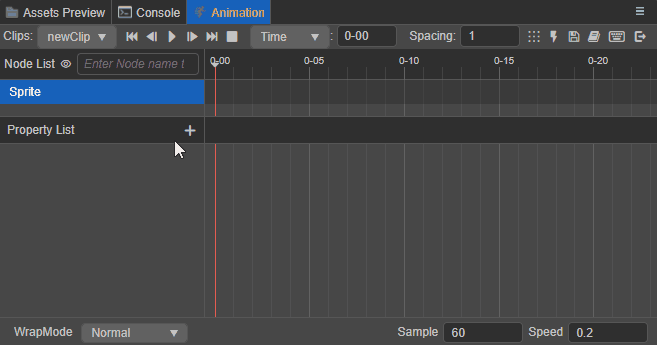
Create a Sprite node.
Create a Sprite node in the Hierarchy panel. Or add a Sprite component to the node by selecting the node and clicking the Add Component button in the Inspector panel and selecting 2D -> Sprite.
Add the Animation Component to the node, attach the Clip file, and enter the Animation Editing Mode. For details, please refer to the Creating Animation Component and Animation Clip documentation.
Add the animation property
cc.Sprite.spriteFrameto the property list.Click the + button in the upper right corner of the property list, then select cc.Sprite -> spriteFrame.
Add a keyframe.
Drag the spriteFrame asset from Assets panel to the property track on the right side of the
cc.Sprite.spriteFrameanimation property, and then drag the spriteFrame to be displayed in the next keyframe to the specified position, or select the needed spriteFrame in the property box above the property track. Play to preview the animation that is just created.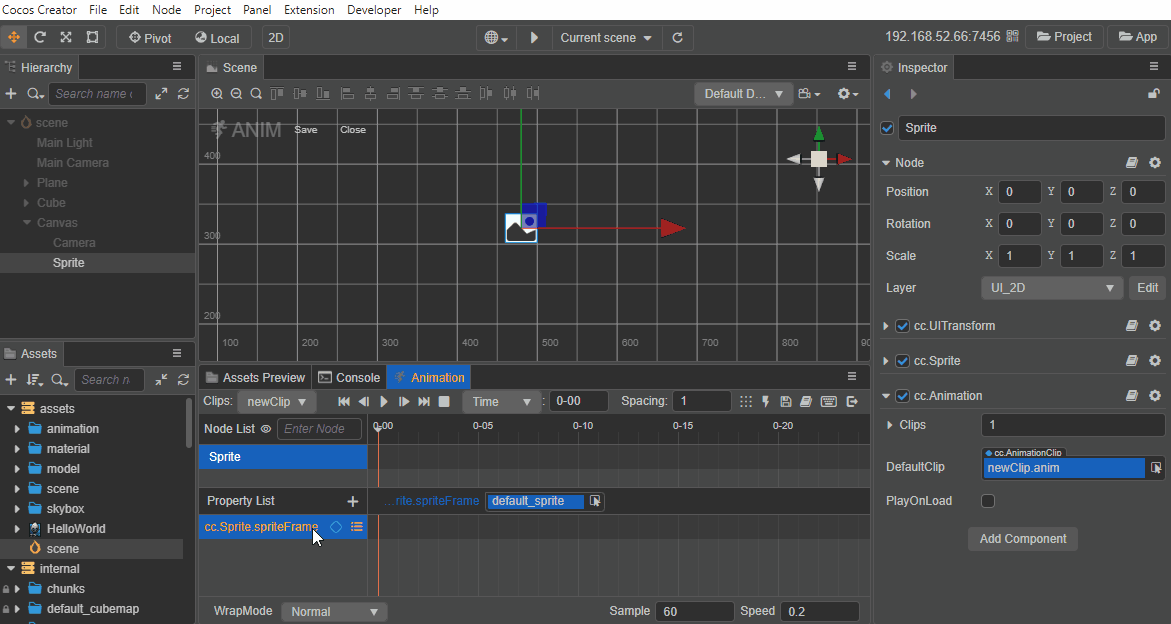
Keyframe data editing
Common operations with node data
The animation clip defines the position of the animation data by the name of the node, itself ignoring the root node, and the rest of the child nodes find the corresponding data by the relative path index to the root node.
Right-clicking on a node in the Node List area of the Animation panel is currently supported to choose between clearing node data, migrating node data, and copying and pasting node data.
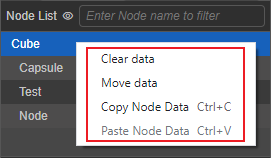
Clearing node data
Right-click the node that needs to clear all animation data (keyframes), then select Clear data, and click Clear in the popup window.
Migrating node data
Right-click the node that needs to migrate all animation data, then select Move Data, the node will show a dynamic dashed box, when the mouse moves to other nodes, it will show the prompt of "Move data to this node", click it and select Move in the pop-up window. If there is no need to migrate, just select Cancel.
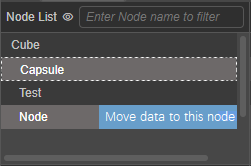
Note: node data migration will overwrite the data on the original node by default.
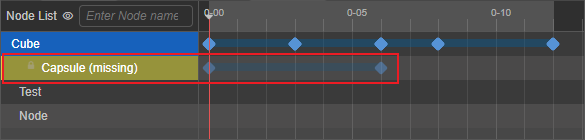
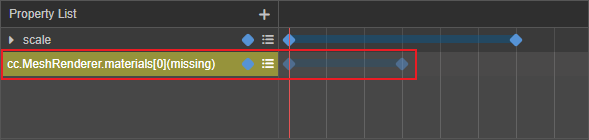
Because the animation clip will record all the node path information that participated in the animation data editing, so when the node information changes (e.g.: node renaming/deletion/move position), which is not consistent with the original saved in the animation clip, the Animation panel will show it in the node list as a yellow uneditable lost state, and the keyframes are also grayed out as uneditable. In this case, the Migrate Data function of the node can be used to migrate the animation data of the missing node to another node.
Copy and paste node data
Copy and paste of node animation data, supports cross-editor (v3.x) usage.
- Copy: Select the node you want to copy data from in the node list, right click and select Copy Data, or use the shortcut Ctrl/Cmd + C to do so.
- Paste: Select the target node in the node list, right click and select Paste Data, or use the shortcut Ctrl/Cmd + V to paste the animation data.
Note: the paste function does not support automatic creation of animation properties, so the copied and pasted nodes must have at least one of the same animation property, if not, please create it in advance. When pasting animation data of multiple nodes on the same node, the animation data of the overlapping part will be overwritten by the latter, and the different parts will be fused with each other.
Edit child node data with the same name
When editing animation data in the animation clip of the parent node, it is possible to also edit the animation data of the child nodes. The animation data will all be saved in the animation clip of the parent node, which is used to achieve effects like moving the hands of the character model with different speeds along with the body, etc. However, if the parent node contains more than one child node with the same name at the same time, only the first child node with the same name will be edited, and the other nodes with the same name will be grayed out to uneditable state.
However, it is supported to add Animation components and animation clips for the same name child node separately and edit them separately.
Common operations for animation property data
Right-click on the animation property or click  button to the right of the track to select Remove property track, Clear keyframe data, or Copy property track.
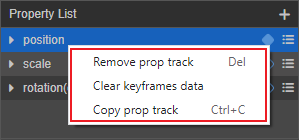
Remove property track: remove the currently selected animation property, including all keyframes on that property track. Or use the shortcut Delete key (Windows) or Cmd + Backspace (macOS).
Clear keyframe data: delete all keyframes on the currently selected animation property track.
Copy animation property track: copy all animation data on the currently selected animation property track and paste it to the target animation property track, supporting the shortcut keys Ctrl/Cmd + C and Ctrl/Cmd + V. When pasting, the overlapping keyframes are overwritten by the latter, and the different parts are blended with each other.
Copy/paste of animation property data between different editors (v3.x) is currently supported. Copy/paste of animation data is only supported for
ccTypedata of the same type.
As with nodes, there is a possibility of missing animation properties. For example, if an property corresponding to an animation property is removed from the Inspector panel, it will be displayed in the animation property list as a yellow uneditable missing state, and the keyframe will be grayed out as uneditable. In this case, either exit edit mode and add the relevant property to the corresponding node or simply remove the missing property track.
Node / Property track keyframe data editing
The Animation panel has two types of view for keyframes: Keyframe Editing View and Curve Editing View. When you enter the Animation panel, the default is keyframe mode, by clicking the switch view button on the side of the property list 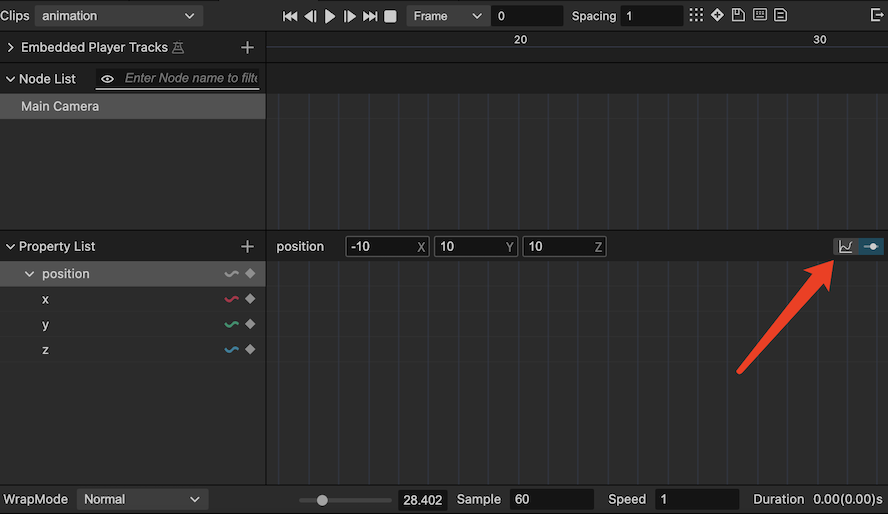 to switch the keyframes in the property track area to the curve editing view, and click it again to return to the keyframe editing view.
Keyframe Editing Mode
For some common keyframe operations in keyframe editing mode, see keyframe editing mode for a description of the documentation.
Curve Editing Mode
For some details of the keyframe operations in curve editing mode, see the curve editing mode documentation.
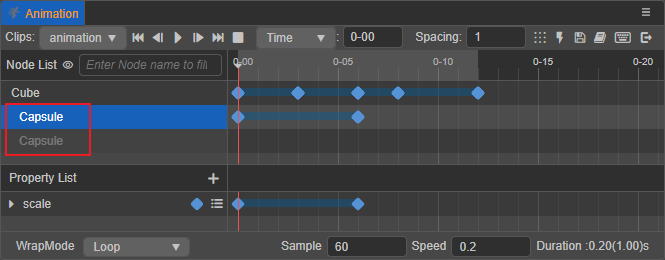
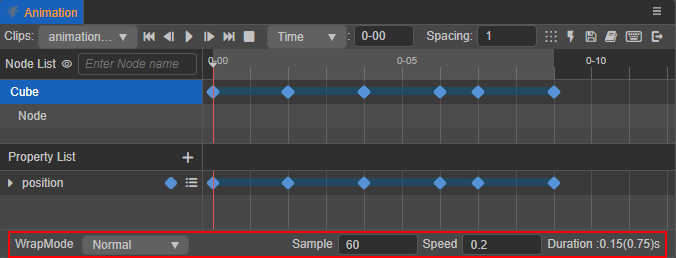
Animation clip property settings
The properties of the current animation clip that can be set directly on the Animation panel include: WrapMode, Sample, Speed and Duration.
WrapMode: use to set the loop mode of the current animation clip, currently include
- Default: the effect is the same as Normal
- Normal: forward single play
- Loop: loop forward
- PingPong: loop in forward and then reverse mode
- Reverse: reverse single play
- LoopReverse: loop reverse
For more information about how to set the loop mode by script code, please refer to Loop Mode.
Sample: define the frame rate per second of the current animation data, i.e. how many frames a second to divide into, default is 60. please refer to the Timeline's scale unit display section above for more details.
Speed: set the speed of current animation, default is 1, the smaller the value the slower the speed.
Duration: the number in front indicates the duration of the animation when the speed is 1, it is determined by the position of the last keyframe. The number in brackets after it indicates the actual running duration, which will change when Speed is adjusted.
Animation clips are reusable and their states are stored in objects called animation states. Through the animation state interface the animation can be controlled by playing, pausing, stopping, shifting, etc. For details, please refer to Animation State.