Cocos Creator
Render Texture
A render texture is a texture on the GPU. Usually, we set it to the camera's target texture, so that the content illuminated by the camera is drawn to the texture via an off-screen frambuffer. This can typically be used to create car mirrors, dynamic shadows, etc.
Creating a RenderTexture
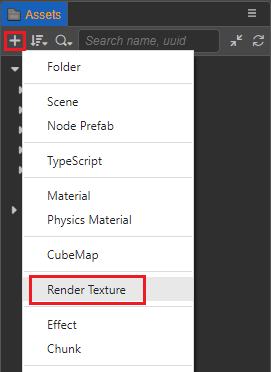
Click the + button in the top left of the Assets panel and select RenderTexture to create a Render Texture:
The properties associated with the render texture asset can then be set in the Inspector panel.
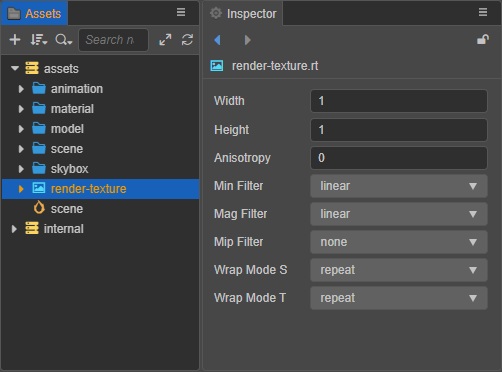
| Property | Description |
|---|---|
| Width | Set the width of the render texture. |
| Height | Set the height of the render texture. |
| Anisotropy | Anisotropy value. |
| Min Filter | Narrowing filtering algorithm. |
| Mag Filter | Amplification filtering algorithm. |
| Mip Filter | Multi-level texture filtering algorithm. |
| Wrap Mode S | S(U) direction texture addressing mode. |
| Wrap Mode T | T(V) direction texture addressing mode. |
Use RenderTexture in editor
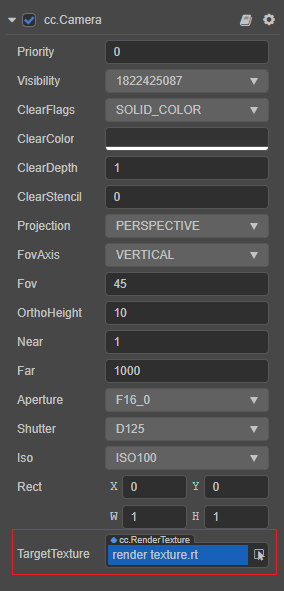
In the camera component, assigning RenderTexture to the camera's TargetTexture property will draw the result of the camera's illumination onto the RenderTexture.
Use RenderTexture in 2D / UI
RenderTexture can be used like a normal texture. Take Sprite Component as an example, drag and drop from Assets panel onto the SpriteFrame property on Sprite's Inspector panel.
![]()
Use RenderTexture in material
To use RenderTexture in material includes the following two steps:
Handle uv in effect asset. Determine
SAMPLE_FROM_RT, and call theCC_HANDLE_RT_SAMPLE_FLIPfunction:#if USE_TEXTURE v_uv = a_texCoord * tilingOffset.xy + tilingOffset.zw; #if SAMPLE_FROM_RT CC_HANDLE_RT_SAMPLE_FLIP(v_uv); #endif #endifSelect the corresponding material in the Assets panel, then check
SAMPLE FROM RTin the Inspector panel: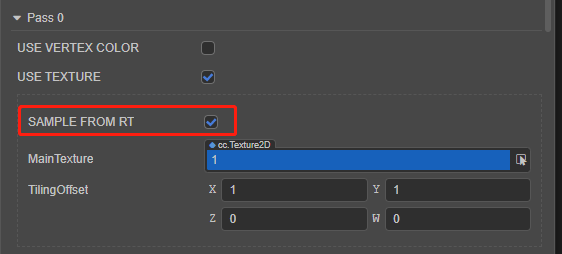
RenderTexture program guide
There are two ways to use RenderTexture programmatically:
Method 1: Draw the contents illuminated by the 3D camera to the sprite frame of the UI.
typescriptimport { _decorator, Component, RenderTexture, SpriteFrame, Sprite, Camera } from 'cc'; const { ccclass, property } = _decorator; @ccclass('CaptureToWeb') export class CaptureToWeb extends Component { @property(Sprite) sprite: Sprite = null; @property(Camera) camera: Camera = null; protected _renderTex: RenderTexture = null; start() { const sp = new SpriteFrame(); const renderTex = this._renderTex = new RenderTexture(); renderTex.reset({ width: 256, height: 256, }); this.camera.targetTexture = renderTex; sp.texture = renderTex; this.sprite.spriteFrame = sp; } }Method 2: Draw the contents illuminated by the 3D camera to the 3D model.
typescriptimport { _decorator, Component, MeshRenderer, RenderTexture, Camera, Material } from 'cc'; const { ccclass, property, requireComponent } = _decorator; @ccclass("RenderCameraToModel") @requireComponent(Camera) export class RenderCameraToModel extends Component { @property(MeshRenderer) model: MeshRenderer = null; start() { const renderTex = new RenderTexture(); renderTex.reset({ width: 256, height: 256, }); const cameraComp = this.getComponent(Camera); cameraComp.targetTexture = renderTex; const pass = this.model.material.passes[0]; // The purpose of setting the 'SAMPLE_FROM_RT' Macro to 'true' is to enable the RenderTexture to display correctly on all platforms const defines = { SAMPLE_FROM_RT: true, ...pass.defines }; const renderMat = new Material(); renderMat.initialize({ effectAsset: this.model.material.effectAsset, defines, }); this.model.setMaterial(renderMat, 0); renderMat.setProperty('mainTexture', renderTex, 0); } }Method 3:Read the content drawn by the 3D camera into the ArrayBuffer through the readPixels method
typescriptimport { _decorator, Component, RenderTexture } from 'cc'; const { ccclass, property } = _decorator; @ccclass("RenderReadPixels") export class RenderReadPixels extends Component { @property(RenderTexture) public renderTexture: RenderTexture; start() { const width = this.renderTexture.width; const height = this.renderTexture.height; const texPixels = new Uint8Array(width * height * 4); this.renderTexture.readPixels(0, 0, this.renderTexture.width, this.renderTexture.height, texPixels); } }Make sure that the shader has a
mainTextureproperty and is enabled in the material if you want to display the drawing results correctly. For example, if using thebuiltin-standardshader, make sure the USE ALBEDO MAP option is checked: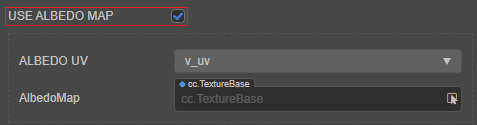
For more information about the usage, please refer to the example RenderTexture (GitHub).