Cocos Creator
Scene Assets
In Cocos Creator, the Scene is the cornerstone for organizing game content during development, and presenting all game content to the players. The Scene itself is a file, also considered a game asset, and saves most of the game's information.
Note: please avoid multiple people modifying the same scene asset at the same time, as this may lead to conflicts that cannot be resolved by
gitmerging.
Creating a Scene
There are three ways to create a Scene:
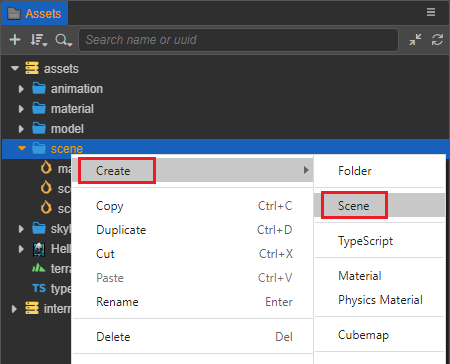
Select the folder to create the Scene file in the Assets panel. On the folder right-click and select Create -> Scene, and then type the desired Scene name.
In order to have a good directory structure in the project, it is strongly recommended that use this method to create a Scene.
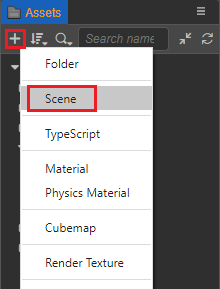
Click the Create (+) button in the upper left corner of the Assets panel, and then select Scene.
Select File -> New Scene in the top menu bar, a new scene will be created directly in the Scene panel. But the new scene file will not appear in the Assets panel, it is required to save the scene file manually in the Save Scene window that pops up when saving the scene, and the
scene.scenefile will appear in the root directory of the Assets panel only after the saving is done.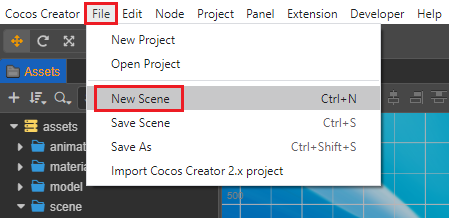
Saving a Scene
Method 1: Use the shortcut keys Ctrl + S (Windows) or Command + S (MacOS) to quickly save the scene.
Method 2: Select File -> Save Scene in the top menu bar.
Switching Scenes
In the Assets panel, double-click the Scene to be opened.
When needing to switch Scenes in the game, use the director.loadScene() API to implement dynamic scene loading and switching in the game.
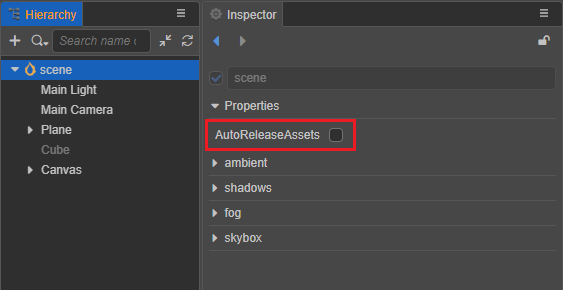
Scene Properties
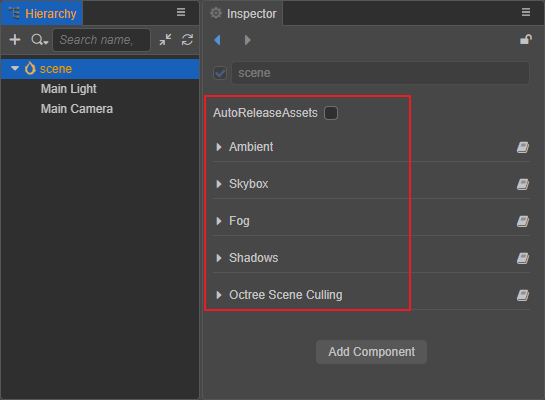
After double-clicking to open the scene file, the scene is the root node of the scene node tree in the Hierarchy panel. Select the scene node, and set whether the scene is automatically released or not in the Inspector panel, as well as the whole scene related properties, including ambient light settings, shadows settings, global fog and sky box settings.
Automatic release of scene assets, please refer to section Change the policy of auto releasing assets from previous scene below for details.
For a detailed description of each property, see the following documentations:
Change the Policy of Auto Releasing Assets from Previous Scene
In a large game where there are many scenes, as the engine continues to load different scenes, the memory usage will continue to increase. Besides using API such as assetManager.releaseAsset to accurately release unused assets, one can also use scene's auto releasing feature.
After double-clicking to open the scene file, select the scene node in the Hierarchy panel to set whether the scene is automatically released in the Inspector panel:
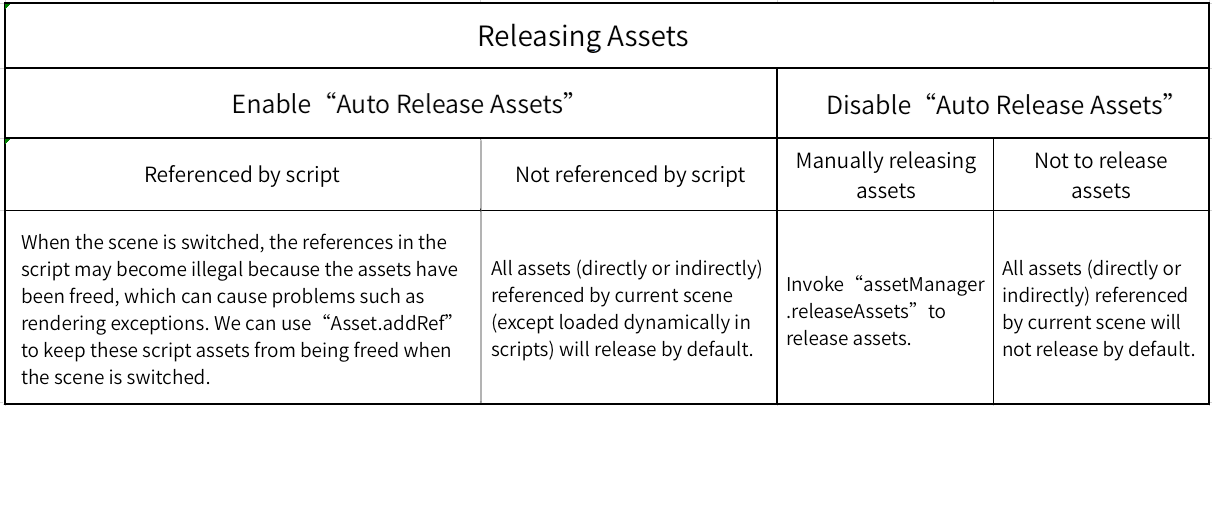
When switching from current scene to the next scene, if current scene disabled the auto releasing, then all assets (directly or indirectly) referenced by current scene (except loaded dynamically in scripts) will not release by default. On the other hand, if enable the auto releasing, then these assets will release by default.
Prevent auto releasing for some specified assets
With the auto releasing enabled for a scene, if some of the scene's assets are saved in the script as "special reference", these references will become invalid once the scene switched, since the asset has been released, may cause rendering problems. To prevent these assets from being released automatically, we can use Asset.addRef to retain them.
"Special reference" refer to references in the form of global variables, singleton, closures, "dynamic assets", and so on.
"Dynamic assets" refer to assets that are dynamically created or dynamically modified in a script.
The above content of the automatic release of scene assets can be summed up in the following diagram of several cases:
For additional information on asset release, please refer to the Release of Assets documentation.