Cocos Creator
Publish from the Command Line
Publish a project from the command line can help us build an auto-publish routine that allows modifying command line parameters to achieve different goals.
Command Reference
For example: Building Web Desktop with debug mode enabled:
Mac
bash/Applications/CocosCreator/Creator/3.0.0/CocosCreator.app/Contents/MacOS/CocosCreator --project projectPath --build "platform=web-desktop;debug=true"Windows
bash...\CocosCreator.exe --project projectPath --build "platform=web-desktop;debug=true"
Currently, when using the command line to build, except for the required build options, if no parameter values are uploaded, the default values are used to build. Please refer to the description below and the platform's build options description for specific default values.
Exit Codes
- 32 Build failed —— Invalid build parameters.
- 34 Build failed —— Some unexpected errors occurred during the build process, please refer to the build log for details.
- 36 Build success.
Publish Parameters
--project: Required, specify the project path.--engine: Optional, specify custom engine path.--build: Specify the parameters to be used when building the project.When parameters are not specified after
--build, then the parameters used in the Build panel, such as platforms, templates, and so on, will be used as default parameters. When additional parameter settings are specified, the default parameters will be overwritten with the specified parameters. The available parameters are:configPath: Parameter file path. If defineconfigPath, then Cocos Creator will load this file as a build parameter in theJSONfile format. This parameter can be modified by yourself or exported directly from the Build panel.stage- Specify the build mode, default is 'build', options are 'make' | 'build'.logDest: Specify the log output path.includedModules: Customize the engine packaged modules, only the required modules are packaged. The corresponding field of each module can be found in thefeaturesfield in this file of engine repository.outputName: The name of the release folder generated after the build.name: Game name.platform: Required, the platform needs to be built.buildPath: Specify the directory where the build release package is generated, the default is thebuilddirectory under the project directory. Either an absolute path or a path relative to the project (e.g.:project://release) can be used. Starting with v3.4.2, relative paths like../are supported.startScene: The UUID of the main scene (the participating scene will use the build option parameters in the Build panel from the last build), and the first scene from the Included Scenes will be used if not specified.scenes: Information about the scenes involved in the build, which defaults to all scenes when not specified.debug: Whether or not debug mode, the default isfalse.replaceSplashScreen: Whether to replace the splash screen, the default isfalse.md5Cache: Enabled or disabled the MD5 Cache, the default isfalse.mainBundleCompressionType: Main bundle compression type. For specific option values, please refer to the document Asset Bundle — compression type.mainBundleIsRemote: Configure the main package as a remote package.packages: The build configuration parameters supported by each plugin. What needs to be stored is the serialized string for the data object. For details, please refer to the following.
Each platform's build will be embedded in the Build panel as a separate plugin, so each platform's build options are in different locations. The build parameters are configured in the packages field, for example, to specify the build options for WeChat Mini Game, the configuration is as follows:
bash
{
    taskName: 'wechatgame',
    packages: {
        wechatgame: {
            appid: '*****',
        }
    }
}
After the build plugin system is opened to the public, the configuration parameters of other plugins are embedded in the Build panel in the same way. Please refer to the documentation of each platform for the specific parameter fields of each platform, it is better to use the Export function of the Build panel to get the configuration parameters. Currently it is still compatible with the old version of the parameters to build, but the compatibility process will be gradually removed later, so please upgrade the configuration parameters as soon as possible.
Bundle Build via Command Line
Open the Bundle Build panel and configure the options. After configuring, export the configuration (since 3.8.2).
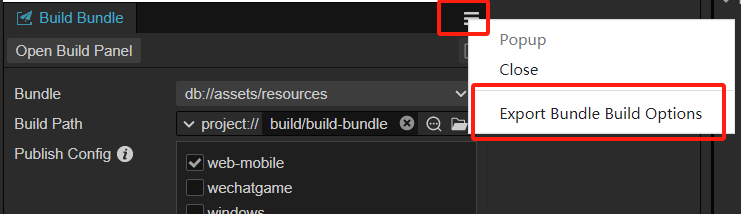 The exported configuration is as follows:json
{
    "buildTaskIds": [
        "1699344873959"
    ],
    "dest": "project://build/build-bundle",
    "id": "buildBundle",
    "bundleConfigs": [
        {
            "root": "db://assets/resources",
            "output": true
        }
    ],
    "taskName": "build bundle db://assets/resources"
}
Execute the following command in the command line:
Mac
bash/Applications/CocosCreator/Creator/3.0.0/CocosCreator.app/Contents/MacOS/CocosCreator --project projectPath --build "stage=bundle;configPath=./bundle-build-config.json;"Windows
bash...\CocosCreator.exe --project projectPath --build "stage=bundle;configPath=./bundle-build-config.json;"
The command line publish of the Bundle is similar to the ordinary command line build, but the stage parameter needs to be specified as bundle, and the configuration exported on the Bundle Build Panel should be specified as the configPath parameter.
- Execute "Build script only" on the command line:
- Mac && Windowsbash
--build "buildScriptsOnly=true"
Publish using Jenkins
Cocos Creator still needs the GUI environment when running from the command line. If the Jenkins server can not run Cocos Creator from the command line, a solution is running Jenkins in agent mode, so it can interact with the operating systems window server. For more details please review this Stack Overflow post.
If the Jenkins server can not compile under Windows, specify a local user for the Jenkins service in the Windows Control Panel -> Administrative Tools -> Services, and then restart the computer. You don't need to set up a master-slave mode separately.