Cocos Creator
Spine Skeletal Component References
The Spine Skeleton components support the data format exported by the official Spine tools, and renders and plays Spine assets.
Select the node and choose Add Component -> Spine -> Skeleton on the Inspector panel to add the Skeleton component to the node.
- For information on using the Spine Skeleton component, please refer to the Spine Skeleton example case for details.
- For Spine Skeleton component related scripting interfaces, please refer to the Spine Skeleton API for details.
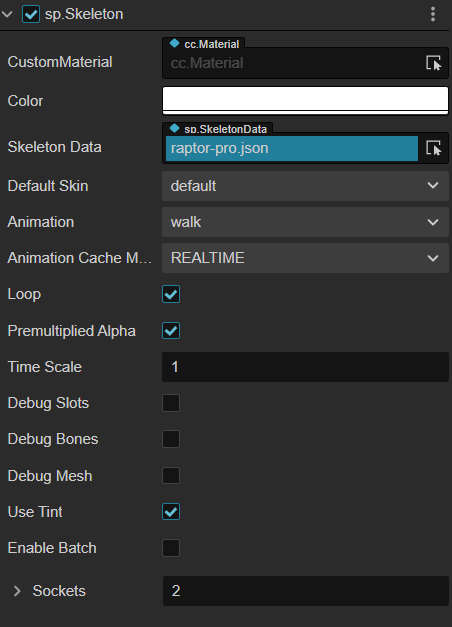
Spine Properties
| Property | Description |
|---|---|
| CustomMaterial | Custom materials that can be used to achieve rendering effects such as dissolve, external glow, etc. Please refer to the Custom Materials documentation for details. |
| Color | Set the skeleton animation color. |
| SkeletonData | Skeleton information data, drag and drop the skeleton assets exported from Spine. into this property |
| Default Skin | Select the default skin. |
| Animation | The name of the currently playing animation. |
| Animation Cache Mode | Rendering mode, the default is REALTIME mode. 1. REALTIME mode, real-time computing, supports all Spine features. 2. SHARED_CACHE mode, caches, and shares skeletal animations and texture data, equivalent to pre-baked skeletal animations. SHARED_CACHE mode has higher performance, but does not support motion fusion, motion overlay, and only supports motion start and end events. As for memory, when creating N (N>=3) animations with the same skeleton and the same action, the memory advantage is obvious. In summary, SHARED_CACHE mode is suitable for scene animations, effects, replica monsters, NPCs, etc., and can greatly improve frame rates and reduce memory consumption. 3. PRIVATE_CACHE mode, similar to SHARED_CACHE, but does not share animation and texture data, and will occupy extra memory, there is only a performance advantage, and it may cause stutter if using this mode a lot to play animation. Use PRIVATE_CACHE to take advantage of the high performance of the cache mode and to also implement texture replacement (which cannot share the texture data). |
| Loop | Whether to loop the current animation. |
| Premultiplied Alpha | Whether to enable premultiplied alpha for the image, default is True. This item needs to be disabled when the transparent area of the image appears as a color block, and enabled when the translucent area of the image turns black. |
| Time Scale | The time scale of all animations in the current skeleton. |
| Debug Slots | Whether to show debug information of slots. |
| Debug Bones | Whether to show debug information of skeletons. |
| Debug Mesh | Whether to show debug information of mesh. |
| Use Tint | Whether to turn on the tinting effect, off by default. |
| Sockets | Used to attach certain external nodes to the specified skeleton joints. The value of the property indicates the number of attachment points. For details, please refer to the description below. |
| Enable Batch | Whether to enable Spine batching |
Notes:
- The
AnchorandSizeproperties on the Node component in the Inspector panel are invalid when using the Skeleton component.- The Spine Skeletal component is a UI renderable component, and the
Canvasnode is the rendering root for UI rendering, the node with this component must be a child of theCanvasnode (or a node with aRenderRoot2Dcomponent) to be displayed properly in the scene.- When using the Spine Skeleton component, since it has the
UseTintproperty, its custom material needs to have two color information, otherwise the Spine staining effect may be wrong. Please refer to the builtin-spine.effect example to achieve this.
Spine ReplaceTexture
Here is an example of how Spine replaces the texture.
First, create a new
Canvasnode in the Hierarchy panel, and then create a new empty node and name it togirlunder theCanvasnode. Select thegirlnode and add the Skeleton component in the Inspector panel, drag and drop the asset into theSkeletonDataproperty box of the Skeleton component. TheAnimationproperty of the Skeleton component can be changed to set the animation that the developer wants to play.
Create a new TypeScript script and name it
SpineSkinin the Assets panel to write the component's script. The script code is as follows:tsimport { _decorator, Component, sp } from 'cc'; const { ccclass, property } = _decorator; @ccclass('SpineSkin') export class SpineSkin extends Component { @property({ type:sp.Skeleton }) spine: sp.Skeleton | null = null; skinId: number = 0; start () { // Your initialization goes here. sp.Skeleton } change() { const skins = ['girl', 'boy', 'girl-blue-cape', 'girl-spring-dress'].map(x=> `full-skins/${x}`); this.skinId = (this.skinId + 1) % skins.length; this.skin!.setSkin(skins[this.skinId]); } // update (deltaTime: number) { // // Your update function goes here. // } }Next, attach the
SpineSkinscript to theCanvasnode, i.e. drag and drop the script into the Inspector panel of theCanvasnode. Drag and drop thegirlnode in the Assets panel into the property boxes corresponding to theSpineSkinscript component and save the scene.
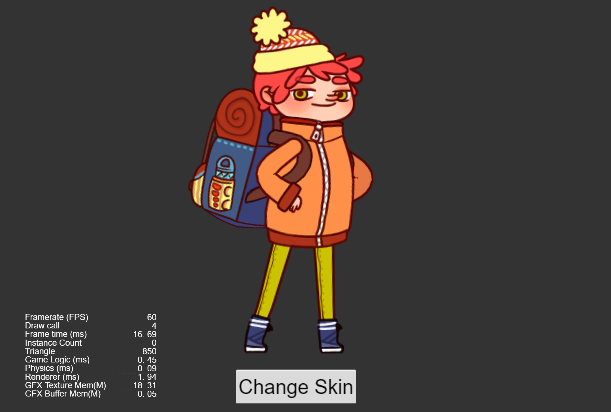
Next, use the Button component's click event to trigger the
changecallback in theSpineSkinscript to replace the texture by clicking the button.Create a new Button node under the
Canvasnode in the Assets panel and name itchange_skin. Adjust its position, size, text display, and other properties as needed.Set the click event of the
change_skinnode in the Inspector panel, drag theCanvasnode attached with theSpineSkinscript component into thecc.Nodeproperty box of theClickEventsproperty, specify script component asSpineSkin, and set the callback tochange.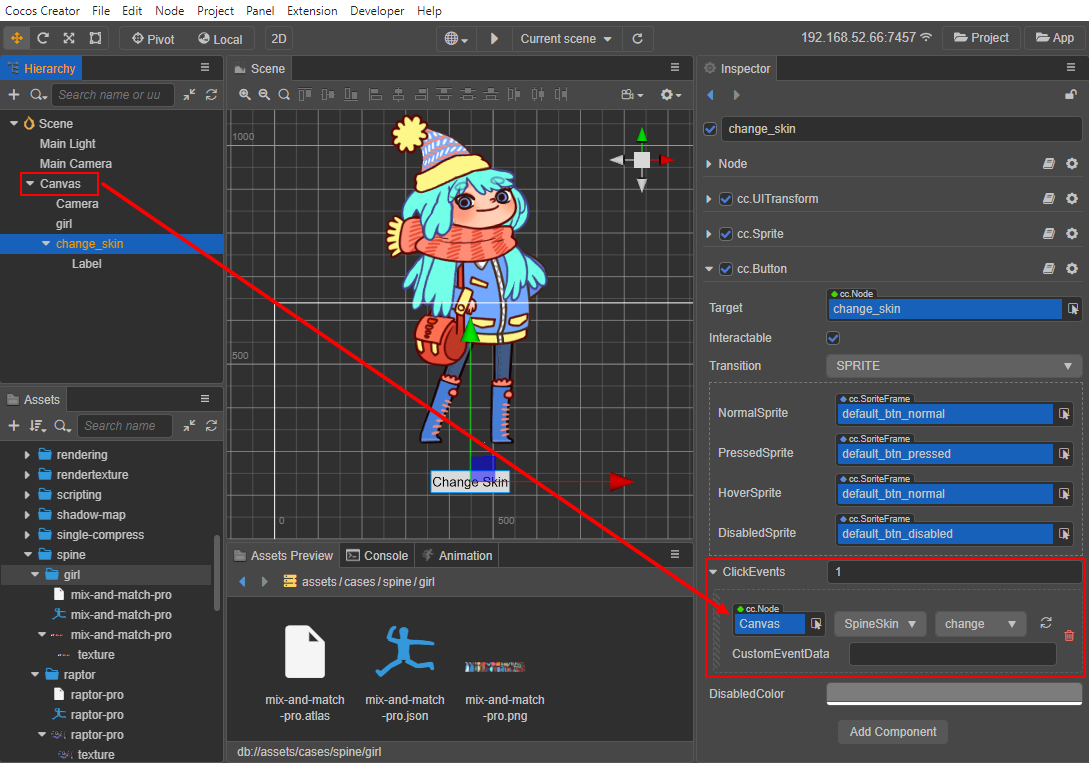
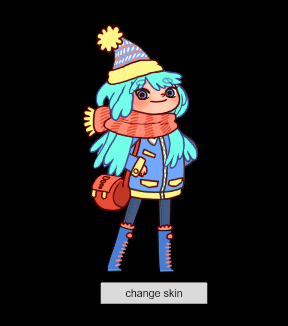
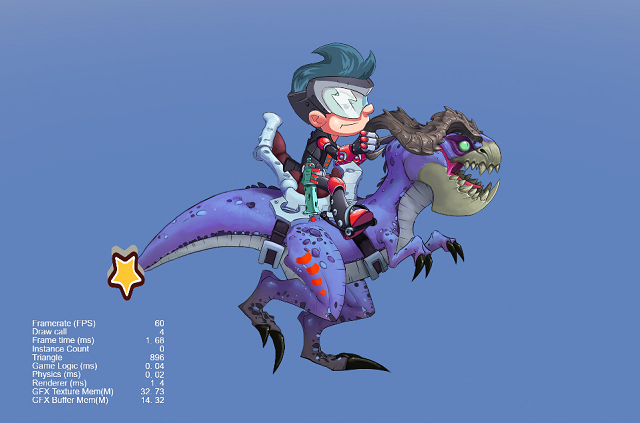
Adjust the scene structure as needed, save the scene and click the Preview button at the top of the editor. Click the change skin button to see that the character skin has been replaced.
Note: if the scene is not displayed when previewing, check that the
Layerproperty of each node is consistent with that of theCameranode.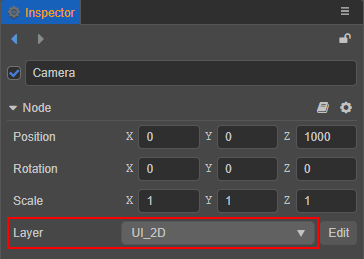
Spine Vertex Effect
The vertex effect is only available when Spine's Animation Cache Mode is in the REALTIME mode. Here is an example of how to set the vertex effect in Spine.
First, create a new
Canvasnode in the Hierarchy panel, and then create a new empty node under theCanvasnode. Select the node and add the Skeleton component in the Inspector panel, drag and drop the asset to theSkeletonDataproperty box of the Skeleton component, and set the Skeleton component properties.Create a new TypeScript script in the Assets panel and name it
SpineExample, write the component script. The script code is as follows:tsimport { _decorator, Component, sp } from 'cc'; const { ccclass, property } = _decorator; @ccclass('SpineExample') export class SpineExample extends Component { @property({ type:sp.Skeleton }) skeleton: sp.Skeleton | null = null; private _jitterEffect?:sp.VertexEffectDelegate; start () { this._jitterEffect = new sp.VertexEffectDelegate(); // Set the jitter parameters. this._jitterEffect.initJitter(20, 20); // Call the 'setVertexEffectDelegate' method of the Skeleton component to set the effect. this.skeleton!.setVertexEffectDelegate(this._jitterEffect!); } };Next, attach the
SpineExamplescript to theCanvasnode, i.e. drag and drop the script into the node's Inspector panel. Drag theSpinenode with the Skeleton component attached in the Hierarchy panel to the correspondingSkeletonproperty box of the script component, and save the scene.Click the Preview button at the top of the editor to see the effect of vertex jitter of the Spine animation. For example, please refer to the SpineMesh example.
Spine Attachment
When using skeleton animation, nodes are often attached on a certain part of the skeleton animation to achieve the effect of linkage between the nodes and the skeleton animation.
Spine Attachments can be implemented by using both editor and script. Here is an example of how Spine uses an attachment to attach a star to the dragon's tail, and shake it with the dragon's tail.
Implementing via the editor
First, create a new
Canvasnode in the Hierarchy panel, and then create a new empty node and name it toSpineunder theCanvasnode. SelectSpineand add the Skeleton component to the Inspector panel. Drag and drop the asset into theSkeletonDataproperty box of the Skeleton component and set the Skeleton component properties.Second, right-click on the Spine node in the Hierarchy panel and select Create -> Empty Node to add a child node for it and name it
targetNode. Create -> 2D Object -> Sprite to add a sprite component namedstarundertargetNode. Drag the star asset to the SpriteFrame property of the Sprite component in the Inspector panel.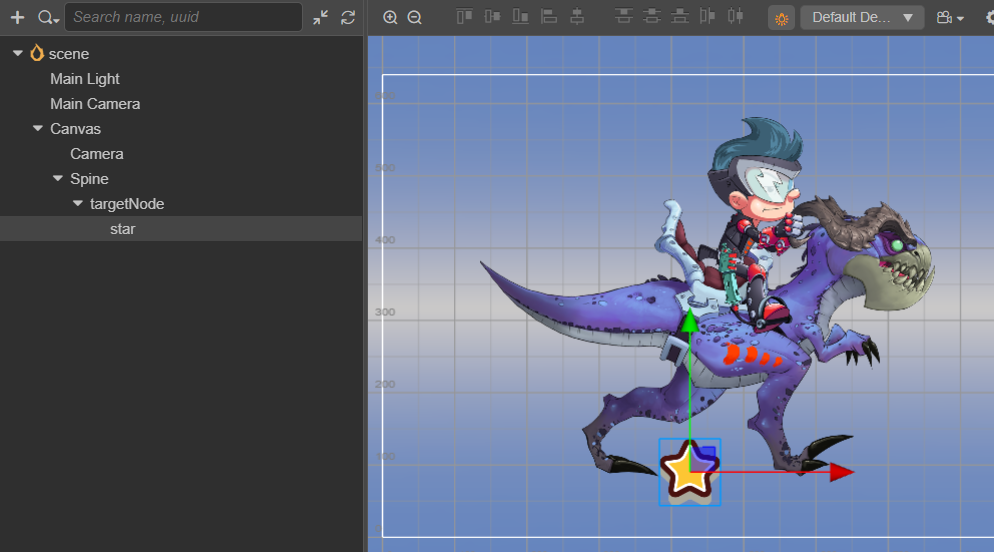
Select the Spine node in the Hierarchy panel, and set the Skeleton component's
Socketsproperty to 1 in the Inspector panel (the value of theSocketsproperty represents the number of attachments).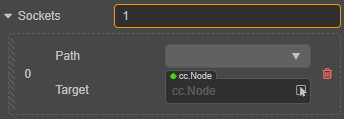
Next, set the Path and Target properties of the Sockets. The Path drop-down box will list all the skeletons, select the target bone you want to attach, here take the dragon's tail as an example, drag the
targetNodenode to the Target property box. Notice the star attached on the dragon's tail in the Scene panel.Note:Do not set the
starnode as Target node, because this will make UITransform ofstarinvalid. Please create a new empty node as the Target node and set components which to be attached as children nodes of **Target ** node.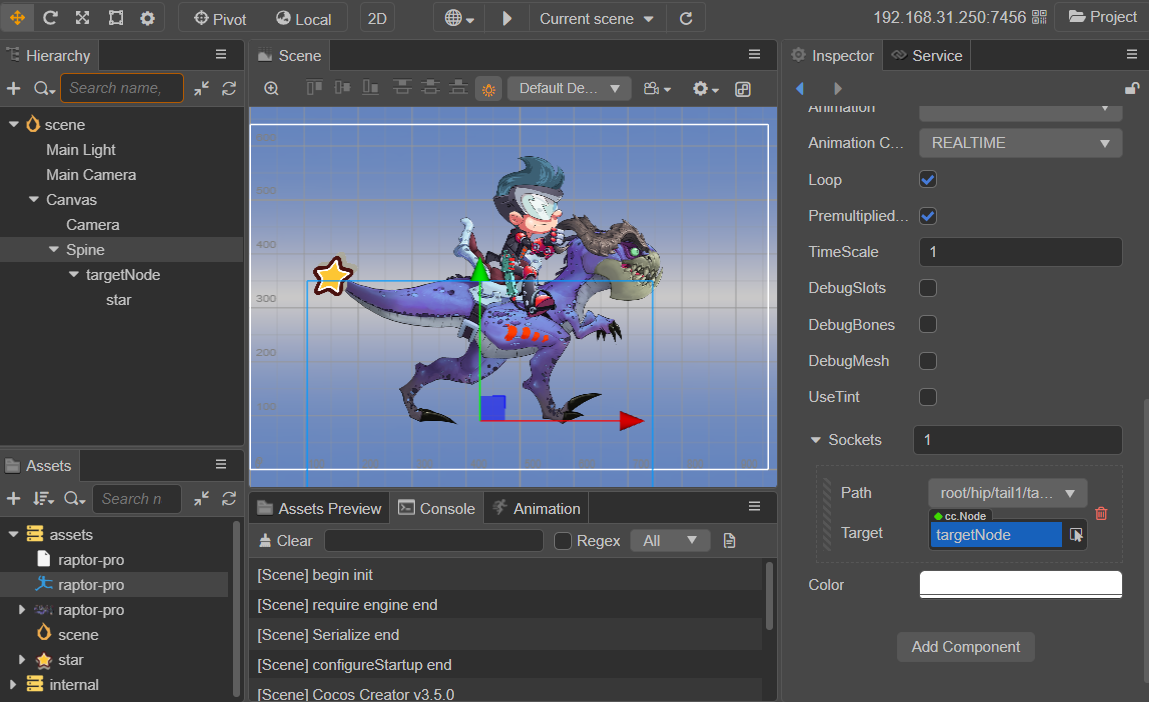
Finally, save the scene and click the Preview button on top of the editor to see the star hanging on the dragon's tail and swaying along with it. Please refer to the SpineAttach example for details.
Implementing via code
The first two steps are the same as those implemented via the editor.
Create a new TypeScript script in the Explorer panel and name it
SpineAttach. Write the component script. The script code is as follows:tsimport { _decorator, Component, sp, Label, Node } from 'cc'; const { ccclass, property } = _decorator; @ccclass('SpineAttach') export class SpineAttach extends Component { @property({ type: sp.Skeleton }) skeleton: sp.Skeleton = null!; @property({ type: Node }) attachNode: Node = null!; start () { var socket = new sp.SpineSocket("root/hip/tail1/tail2/tail3/tail4/tail5/tail6/tail7/tail8/tail9/tail10", this.attachNode); // The first incoming parameter is the target bone of the attachment, and the second incoming parameter is the node of the attachment. this.skeleton!.sockets.push(socket); this.skeleton!.sockets = this.skeleton!.sockets; } }If the name of the target bone is unknown, set the
Socketsproperty in the Skeleton component to 1 and then look for the name of the desired target bone in thePathdrop-down box. When the search is complete, restore theSocketsproperty to 0.Next, attach the
SpineAttachscript to theCanvasnode, i.e. drag and drop the script into the node's Inspector panel. Drag and drop theSpinenode with the Skeleton component attached and thetargetNodenode in the Hierarchy panel to the Skeleton property box and the AttachNode property box of the script component, respectively, and save the scene.Click the Preview button at the top of the editor to see the star hanging from the dragon's tail and shaking along with the dragon's tail.
Spine Collision Detection
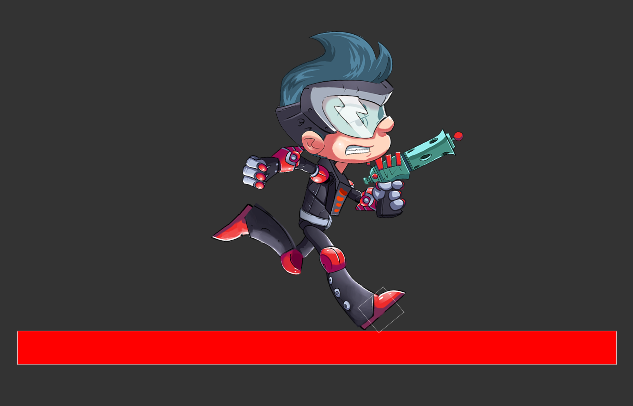
The Spine attachment function allows for the detection of a collision of a part of the skeleton animation. The following is an example of how Spine implements collision detection, by determining whether the character's feet are in contact with the ground or not to dynamically change the ground color when the character is running.
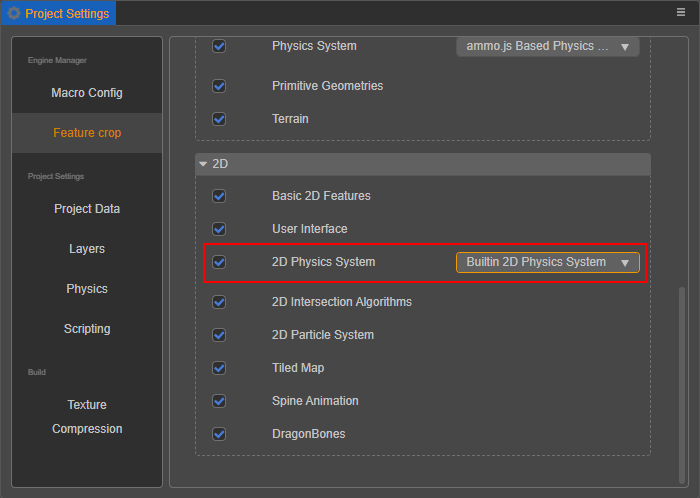
First, set the 2D Physics System to Builtin 2D Physics System in the Project -> Project Settings -> Feature Cropping of the editor menu bar.
Create the Spine node and its children (an empty node and named
frontFoot), as well as the Sprite node as the ground (namedGround), and set the position, size, and other properties, as in the first two steps for the Spine attachment.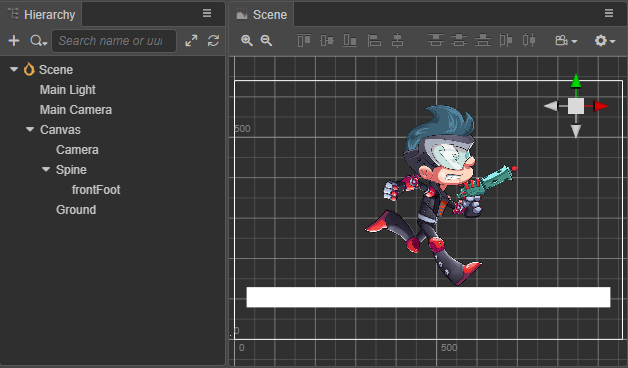
Select the
frontFootnode in the Hierarchy panel, click Add Component -> Physics2D -> Colliders -> Polygon Collider2D in the Inspector panel to add a collision component, and set the collision component parameters.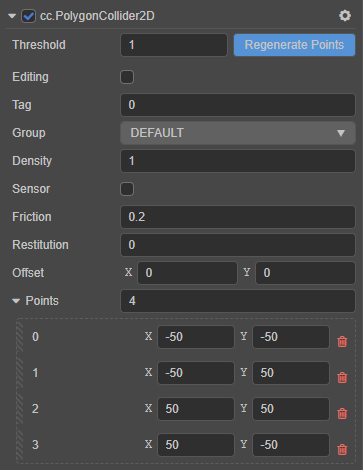
Referring to steps 3 and 4 of the Spine attachment, attach the
frontFootnode to the target bone ("foot" for example) of the Sprite node. ThefrontFootnode will then move along with the skeletal animation, and thus the collision component's bounding box will be synchronized with the skeletal animation in real time.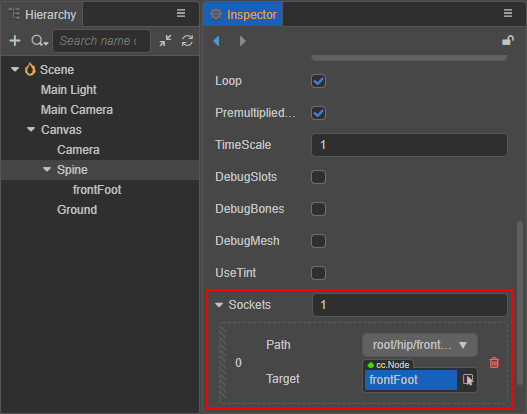
Select the
Groundnode in the Hierarchy panel, click Add Component -> Physics2D -> Colliders -> BoxCollider2D in the Inspector panel to add a collision component, and set the collision component parameters.Create a new TypeScript script in the Assets panel and name it
SpineCollider. Then attach the script on theGroundnode. The script code is as follows:tsimport { _decorator, Component, Node, PhysicsSystem2D, Contact2DType, Collider2D, Color, Sprite, ParticleSystem2D, EPhysics2DDrawFlags } from 'cc'; const { ccclass } = _decorator; @ccclass('SpineCollider') export class SpineCollider extends Component { touchingCountMap : Map < Node, number > = new Map; private debugDrawFlags : number = 0; start () { // Your initialization goes here. PhysicsSystem2D.instance.on(Contact2DType.BEGIN_CONTACT, this.onBeginContact, this); PhysicsSystem2D.instance.on(Contact2DType.END_CONTACT, this.onEndContact, this); this.debugDrawFlags = PhysicsSystem2D.instance.debugDrawFlags; } onEnable () { PhysicsSystem2D.instance.debugDrawFlags = this.debugDrawFlags | EPhysics2DDrawFlags.Shape; } onDisable () { PhysicsSystem2D.instance.debugDrawFlags = this.debugDrawFlags; } addContact (c: Collider2D) { let count = this.touchingCountMap.get(c.node) || 0; this.touchingCountMap.set(c.node, ++count); let sprite = c.getComponent(Sprite); if (sprite) { sprite.color = Color.RED; } } removeContact (c: Collider2D) { let count = this.touchingCountMap.get(c.node) || 0; --count; if (count <= 0) { this.touchingCountMap.delete(c.node); let sprite = c.getComponent(Sprite); if (sprite) { sprite.color = Color.WHITE; } } else { this.touchingCountMap.set(c.node, count); } } onBeginContact (a: Collider2D, b: Collider2D) { this.addContact(a); this.addContact(b); } onEndContact (a: Collider2D, b: Collider2D) { this.removeContact(a); this.removeContact(b); } }Click the Preview button at the top of the editor to see the effect. For details, please refer to the SpineCollider example.
Note: the collision detection based on attachment has a delay of one frame due to the implementation mechanism of the attachment.