Cocos Creator
DragonBones ArmatureDisplay Component References
The ArmatureDisplay component can render and play DragonBones assets.
In the Hierarchy panel, select the node where you want to add the ArmatureDisplay component, and then click the Add Components -> DragonBones -> ArmatureDisplay button under the Inspector panel to add the ArmatureDisplay component to the node.
- For information on using the ArmatureDisplay component, please refer to the DragonBones example case for details.
- For DragonBones ArmatureDisplay related scripting interfaces, please refer to the ArmatureDisplay API for details.
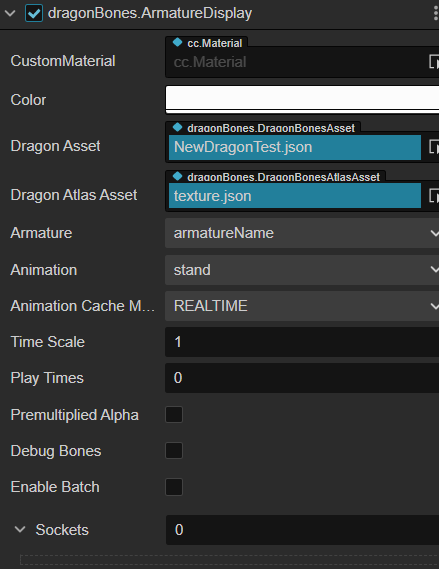
DragonBones Properties
| Property | Description |
|---|---|
| CustomMaterial | Custom materials that can be used to achieve rendering effects such as dissolve, external glow, etc. Please refer to the Custom Materials documentation for details. |
| Color | Set the skeleton animation color. |
| DragonAsset | Skeletal information data that contains skeletal information (bound skeletal actions, slots, render order, attachments, skins, etc.) and animations, but does not hold any state. Multiple ArmatureDisplays can share the same skeletal data. Skeletal assets exported by DragonBones can be dragged and dropped here. |
| DragonAtlasAsset | The Atlas Texture data needed for the skeleton data. Drag and drop DragonBones exported Atlas assets here. |
| Armature | The name of the Armature currently in use |
| Animation | Name of the currently playing animation |
| Animation Cache Mode | Rendering modes, including REALTIME (default setting), SHARED_CACHE and PRIVATE_CACHE. 1. REALTIME mode, real-time computing, supports all DragonBones features. 2. SHARED_CACHE mode, caches and shares skeletal animations and texture data, equivalent to pre-baked skeletal animations. SHARED_CACHE mode has higher performance, but does not support action fusion, action overlay, skeleton nesting, and only supports action start and end events. As for memory, it has a memory advantage when creating N (N>=3) animations with the same skeleton and the same action, the larger the N value, the more obvious the advantage. In summary, SHARED_CACHE mode is suitable for scene animations, effects, replica monsters, NPCs, etc., and can greatly improve frame rates and reduce memory consumption. 3. PRIVATE_CACHE mode, similar to SHARED_CACHE but does not share animation and texture data, so there is no memory advantage, only performance advantage. Use PRIVATE_CACHE to take advantage of the high performance of the cache mode and to also implement texture replacement (which cannot share the texture data). |
| TimeScale | The time scale of all animations in the current skeleton. The default value is 1, which means no scaling. |
| PlayTimes | The number of cycles to play the default animation. -1 means use the default value from the DragonBones resource file. 0 means infinite loop. >0 means loop times. |
| PremultipliedAlpha | Whether the image is enabled for texture pre-multiplied, default is True. This item needs to be turned off when the transparent area of the image appears color blocked. Enabled when the translucent areas of the image become black. |
| DebugBones | Whether to show debug information for bone |
| Sockets | Used to attach certain external nodes to the specified skeleton joints. The value of the property indicates the number of attachment points. For details, please refer to the description below. |
| Enable Batch | Whether to enable batching |
Notes:
- The Anchor and Size properties on the Node component in the Inspector panel are disabled when using the ArmatureDisplay component.
- The ArmatureDisplay component is a UI renderable component, and the
Canvasnode is the rendering root for UI rendering, so the node with this component must be a child of theCanvasnode (or a node with aRenderRoot2Dcomponent) to be displayed properly in the scene.
DragonBones ReplaceTexture
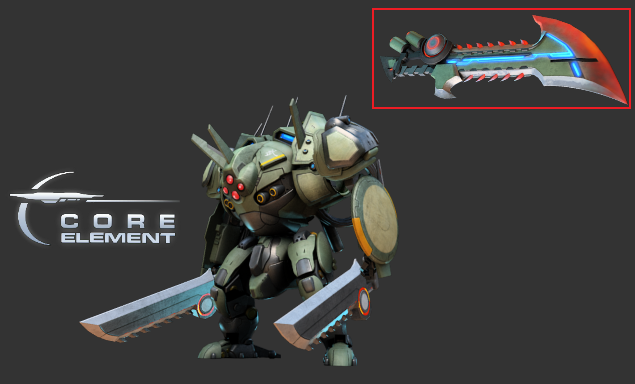
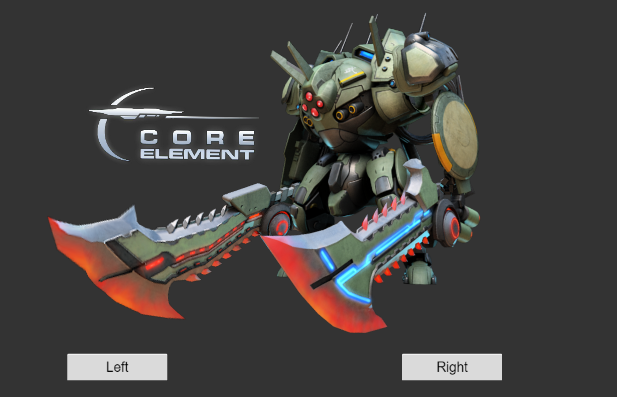
The following is an example of how DragonBones replaces the texture. Replace the weapon in the left or right hand of the robot below with the weapon in the red box by replacing the slot's display object.
First create a new
Canvasnode in the Hierarchy panel, and then create a new empty node and name it toreplaceDBNodeunder theCanvasnode. SelectreplaceDBNodeand add the ArmatureDisplay component to the Inspector panel. Drag and drop the weapon resource in the green box to the property boxes of the ArmatureDisplay component, as shown below: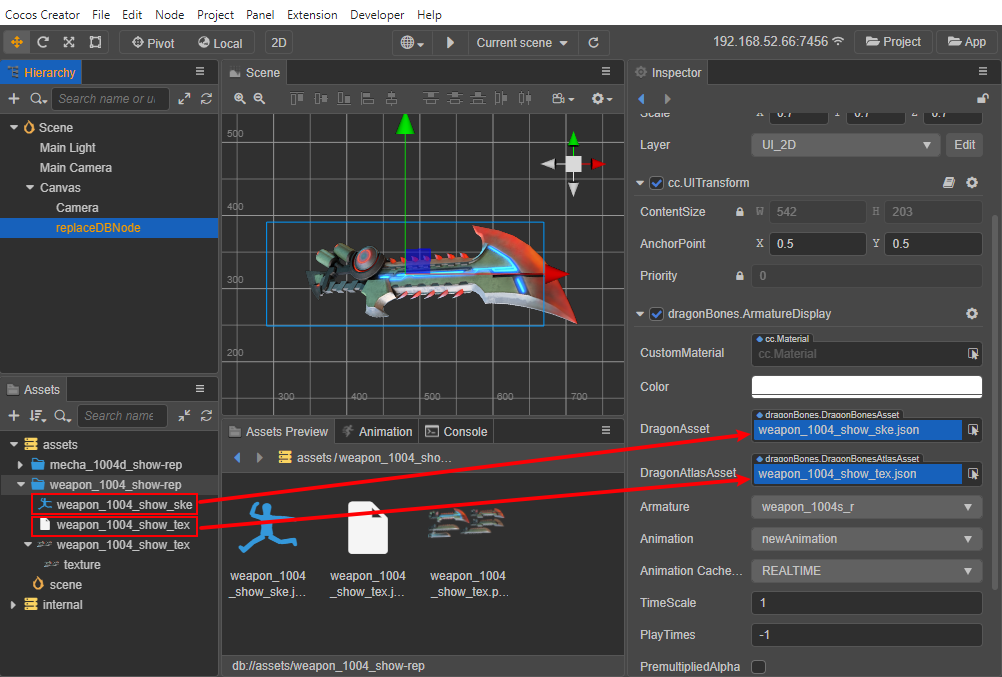
Create a new empty node again and name it to
dbNode. Then add the ArmatureDisplay component to the Inspector panel and drag the robot's assets to the property boxes of the ArmatureDisplay component, as shown below. Change theAnimationproperty of the ArmatureDisplay component to set the animation you want to play.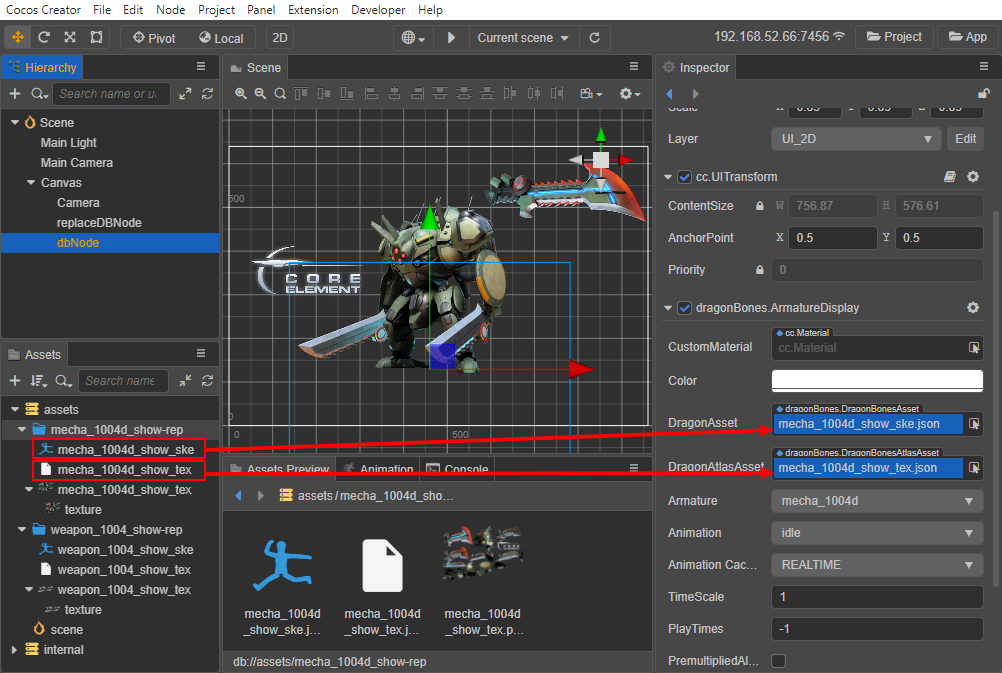
Create a new TypeScript script and name it
ReplaceSlotDisplayin the Assets panel to write the component script. The script code is as follows:tsimport { _decorator, Component, dragonBones } from 'cc'; const { ccclass, property } = _decorator; @ccclass('ReplaceSlotDisplay') export class ReplaceSlotDisplay extends Component { @property({ type: dragonBones.ArmatureDisplay }) armatureDisplay: dragonBones.ArmatureDisplay | null = null @property({ type: dragonBones.ArmatureDisplay }) replaceArmatureDisplay: dragonBones.ArmatureDisplay | null = null; _leftWeaponIndex = 0; _rightDisplayIndex = 0; _rightDisplayNames:string[] = []; _rightDisplayOffset:{x: number, y: number}[] = []; start () { this.replaceArmatureDisplay!.node.active = false; this._leftWeaponIndex = 0; this._rightDisplayIndex = 0; this._rightDisplayNames = ["weapon_1004s_r", "weapon_1004e_r"]; this._rightDisplayOffset = [{ x: 0, y: 0 }, { x: -60, y: 100 }]; } left () { let armature = this.armatureDisplay!.armature(); let slot = armature!.getSlot("weapon_hand_l"); slot!.displayIndex = slot!.displayIndex == 0 ? 4 : 0; } right () { this._rightDisplayIndex++; this._rightDisplayIndex %= this._rightDisplayNames.length; let armature = this.armatureDisplay!.armature(); let slot = armature!.getSlot("weapon_hand_r"); let replaceArmatureName = this.replaceArmatureDisplay!.armatureName; const displayName = this._rightDisplayNames[this._rightDisplayIndex]; let factory = dragonBones.CCFactory.getInstance() as any; factory.replaceSlotDisplay(this.replaceArmatureDisplay!.getArmatureKey(), replaceArmatureName , "weapon_r", displayName, slot); let offset = this._rightDisplayOffset[this._rightDisplayIndex]; slot!.parent.offset.x = offset.x; slot!.parent.offset.y = offset.y; armature!.invalidUpdate(); } }Next, attach the script component to the
Canvasnode, i.e. drag and drop the script into the Inspector panel of theCanvasnode. Drag and drop thedbNodenode andreplaceDBNodenode from the Hierarchy panel into the corresponding property boxes of the script component and save the scene.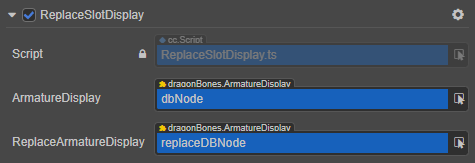
Next, use the Button component's click event to trigger the
leftandrightcallback in theReplaceSlotDisplayscript to replace the texture by clicking the button.Create two new Button nodes under the
Canvasnode in the Assets panel and name themleftandright. Adjust their position, size, text display and other properties as needed.Set the click events for the
leftandrightnodes in the Inspector panel, drag theCanvasnode with theReplaceSlotDisplayscript component attached to thecc.Nodeproperty box of theClickEventsproperty of theleftandrightnodes respectively, specify script component asReplaceSlotDisplay, and set the callback toleft/right(the following figure shows therightnode as an example).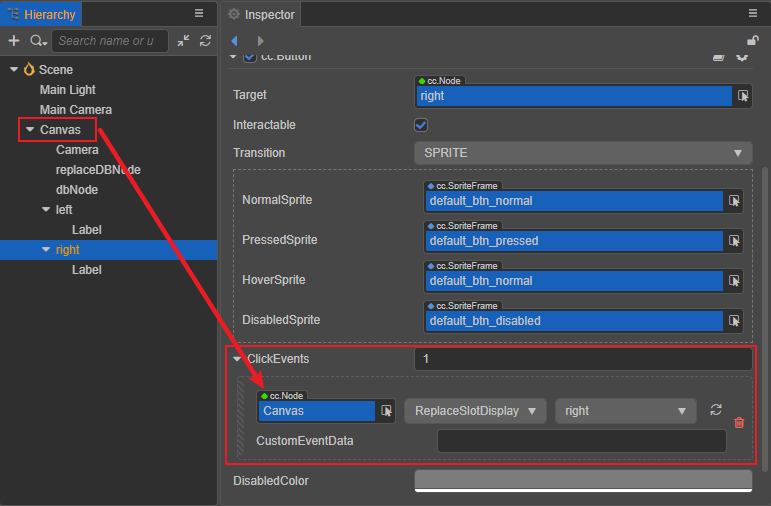
After saving the scene, click the Preview button at the top of the editor, and click the Left/Right button to see that the robot's left/right hand weapons have been replaced. For details, please refer to the ReplaceSlotDisplay example.
Notes:
- After the example is run, the weapon style replaced by the right hand is not consistent with the weapon style prepared in the Scene, which is caused by the resource problem, please refer to the specific code implementation.
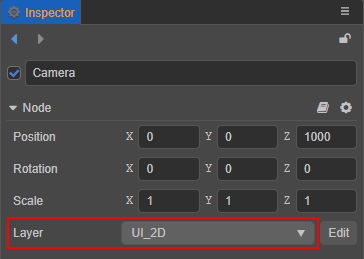
- If the scene is not displayed when previewing, check that the
Layerproperty of each node is consistent with that of theCameranode.
DragonBones Attachment and Collision Detection
DragonBones attachment and collision detection are done in exactly the same way as Spine, please refer to the Spine Attachment and Collision Detection documentation.