Prefab
It is necessary to use Prefabs for Nodes that will be repeatedly generated in a project.
Creating a Prefab
After editing the Node in the Scene, drag the Nodes directly from the Hierarchy Manager to the Assets Panel to complete the creation of the Prefab. After the creation is complete, the original Node will automatically become a Prefab Node, showing in green.

Using Prefabs
Drag a Node from the Assets Panel to the Hierarchy Manager or the Scene Panel to create a Prefab Node in the Scene.
In the Scene, the Prefab Node objects data source comes from the deserialization of the Prefab assets. They are completely independent of each other, multiples can coexist, and there is no data association with the Prefab assets. Assets and Nodes are changed separately unless the Restore from assets orUpdate to assets (described below) is used. Otherwise, they will not affect each other.
Editing Prefab Nodes in a Scene
In the Hierarchy Manager, select the Prefab Node, and notice there are several buttons that can be clicked at the top of the Property Inspector. If you move the mouse up, there will be a text prompt for these functions. The following image describes the functions of the buttons in the red frame area:
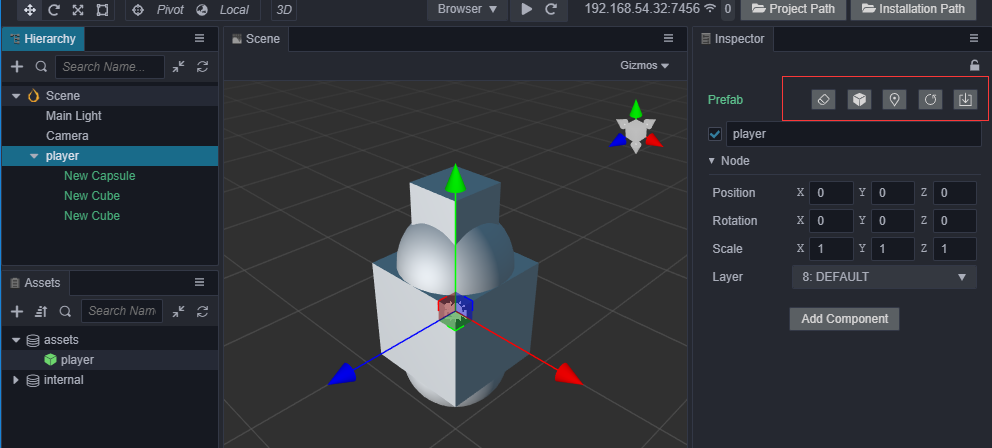
First, revert to normal node. Prefab Nodes can become ordinary Nodes, that is, completely separated from the relationship between assets. This function is available in the top-level menu ,Edit.
Second, associate the Node to another Prefab asset. As a way for Nodes to re-associate assets, you need to first select a Prefab asset in the Asset Manager, and then select a Prefab Node in the Hierarchy Panel to re-associate it. This function is available in the top-level menu, Edit.
Third, locating assets is convenient to quickly locate Prefab assets in the Asset Manager. When there are many assets, the efficiency is higher.
Fourth, you can deserialize a Node object again from the asset and replace the existing node. This operation does not change the uuid of the existing Node. It is usually used when you want the Node to be re-synchronized with the Prefab Asset.
Fifth, when there are new changes to the Node, and you want to update to the associated Prefab asset, you can use this button.
Status of prefab nodes
Prefab Nodes in the Property Inspector render green to indicate normal association with assets and render red to indicate that the associated assets no longer exist.
Entering prefab editing mode
Double-click the Prefab Asset in the Assets Panel to switch from Scene editing mode to Prefab editing mode. You can edit the Prefab Assets in the Editor. After editing, click Save Prefab in the Scene editor to save the edited Prefab Assets. Next, click Close to return to the Scene editing mode.
There is no automatic synchronization between Prefab Nodes and Assets. Manual synchronization is required.
Modifying Prefab Assets in this way will not affect existing Prefab Nodes after saving. If you need to update other such Prefab Nodes in the Scene, and the Scene where the Node is not open, the Scene needs to be opened and edited. Select the Prefab Node, click the Restore option from the Assets button at the top in the Property Inspector. Now, the Node can be updated, the scene saved and the Asset synchronized to the Node.