Project Settings
The Project Settings windows are available from Cocos Creator 3D’s main menu (Project > Project Settings) which includes all the settings related to your project. These settings will be saved in the project's settings / packages folder. If you need to synchronize project settings between different developers, this folder should be added in your source control system.
General
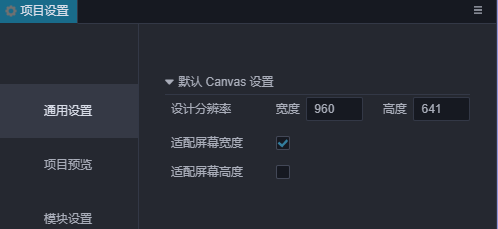
Default Canvas settings
The default Canvas settings include design resolution and adapted screen width/height, which are used to specify the default design resolution value in Canvas when creating a new scene or Canvas component, as well as the Fit Height, Fit Width options.
For more information, please refer to the Multi-resolution adaptation scheme documentation.
Engine Modules
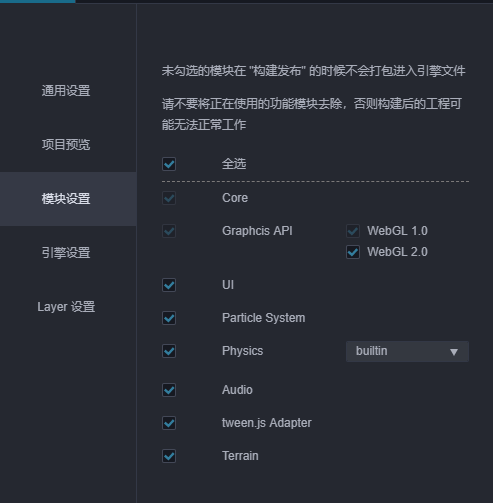
The setting here is to crop the modules used in the engine to reduce the size of the released engine. Modules not selected in the panel will be cropped when they are packaged and previewed. It is recommended to perform a complete test after released to avoid using cropped modules in scenes and scripts.
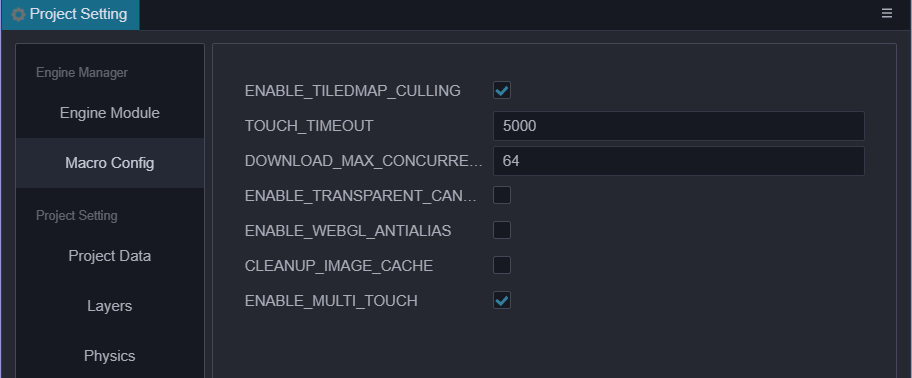
Macro Config
For more information and code of the engine macro module, please refer to the Engine macro documentation.
This panel here provide the convenience to modify the macro configuration. The Macro Config will take effect during preview and build. At the same time, the default value of the current macro configuration will be updated with the configuration of the custom engine.
Texture Compress
As of v1.2, the editor has modified the use of compressed texture configuration to configure presets in project settings and select presets for image asset's inspector. After the old version of the project is upgraded, the editor will automatically scan all the compressed texture configurations in the project and sort out as several presets.
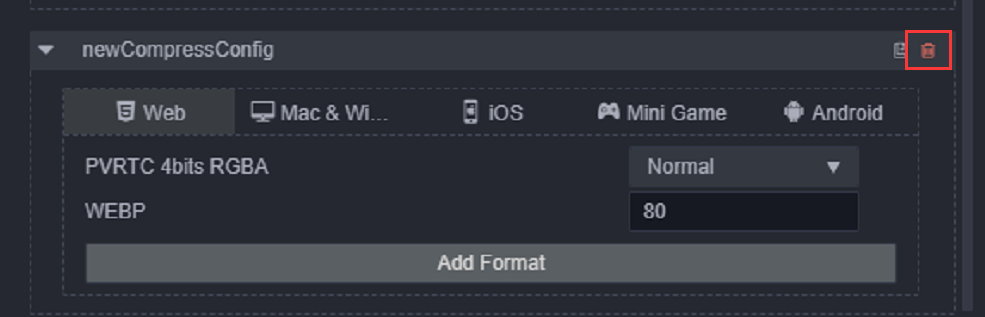
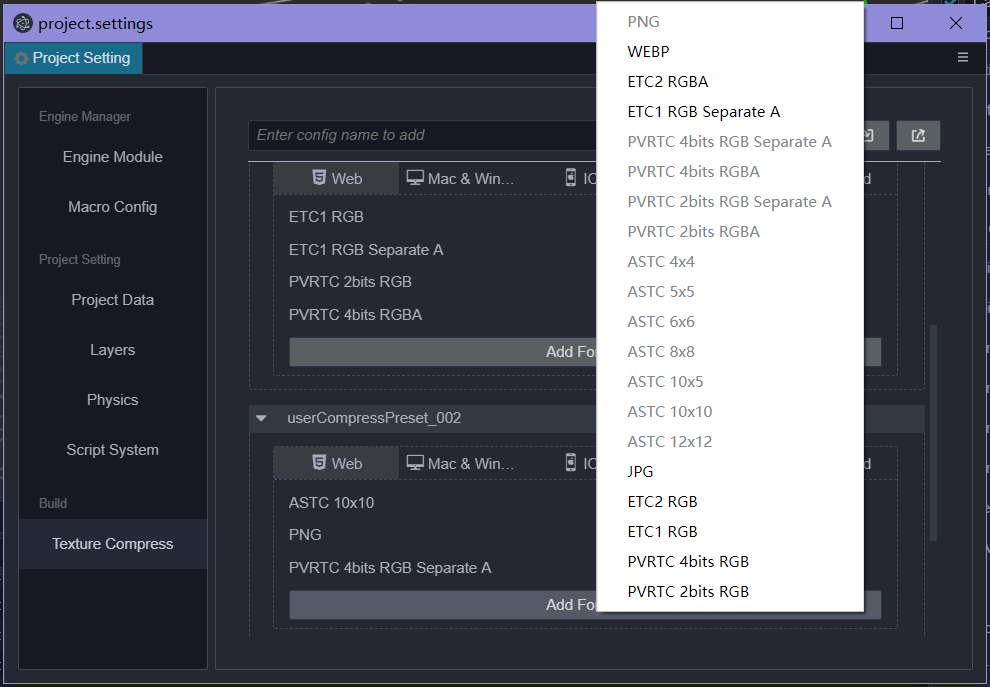
Used to add compressed texture preset configuration, you can directly select the compressed texture preset to quickly add in the inspector of image asset. At the same time, after adding presets, you can also directly modify the presets to update batch texture compress configuration. Project settings allow users to add multiple compressed texture configurations, and each compressed texture configuration allows to add different format for different platform categories.
Platform is rough devised as following:
- Web: refers to the two platforms Web-Mobile and Web-Desktop
- Mac & Windows
- iOS
- Mini Game: Refers to the mini-games of various manufacturers' platforms, such as WeChat Mini Games and Huawei Quick Game Waiting;
- Android
For the detail of the texture compression support of the platforms, please refer to the Compressed Texture Chapter documentation.
Add / remove texture compression presets
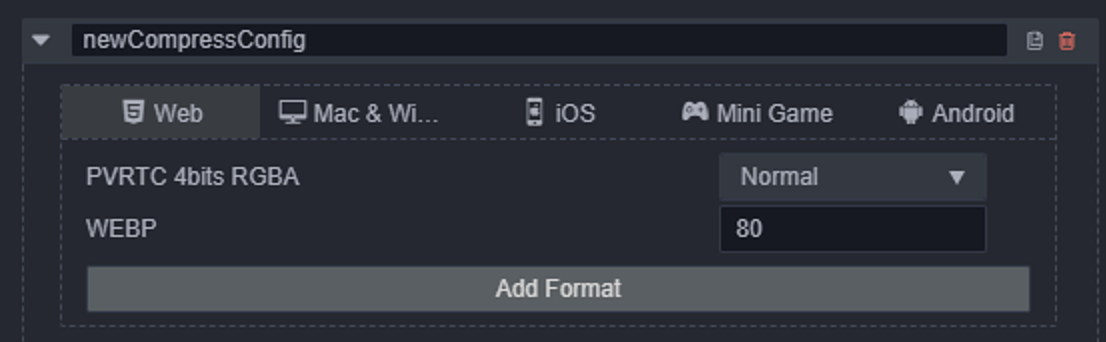
Enter the name of the compressed texture preset in the input box and press Enter or the plus button on the left to add it.

After adding the compressed texture preset, if you need to delete it, you can directly move the mouse to the preset name and click the delete button on the right.
Add / remove texture compression format
Click the Add Format button, select the desired texture format, and configure the corresponding quality level. Currently, only one image format of the same type can be added at the same time.
To delete, move the mouse over the texture format and click the red delete button.
Modify compressed texture preset name
The name of the compressed texture is only used for display. When adding a compressed texture preset, uuid will be randomly generated as the ID of the preset, so directly modifying the preset name will not affect the reference to the preset in the image asset.
Export / import compressed texture presets
The compressed texture configuration page allows developers to import and export compressed texture presets for better cross-project reuse. It is also possible to edit the compressed texture presets externally and import them into the editor.
In most cases, importing and exporting directly works well. If, however, the configuration needs to be customized, please refer to the following interface definitions and examples:
type IConfigGroups = Record<ITextureCompressPlatform, IConfigGroupsInfo>;
type ITextureCompressPlatform = 'miniGame' | 'web' | 'ios' | 'android' | 'pc';
type ITextureCompressType =
    | 'jpg'
    | 'png'
    | 'webp'
    | 'pvrtc_4bits_rgb'
    | 'pvrtc_4bits_rgba'
    | 'pvrtc_4bits_rgb_a'
    | 'pvrtc_2bits_rgb'
    | 'pvrtc_2bits_rgba'
    | 'pvrtc_2bits_rgb_a'
    | 'etc1_rgb'
    | 'etc1_rgb_a'
    | 'etc2_rgb'
    | 'etc2_rgba'
    | 'astc_4x4'
    | 'astc_5x5'
    | 'astc_6x6'
    | 'astc_8x8'
    | 'astc_10x5'
    | 'astc_10x10'
    | 'astc_12x12';
type IConfigGroupsInfo = Record<ITextureCompressType, IQuality>
interface ICompressPresetItem {
    name: string;
    options: IConfigGroups;
}
Example:
{
    "default": {
        "name": "default",
        "options": {
            "miniGame": {
                "etc1_rgb": "fast",
                "pvrtc_4bits_rgb": "fast"
            },
            "android": {
                "astc_8x8": "-medium",
                "etc1_rgb": "fast"
            },
            "ios": {
                "astc_8x8": "-medium",
                "pvrtc_4bits_rgb": "fast"
            },
            "web": {
                "astc_8x8": "-medium",
                "etc1_rgb": "fast",
                "pvrtc_4bits_rgb": "fast"
            },
        }
    },
    "transparent": {
        "name": "transparent",
        "options": {
            "miniGame": {
                "etc1_rgb_a": "fast",
                "pvrtc_4bits_rgb_a": "fast"
            },
            "android": {
                "astc_8x8": "-medium",
                "etc1_rgb_a": "fast"
            },
            "ios": {
                "astc_8x8": "-medium",
                "pvrtc_4bits_rgb_a": "fast"
            },
            "web": {
                "astc_8x8": "-medium",
                "etc1_rgb_a": "fast",
                "pvrtc_4bits_rgb_a": "fast"
            },
        }
    }
}
Layers
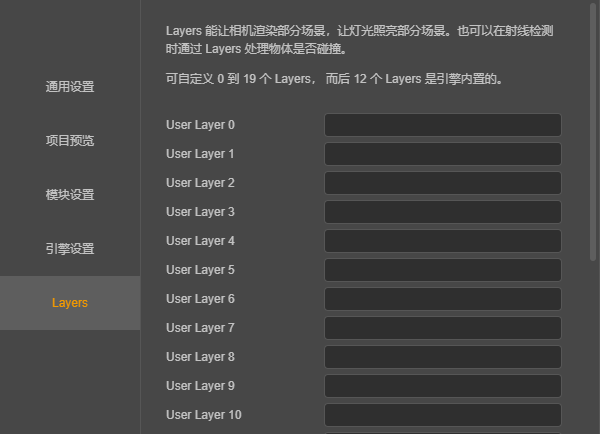
- Layers allows the camera to render part of the scene and let the light illuminate part of the scene.
- You can customize 0 to 19 Layers, and the original settings will be deleted when you clear the input box.
- The last 12 Layers are built-in in the engine and cannot be modified.
The layers of node matches the visibility option of the camera, the camera can only see nodes whose layer is included in the camera's visibility.
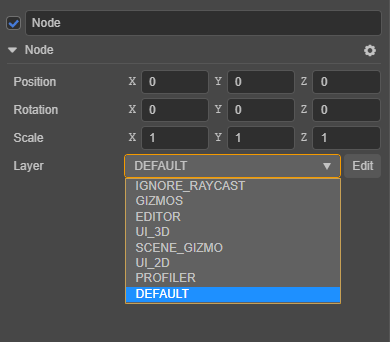
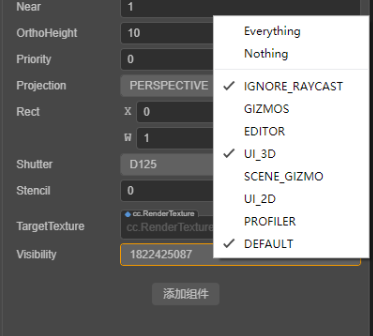 For more instructions, please refer to Camera Component introduction;
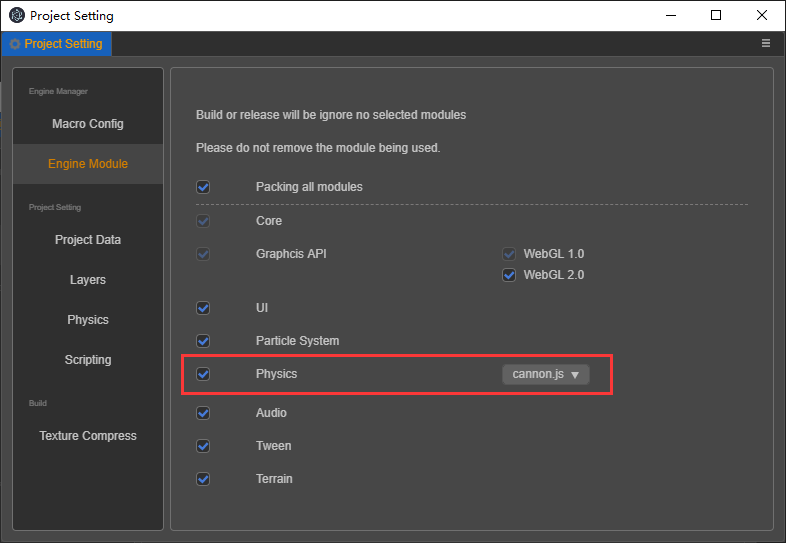
Physics
This physics configuration will be take effect only when the Physics Module is enabled in the Engine Module.
It should be noted that the collision matrix is a further encapsulation of the physical group mask functionality.It is similar to the grouping configuration of Creator 2D, but with some differences. The grouping configuration of Creator 2D is only responsible for initialization, while the grouping configuration of Creator 3D is also responsible for automatic updates (which may be adjusted to be initialization only in the future).
Therefore, after useCollisionMatrix is turned on, the mask value can only be set through the collision matrix, meaning that related apis such as setMask cannot be used. To modify the collision matrix at runtime, please refer to the PhysicsSystem documentation under setCollisionGroup.
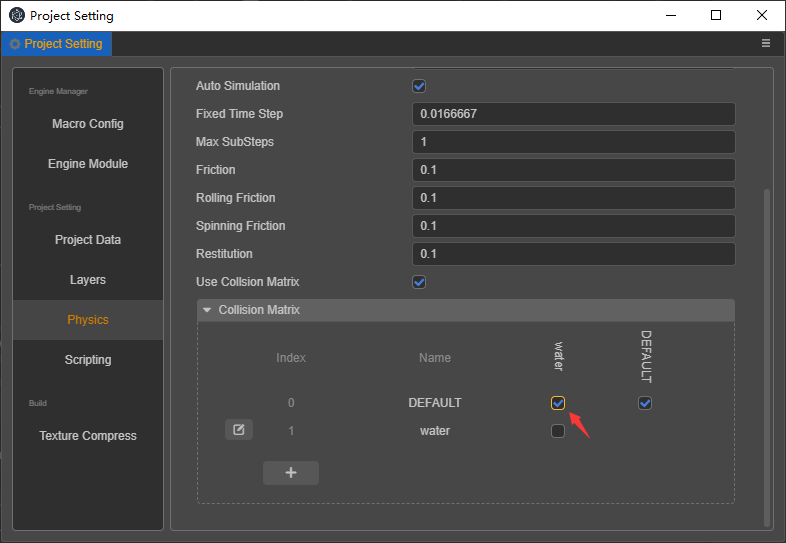
The physical configuration will take effect for both preview and publish environments. It includes parameters like gravity, friction, kinetic energy transfer, and collision detection.
Property description
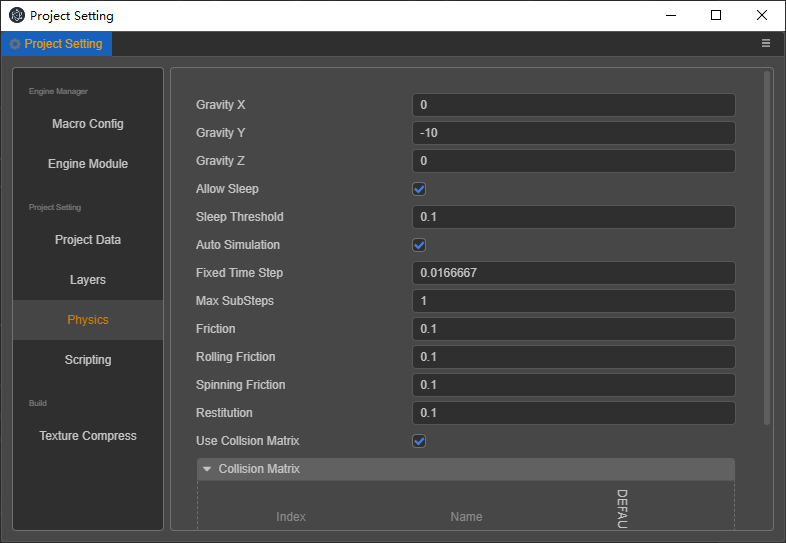
gravityGravity direction vector, the sign means the positive or negative direction on the axis. Default:{ x: 0, y: -10, z: 0 }.allowSleepWhether to allow rigid bodies to enter sleep state. Default:true.sleepThresholdThe maximum speed threshold for entering sleep. Default:0.1,Min:0.autoSimulationWhether to enable automatic simulation.fixedTimeStepFixed time step between each simulation. Default:1/60, Min:0.maxSubStepsMaximum number of substeps per simulation step. Default:1, Min:0.frictionCoefficient of friction. Default:0.5.rollingFrictionRolling friction coefficient. Default:0.1.spinningFrictionSpin friction coefficient. Default:0.1.restitutionCoefficient of elasticity. Default:0.1.useCollisionMatrixWhether to use collision matrix. Default:true.collisionMatrixThe setting result of the collision matrix. Format:{ index: value }, Default:{ "0": 1 }.
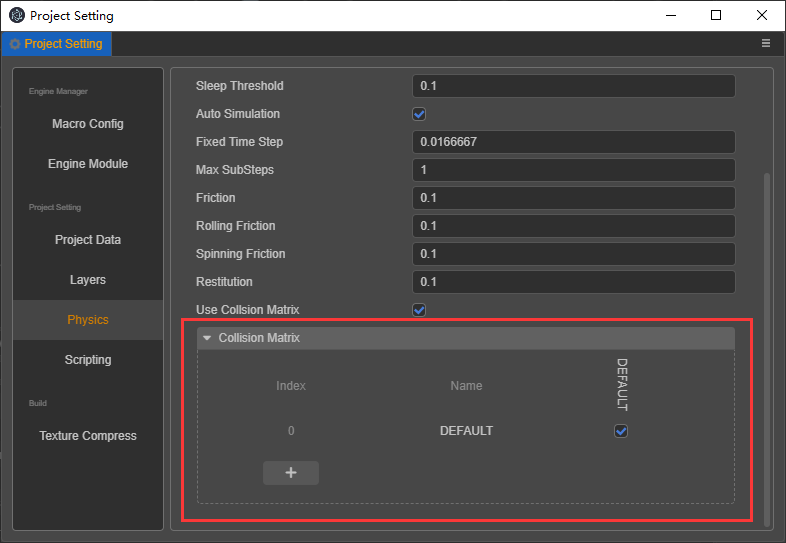
Collision Matrix
The collision matrix is used to manage the group and mask of physical elements. The corresponding mask value will be set automatically after useCollisionMatrix is turned on.This feature is still in its infancy, so please use it with caution.
Grouping concept
In the editor, the grouping format of the collision matrix is {index, name}, index is the number of bits from 0 to 31, and name is the name of the group. The new project project will have a default grouping: {index: 0, name:'DEFAULT'}.
By clicking the + button you can add a new group.
Note: Both
indexandnamecannot be empty and cannot be repeated with existing items; after adding, the group cannot be deleted, only the name of the group can be modified.
How to configure
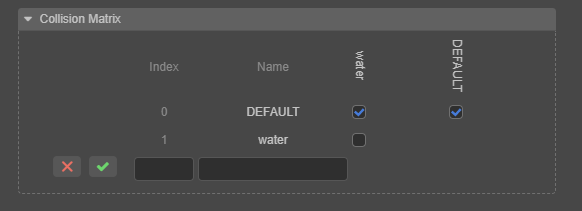
Take a new water group as an example:
This table lists all the groups, and you can check it to determine which two groups will do the collision detection.
As shown in the figure above, whether DEFAULT and water will perform collision detection will be determined by whether the corresponding check box is checked.
According to the above rules, the collision pairs generated in this table are:
- DEFAULT - water
- DEFAULT - DEFAULT
And the grouping pairs that do not perform collision detection include:
- water - water
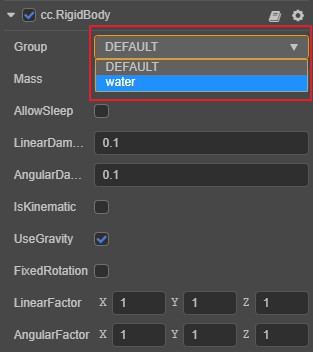
In addition, the Group property on the rigid body component needs to be configured into the corresponding physical element:
Bone map layout settings
Explicitly specify the bone texture layout to assist the instancing of the skinning models. For details, please refer to the Joints Texture Layout documentation.