Publishing to native
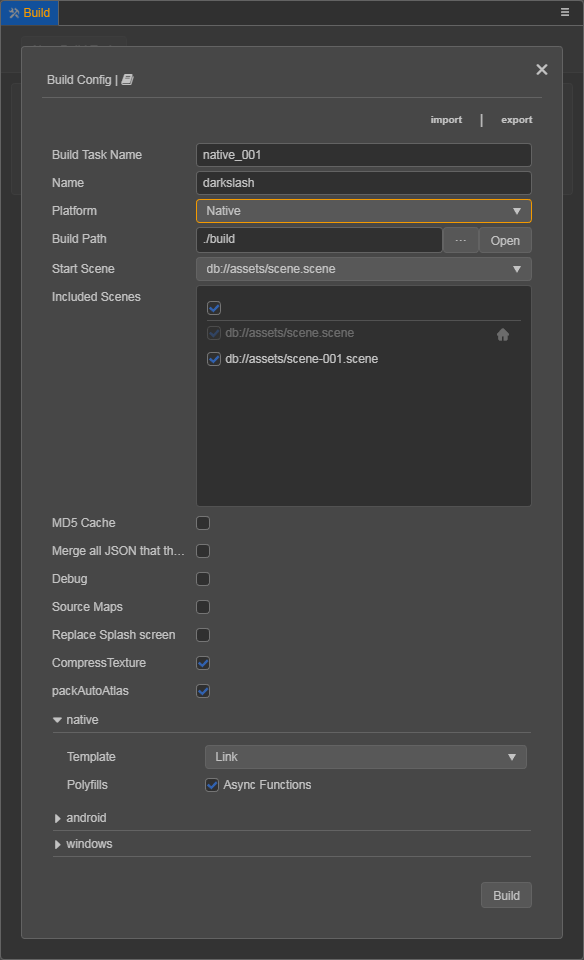
Cocos Creator 3D officially supports the native platform since v1.0.3, click the Project -> Build in the main menu to open the Build panel.
There are four native platforms, which include Android, iOS, Mac and Windows. The options to release games on iOS, Mac and Windows will only appear on those operating systems. This means it isn't possible to publish, for example, a game to iOS from a Windows computer. Currently, all native platforms are packaged together, you can configure the parameters of each native platform in the Build panel, and all native platform release packages can be generated in one build.
Environment Configuration
Please refer to the Setup Native Development Environment documentation for details.
Build Options
For some general build options of platforms, please refer to the General Build Options documentation for details.
The following are specific build options for individual platforms and considerations for general build options.
MD5 Cache
MD5 Cache is used as a generic option, mainly to add MD5 information to all asset file names after the build, solving the CDN asset cache problem during hot update.
When enabled, if any asset fails to load, it is because after renaming the new file, it cannot be found. This is usually because some third party assets used in C++ was not loaded by loader. At this point, you can convert the URL before loading with the following method, to fix the loading problem:
auto cx = ScriptingCore::getInstance()->getGlobalContext();
JS::RootedValue returnParam(cx);
ScriptingCore::getInstance()->evalString("loader.md5Pipe.transformURL('url')", &returnParam);

string url;
jsval_to_string(cx, returnParam, &url);
Native Build Options
Due to the adjustments made to the build mechanism, the processing of the different platforms is provided in the form of plugins. When you select Native in the Platform section of the Build panel, you will see that there is a native option in addition to the build options of a specific platform, and the configuration of native related options will affect all native platforms.

Template
There are two types of available engine templates in the dropdown menu of Template, from which we can choose one:
Default - build the project with the Cocos2d-x source-code version engine.
Link - unlike the Default template, the Link template does not copy the Cocos2d-x source-code to the
builddirectory. Instead, the shared Cocos2d-x source-code is used. This can effectively reduce the footprint of thebuilddirectory, and modifications to the Cocos2d-x source-code can also be shared.
Let's review the concept of the source-code engine:
The Cocos2d-x engine includes the source-code engine. Remember:
- The first time the source-code engine builds and compiles a project, it takes a long time to compile C++ code, depending on the configuration of the computer, which may take 5~20 minutes. After the same project has been compiled once, the time required for the next recompile is greatly shortened.
- The projects built by the source-code engine, compiled and run using native development environment (such as Android Studio, Xcode, etc. IDE), and also can be debugged and error captured.
The Cocos Creator 3D installation directory under resources/3d/cocos2d-x-lite already contains the Cocos2d-x source-code engine.
Polyfills
Polyfills is a new feature option supported by the script system. If this option is checked at build time, the resulting release package will have the corresponding polyfills in it, and will also increase the size of the package. Developers can choose polyfills on demand, but only Async Functions are currently available, and more will be opened later.
Android Build Options
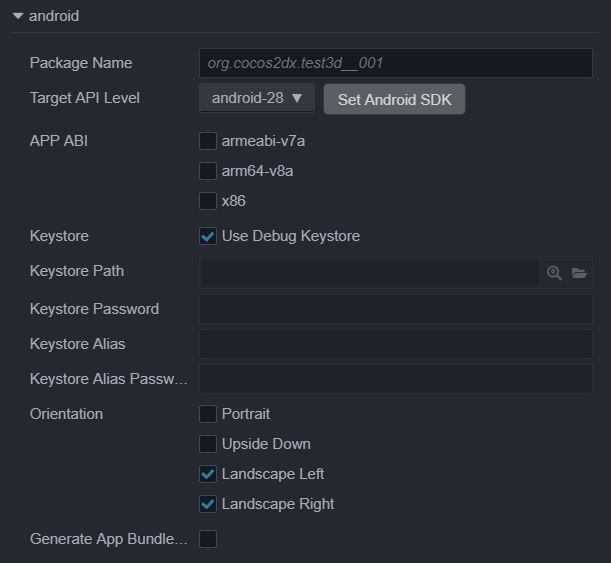
Package Name (Bundle Identifier)
Usually in descending order by product site URL, e.g. com.mycompany.myproduct.
Note: Only numbers, letters and underscores can be included in the Package Name. In addition, the last part of the Package Name must begin with a letter, not with an underscore or a number.
Target API Level
Set the Target API Level required to compile the Android platform. Click the Set Android SDK button next to it to quickly jump to the Android SDK configuration page. You can refer to the Setup Native Development Environment documentation for details.
APP ABI
Set the CPU types that Android needs to support, including armeabi-v7a、arm64-v8a and x86. You can choose one or more options.
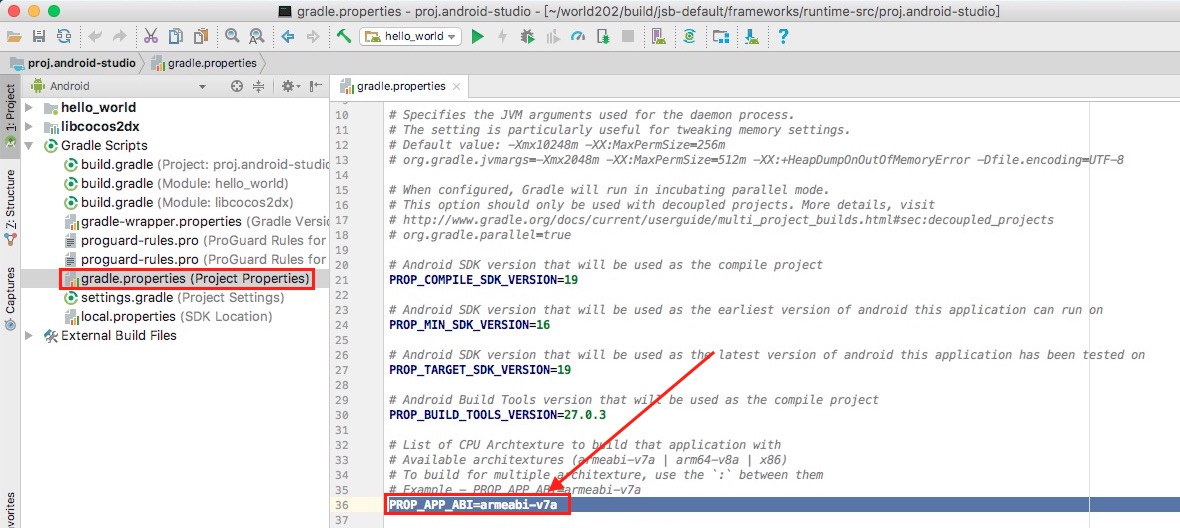
Note: When you select an ABI to build and then build another ABI without
Clean, both ABI'ssowill be packaged into the APK, which is the default behavior of Android Studio. If you import a project with Android Studio, after selecting an ABI to build, run Build -> Clean Project, then build another ABI, only the latter ABI will be packaged into the APK.Note: After the project is imported with Android Studio, it is an independent existence and does not depend on the Build panel. If you need to modify the ABI, you can directly modify the
PROP_APP_ABIproperty ingradle.propertiesas shown below:
Keystore
Android requires that all APKs be digitally signed with a certificate before they can be installed. A default keystore is provided, check the Use Debug Keystore to use the default keystore. If you need to customize the keystore, you can remove the Use Debug Keystore checkbox. Please refer to the official Android Documentation for details.
Orientation
The orientation of the device includes three types Portrait, Landscape Left, and Landscape Right.
Generate App Bundle (Google Play)
Check this option to package the game in App Bundle format for uploading to the Google Play store. Please refer to the official Android Documentation for details.
Mac Build Options

Bundle Identifier
Please refer to the Package Name option for Android.
iOS Build Options
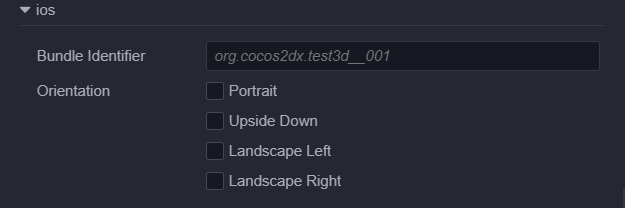
Bundle Identifier
Please refer to the Package Name option for Android.
Orientation
Please refer to the Orientation option for Android.
Build
After selecting the Platform, setting the initial scene and the platform configuration options in Build panel, then click the Build button in the bottom right corner, and you can start the building process.
When the build is complete, what we get is a standard Cocos2d-x project that has the same structure as a new one built using the Cocos Console. Then clicking the Open button next to the Build Path opens the build release path in the operating system's file manager, where the release package for all native platforms is included in the native -> frameworks -> runtime-src directory of this path.
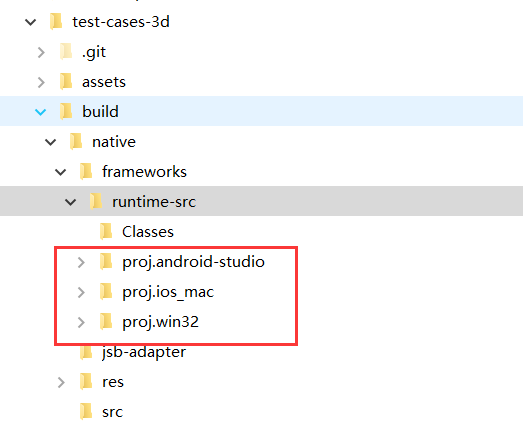
Compile
Currently, the editor has not integrated compilation functions. You need to manually open the built native project in the IDE of the corresponding platform (e.g. Xcode, Android Studio, Visual Studio) for further preview, debugging and releasing.
The following are manual compilations for each native platform:
iOS: Use Xcode to open the
native\frameworks\runtime-src\proj.ios_mac\.xcodeprojfile in thebuilddirectory, set the signature in theGeneral -> Signingof the Xcode panel, and then click the compile button after selecting the connected device in the top left of Xcode to compile and run.Android: Open the project using Android Studio, download the missing tool (if prompted), and then compile and run it.
Mac: Use Xcode to open the
native\frameworks\runtime-src\proj.ios_macfolder in thebuilddirectory to compile and run.Windows: Use Visual Studio (Visual Studio 2017 is recommended) to open the
native\frameworks\runtime-src\proj.win32\.slnfile in thebuilddirectory, or just double-click it to compile and run the project. When installing Visual Studio, please note that you need to check the box to install the SDK for Windows 8.1 version.
Note: When running a project built in debug mode on the MIUI 10 system, the
Detected problems with API compatibilityprompt may pop up, which is a problem introduced by the MIUI 10 system itself, just use the release mode to build.