Cocos Creator
监听触摸事件
触摸事件可以通过监听 Input.EventType.TOUCH_START 来接收屏幕或者鼠标的事件。
监听方式有两种:
- 通过
input.on的方式监听,这种方式会监听屏幕上所有的触摸 - 通过
node.on的方式监听时,可以监听某个范围内的触摸事件
考虑到我们需要操作角色跳一步或者两步,因此我们选择将屏幕的左边的触摸用于处理跳一步的输入,而右边用于跳两步。
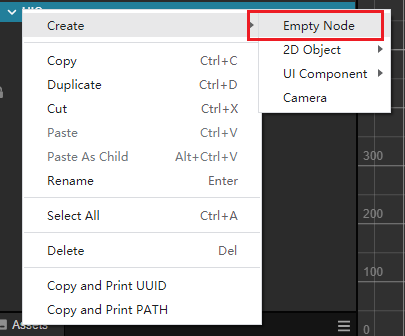
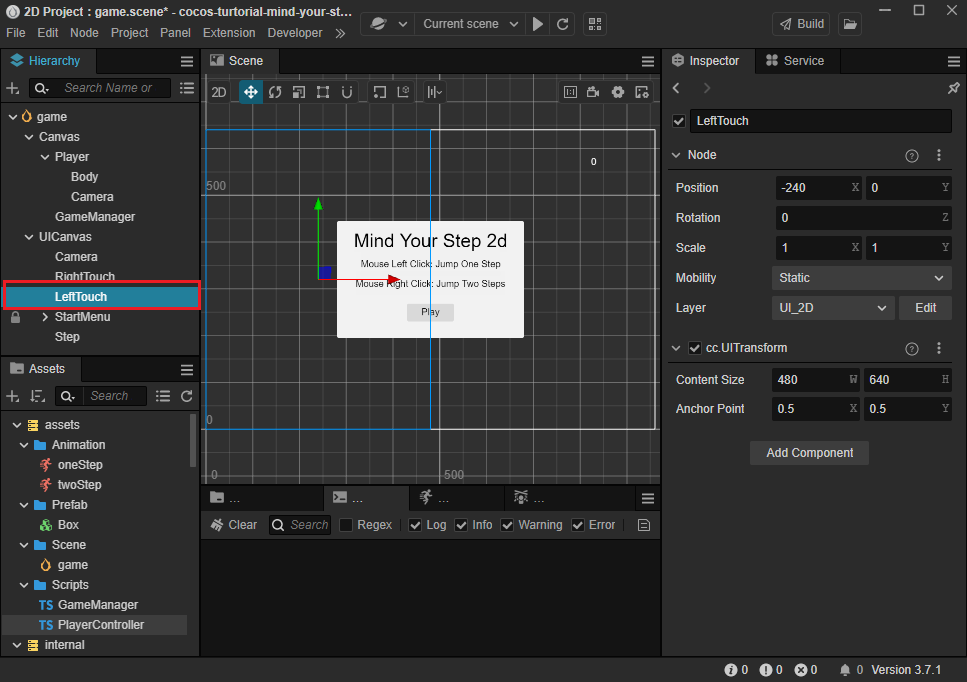
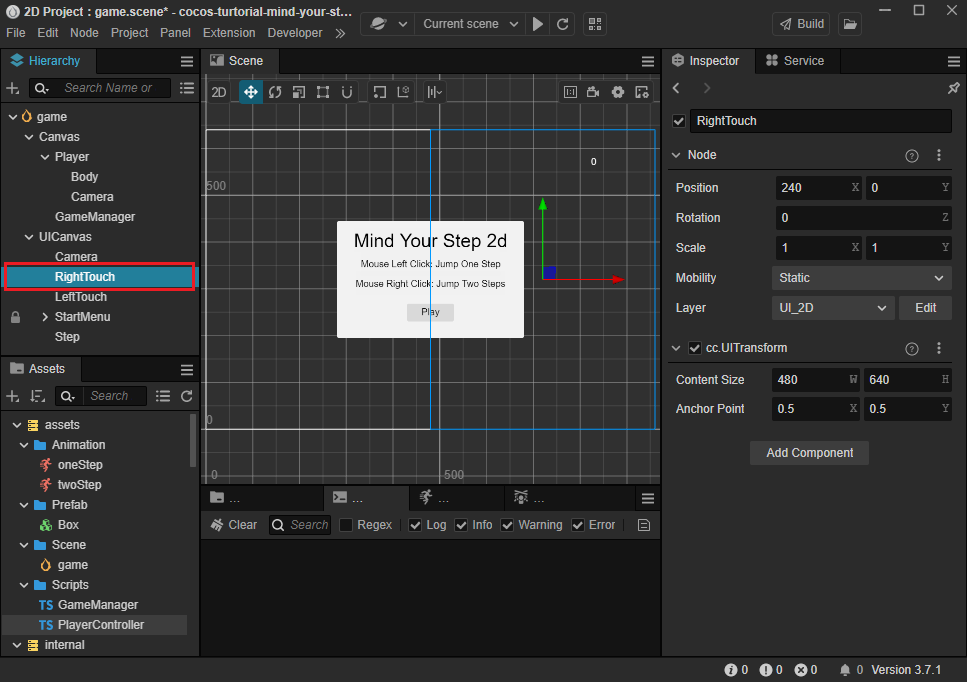
在 UI 层级里,也就是 UICanvas 节点下方创建两个空的节点,并分别命名为 LeftTouch 和 RightTouch:

参考下图设定好他们的位置和大小:


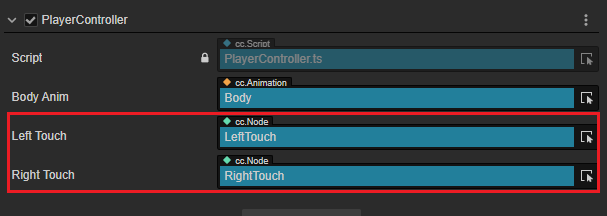
回到 PlayerController 在里面添加下列属性可以在角色上配置触摸区域:
ts
@property(Node)
leftTouch: Node = null;

@property(Node)
rightTouch: Node = null;
并将刚才创建好的节点拖拽到上面去:

在 PlayerController 里面添加下面的代码:
监听触摸输入:
tssetInputActive(active: boolean) { if (active) { this.leftTouch.on(Input.EventType.TOUCH_START, this.onTouchStart, this); this.rightTouch.on(Input.EventType.TOUCH_START, this.onTouchStart, this); } else { this.leftTouch.off(Input.EventType.TOUCH_START, this.onTouchStart, this); this.rightTouch.off(Input.EventType.TOUCH_START, this.onTouchStart, this); } }添加响应触摸的回调:
tsonTouchStart(event: EventTouch) { const target = event.target as Node; if (target?.name == 'LeftTouch') { this.jumpByStep(1); } else { this.jumpByStep(2); } }target在定义中是any类型,因此我们需要通过as关键字将其转化为Node类型。通过 as 关键字可以进行类型转换,前提是您得知道他是什么类型。
取到触摸的目标后,我们就可以通过
name这个属性来区分用户点击的是右侧的触摸区域还是左侧。
之后运行游戏就可以观察到触摸时的跳跃情况,此时可以通过手机应用扫描下图中的 QR 码来在移动设备上游玩(注意要在一个局域网内)。
完整的 Playercontroller 代码参考如下:
ts
import { _decorator, Component, Vec3, EventMouse, input, Input, Animation, EventTouch, Node } from "cc";
const { ccclass, property } = _decorator;
export const BLOCK_SIZE = 40;
@ccclass("PlayerController")
export class PlayerController extends Component {
@property(Animation)
BodyAnim: Animation = null;
private _startJump: boolean = false;
private _jumpStep: number = 0;
private _curJumpTime: number = 0;
private _jumpTime: number = 0.3;
private _curJumpSpeed: number = 0;
private _curPos: Vec3 = new Vec3();
private _deltaPos: Vec3 = new Vec3(0, 0, 0);
private _targetPos: Vec3 = new Vec3();
private _curMoveIndex = 0;
@property(Node)
leftTouch: Node = null;
@property(Node)
rightTouch: Node = null;
start() {
//input.on(Input.EventType.MOUSE_UP, this.onMouseUp, this);
}
setInputActive(active: boolean) {
if (active) {
//input.on(Input.EventType.MOUSE_UP, this.onMouseUp, this);
this.leftTouch.on(Input.EventType.TOUCH_START, this.onTouchStart, this);
this.rightTouch.on(Input.EventType.TOUCH_START, this.onTouchStart, this);
} else {
//input.off(Input.EventType.MOUSE_UP, this.onMouseUp, this);
this.leftTouch.off(Input.EventType.TOUCH_START, this.onTouchStart, this);
this.rightTouch.off(Input.EventType.TOUCH_START, this.onTouchStart, this);
}
}
reset() {
this._curMoveIndex = 0;
}
onTouchStart(event: EventTouch) {
    const target = event.target as Node;
    if (target?.name == 'LeftTouch') {
        this.jumpByStep(1);
    } else {
        this.jumpByStep(2);
    }
}
onMouseUp(event: EventMouse) {
if (event.getButton() === 0) {
this.jumpByStep(1);
} else if (event.getButton() === 2) {
this.jumpByStep(2);
}
}
jumpByStep(step: number) {
if (this._startJump) {
return;
}
this._startJump = true;
this._jumpStep = step;
this._curJumpTime = 0;
const clipName = step == 1 ? 'oneStep' : 'twoStep';
const state = this.BodyAnim.getState(clipName);
this._jumpTime = state.duration;
this._curJumpSpeed = this._jumpStep * BLOCK_SIZE / this._jumpTime;
this.node.getPosition(this._curPos);
Vec3.add(this._targetPos, this._curPos, new Vec3(this._jumpStep * BLOCK_SIZE, 0, 0));
if (this.BodyAnim) {
if (step === 1) {
this.BodyAnim.play('oneStep');
} else if (step === 2) {
this.BodyAnim.play('twoStep');
}
}
this._curMoveIndex += step;
}
onOnceJumpEnd() {
this.node.emit('JumpEnd', this._curMoveIndex);
}
update(deltaTime: number) {
if (this._startJump) {
this._curJumpTime += deltaTime;
if (this._curJumpTime > this._jumpTime) {
// end
this.node.setPosition(this._targetPos);
this._startJump = false;
this.onOnceJumpEnd();
} else {
// tween
this.node.getPosition(this._curPos);
this._deltaPos.x = this._curJumpSpeed * deltaTime;
Vec3.add(this._curPos, this._curPos, this._deltaPos);
this.node.setPosition(this._curPos);
}
}
}
}