Cocos Creator
自定义渲染管线(实验性质)
Cocos Creator 3.6中添加了新的 自定义渲染管线。
目前为实验性的前瞻版本,接口、命名尚未稳定,不推荐在正式项目中使用。目前仅支持 Web 端。
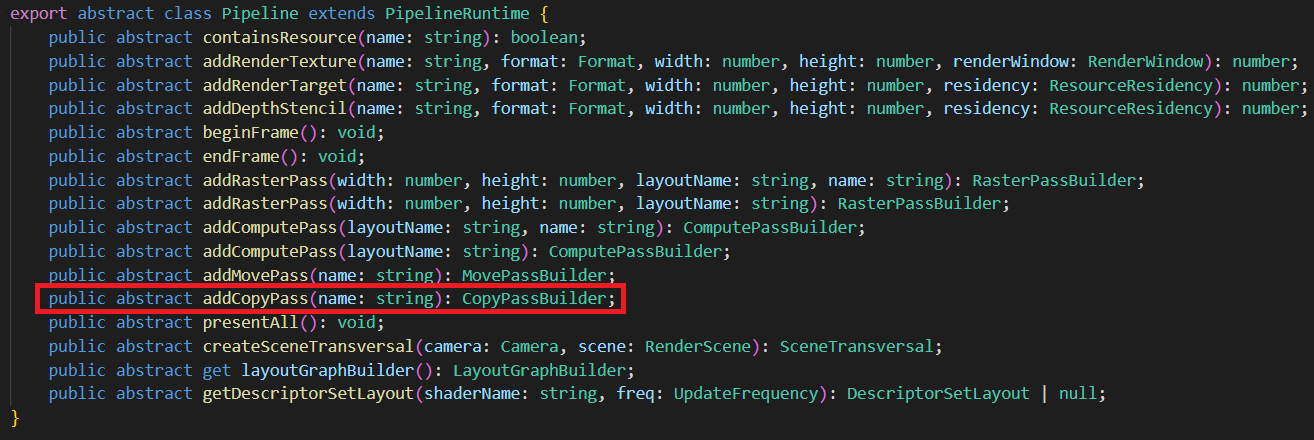
自定义渲染管线 的接口位于 cocos/core/pipeline/custom/pipeline.ts
概述
通过 自定义渲染管线(CustomPipeline),用户可以定制 渲染通道(RenderPass),设置输入/输出的 渲染视图(RenderView)、以及每个 渲染通道 需要绘制的 渲染内容(RenderContent)。
渲染内容 可以是 场景、屏幕 矩形,也可以是计算任务的 分发(Dispatch),取决于 渲染通道 的类型。
渲染内容 的绘制顺序,可以通过 渲染队列(RenderQueue)进行调整。
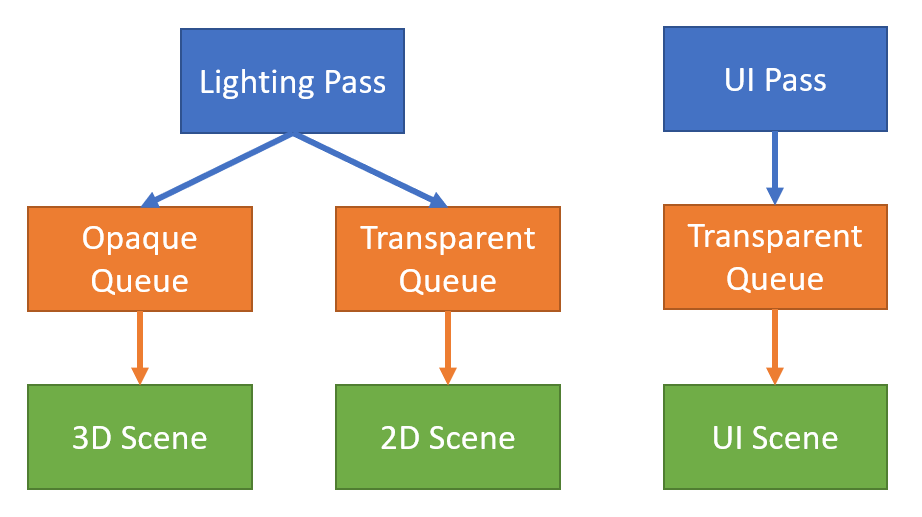
自定义渲染管线 的【渲染通道、渲染队列、渲染内容】构成一个森林:
自定义渲染管线的【渲染通道、渲染视图】构成一个有向无圈图(DAG):
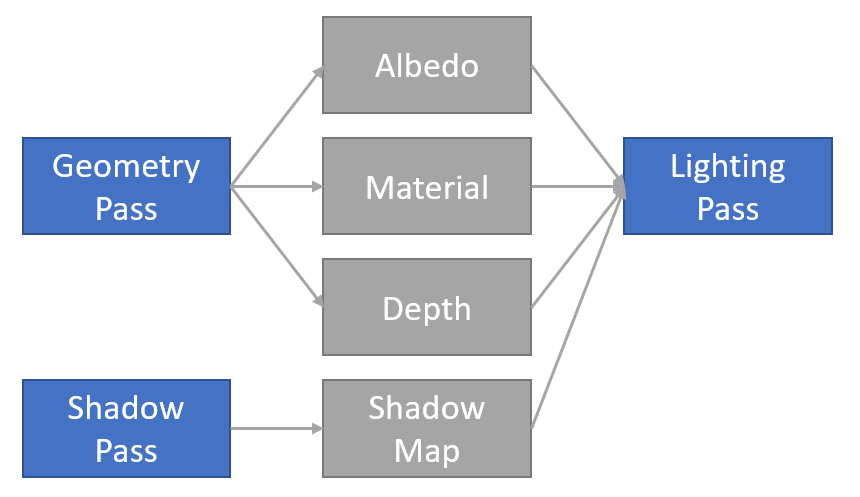
我们可以层叠(Stack)以上两张图,得到 渲染流程图(RenderGraph)。渲染流程图 描述了 自定义渲染管线 的全部流程,引擎会按照用户定制的流程图进行资源分配、流程优化、渲染执行。
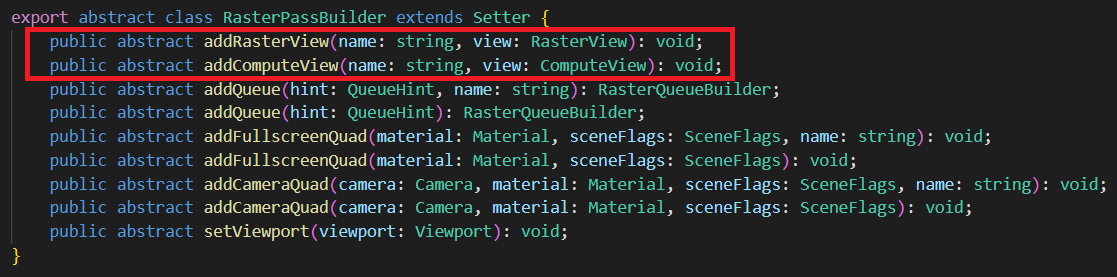
渲染通道(RenderPass)
渲染通道 有三种类型:光栅(Raster)、计算(Compute)、资源(Resource)。
每种类型会有各自不同的 渲染通道。
光栅类型(Raster)
光栅类型使用了GPU的光栅化能力(在GraphicsEngine执行)。
1. 光栅化通道(RasterPass)
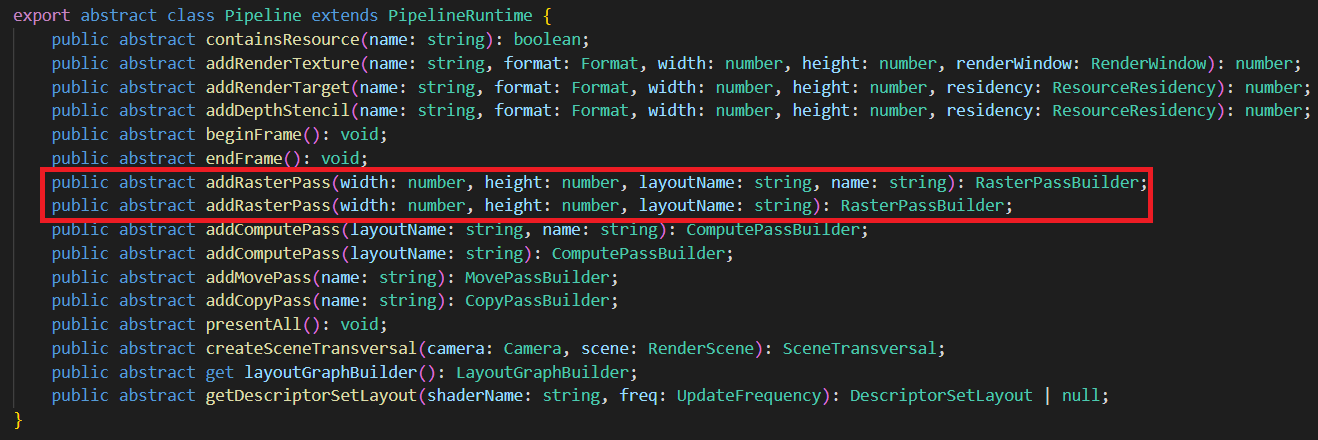
width、height为输出渲染目标的分辨率。
layoutName为Effect的Stage名字。
name为调试(debug)时显示的名字。为空时,系统会赋予默认名字。
2. 光栅化子通道(RasterSubpass)
功能尚未开放。需要GPU分块渲染能力(Tile-based rendering)。
3. 光栅化展示通道(PresentPass)
将画面渲染至屏幕上。
计算类型(Compute)
计算类型使用了GPU的通用计算能力、以及光线追踪能力(可在GraphicsEngine、ComputeEngine执行)。
1. 计算通道(ComputePass)
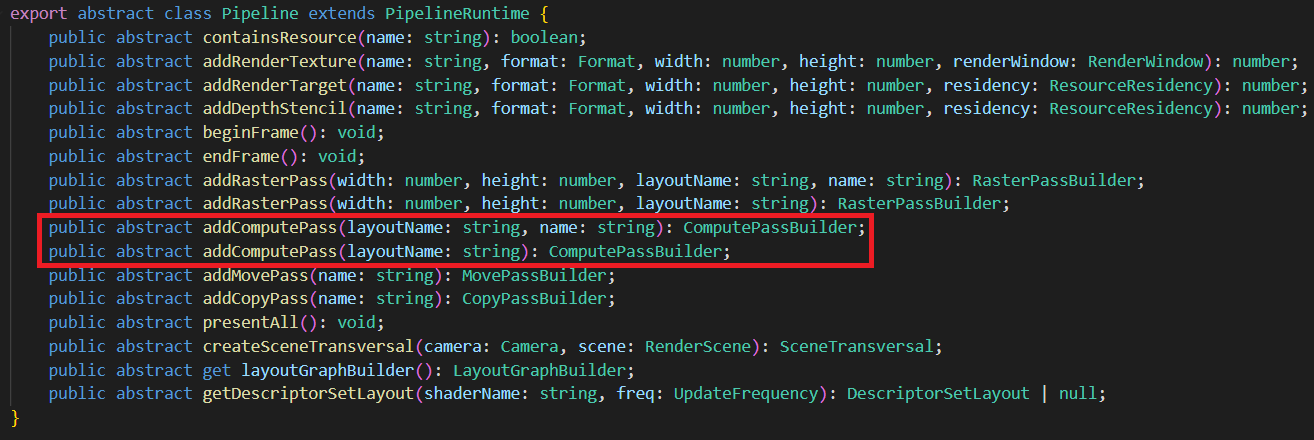
layoutName为Effect的Pass名字。
name为调试(debug)时显示的名字。为空时,系统会赋予默认名字。
2. 光线追踪通道(RaytracePass)
功能尚未开放。需要GPU光线追踪能力。
资源类型(Resource)
资源类型使用了 GPU 的资源处理能力(可在GraphicsEngine、ComputeEngine、CopyEngine执行)。
1. 拷贝通道(CopyPass)
负责将资源来源(source)拷贝至目标(target),需要资源格式兼容。
- name 为调试(debug)时显示的名字。为空时,系统会赋予默认名字。
2. 移动通道(MovePass)
负责将资源来源(source)移动至目标(target),需要资源格式全同。
这里的移动是语义上的概念(move semantics):将来源的变量移动至目标变量,作废来源变量。如果资源因某些原因无法移动(比如资源来源正在被读取),则以拷贝方式实现。
移动语义用于管线优化,达到减小带宽的目的。如果不清楚如何正确使用移动通道,可以用拷贝通道替代,不会影响画面表现,调试时较为容易。
渲染视图(RenderView)
RenderView 有两种类型:光栅化视图(RasterView),计算视图(ComputeView)。
光栅化视图(RasterView)
光栅化视图 会被光栅化。有两种子类型:渲染目标(RenderTarget),深度模板(DepthStencil)。
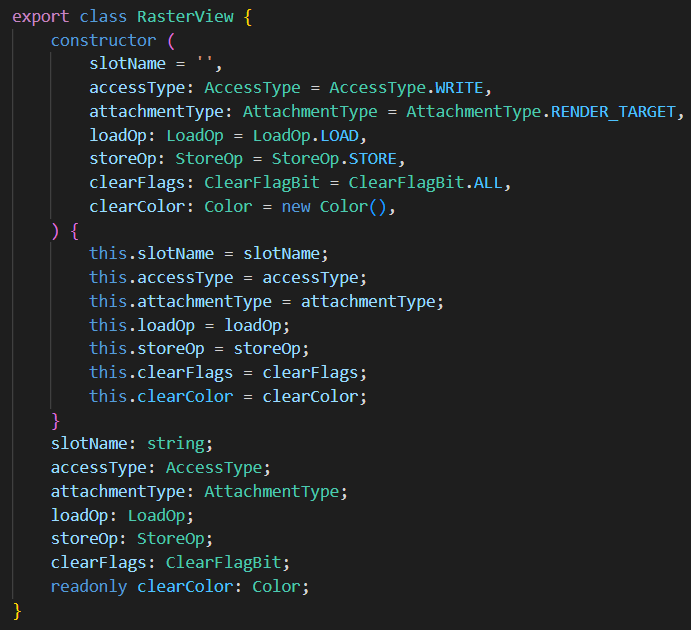
slotName 为 shader pixel 分量的名字。(比如color、normal等)
accessType 为绑定类型,可以是 Read、ReadWrite、Write。作为输入(Input)时,为Read;作为输出(Output)时为Write;同时作为输入与输出(Inout),为ReadWrite。【注意】深度模板(DepthStencil)在做深度测试(DepthTest)时,虽然结果不写入视图,但此时作为输出,绑定类型依然为Write。部分平台开启ARM_shader_framebuffer_fetch_depth_stencil扩展时,DepthStencil绑定类型为ReadWrite。DepthStencil的绑定类型不能为Read。
attachmentType为类型,可以是RenderTarget或者DepthStencil。
loadOp 是光栅化读取选项,可以是读取(Load)、清除(Clear)、舍弃(Discard)。
storeOp 是光栅化存储选项,可以是写入(Store)、舍弃(Discard)。
clearFlags 是清除标志位,如果类型是 RenderTarget,标志位必须是Color。如果类型是 DepthStencil,为 Depth、Stencil、Depth | Stencil三者其一。
clearColor 为清除颜色,如果类型是 RenderTarget,为 RGBA(Float4)。如果类型为 DepthStencil,为 RG,此时 R 通道存储 Depth(Float)。G 通道存储 Stencil(Uint8)。
计算视图(ComputeView)
计算视图不会被光栅化。常用于采样(Sample)、乱序读写(Unordered Access)。
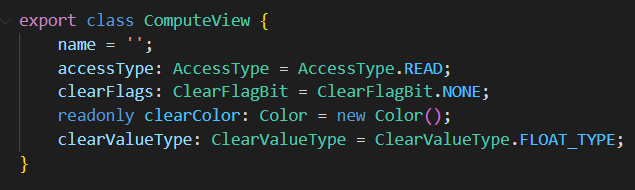
name 为 Shader 描述符(Descriptor)的名字。
accessType 为读写类型。可以是 Read、ReadWrite、Write。
clearFlags 为资源的清除类型,一般为 None 或者 Color。
clearColor 为资源的清除颜色,为 Float4 或者 Int4。取决于 clearValueType。
clearValueType 为资源清除颜色的类型,为 Float 或者 Int。
如果资源标注了清除颜色,那么在执行 计算通道(ComputePass)前,会以 clearColor 清除资源内容。光栅类型的通道(Raster)不清除 计算视图 内容。
渲染视图设置
光栅化通道:
计算通道:

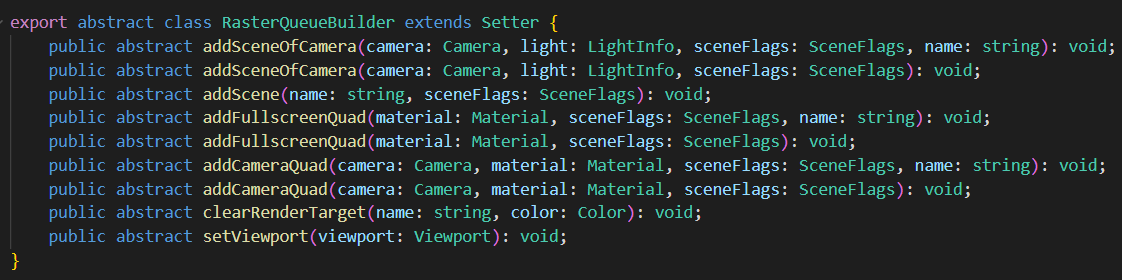
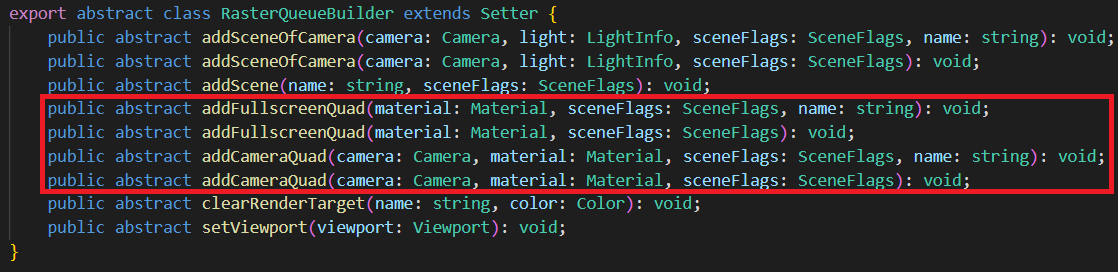
渲染队列(RenderQueue)
渲染队列 是 渲染通道(Render Pass)的子节点,有严格的(渲染)先后顺序。只有一个 渲染队列 的内容完全绘制后,才会绘制下一个 渲染队列 的内容。
渲染队列 有两种类型:光栅化队列、计算队列。分别在 光栅化通道、计算通道 添加。
光栅化队列(RasterQueue)
光栅化队列 执行光栅化任务,一般为绘制 场景、绘制全屏四边形等。光栅化队列 内部为乱序绘制。
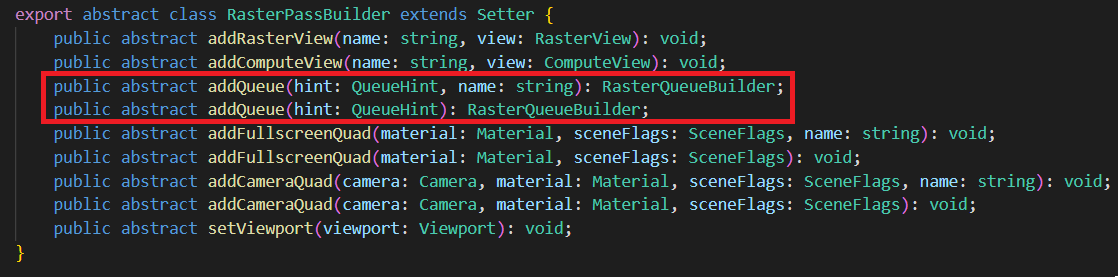
hint 为队列提示,有 None、Opaque、Cutout、Transparent 四种选项。hint 不会影响执行,只用于性能检测。比如在移动平台上,我们往往希望先绘制 Opaque 队列(关闭 AlphaTest),再绘制 Cutout 队列(开启AlphaTest)。如果在 Opaque 队列的绘制内容中,不小心混入了开启 AlphaTest 的物件,会降低图形性能。因此我们会通过队列提示,检查用户的提交是否符合预期。
name 为调试(debug)时显示的名字。为空时,系统会赋予默认名字。
计算队列(ComputeQueue)
计算队列 只包含 分发(Dispatch),顺序执行。
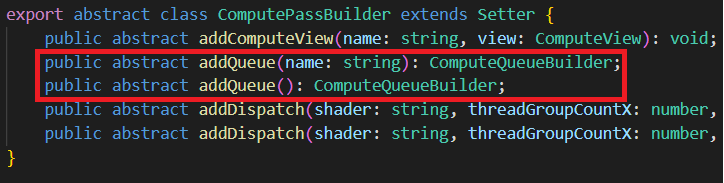

计算通道 没有队列提示。
渲染内容(RenderContent)
渲染内容 通过 渲染队列 排序、由多种元素组成。
场景(Scene)
需要绘制的2D、3D场景。适用于光栅化队列。
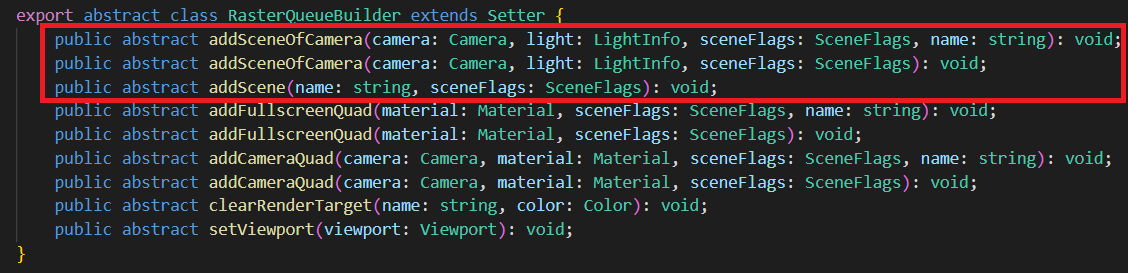
可通过 camera 添加,也可以直接添加。可以附加一定的光照信息。
- sceneFlags一定程度控制 场景 的渲染。比如渲染哪些对象(Opaque、Cutout、Transparent)、是否只渲染阴影投射对象(ShadowCaster)、是否只渲染 UI、光照方式(None、Default、Volumetirc、Clustered、PlanarShadow)、是否渲染 GeometryRenderer、是否渲染 Profiler 等。
矩形(Quad)
全屏/局部的矩形。常用于后期特效渲染。适用于光栅化队列。
分发(Dispatch)
用于计算队列。
动态设置
我们可以动态设置Queue、Pass的一些属性。
比如viewport、clearRenderTarget等。
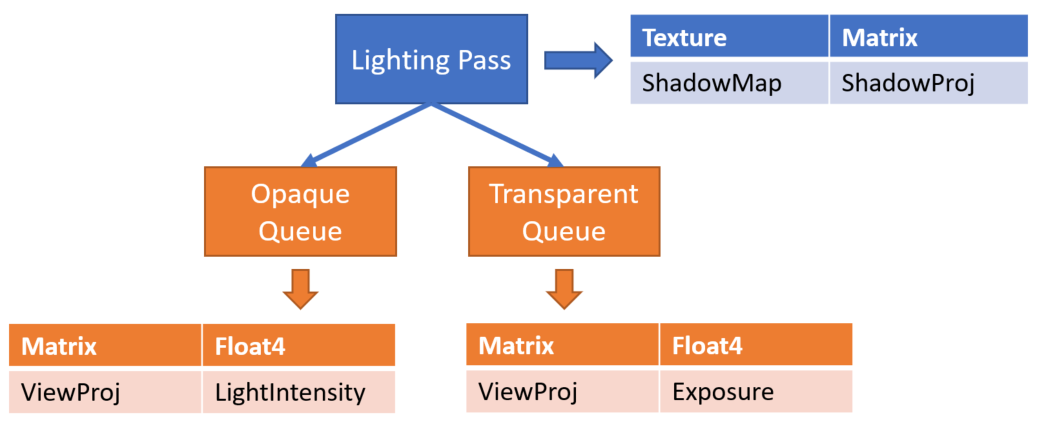
渲染数据设置
在编写渲染算法时,我们往往需要设置一些数据供Shader使用。
渲染流程图(RenderGraph)在 渲染通道(RenderPass)、渲染队列(RenderQueue)提供了设置数据的接口。
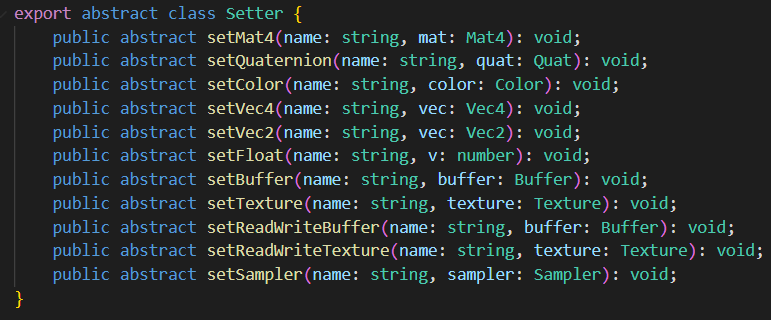
用户可以设置常量(Constant)、缓冲(Buffer)、贴图(Texture)等数据。
这些数据可以是只读的、或者始终处于可读写状态。
对于有读/写状态变化的资源,我们建议用 渲染视图(RenderView)进行跟踪。
每个 渲染通道、渲染队列 有各自独立的存储。
每个节点有不同的数据更新/上传频率。用户填写的常量、Shader描述符(Descriptor)的更新频率需要与节点的更新频率一致。
渲染通道:每 渲染通道 上传一次(PerPass)。
渲染队列:每 渲染阶段 上传一次(PerPhase)。
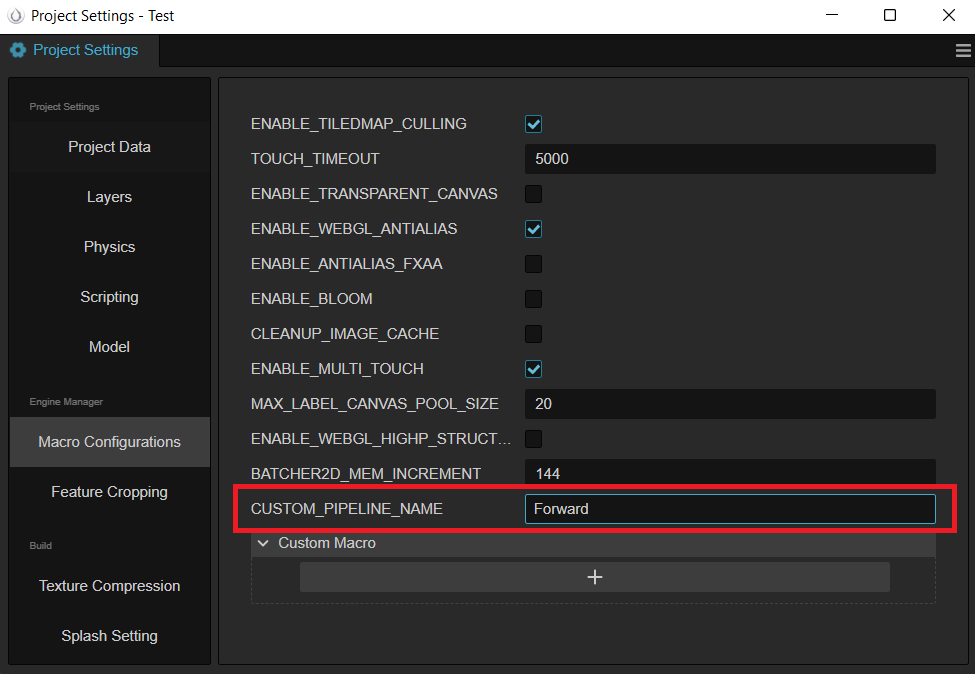
功能开启
勾选 自定义渲染管线。
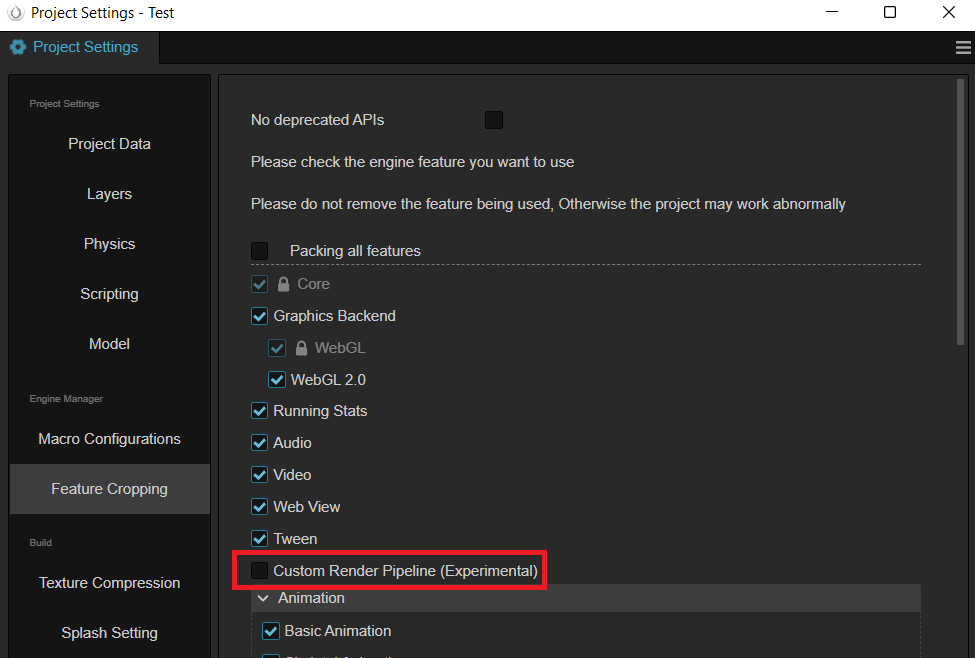
通过填写 自定义管线 的名字,选择注册好的 自定义渲染管线。
- 目前支持 Custom, Forward, Deferred 三种 (其中 Custom 是基于 Forward 基础上添加的 Bloom 后效示例)。
编写自定义渲染管线
新建 TypeScript 文件,定义名为 TestCustomPipeline 类,让该类实现 rendering.PipelineBuilder 接口,通过 rendering.setCustomPipeline 方法把该 pipeline 注册到系统中,如下代码所示。
typescript
import { _decorator, rendering, renderer, game, Game } from 'cc';
import { AntiAliasing, buildForwardPass, buildBloomPasses,
    buildFxaaPass, buildPostprocessPass, buildUIPass, isUICamera, decideProfilerCamera } from './PassUtils';

export class TestCustomPipeline implements rendering.PipelineBuilder {
    setup(cameras: renderer.scene.Camera[], pipeline: rendering.Pipeline): void {
        decideProfilerCamera(cameras);
        for (let i = 0; i < cameras.length; i++) {
            const camera = cameras[i];
            if (camera.scene === null) {
                continue;
            }
            const isGameView = camera.cameraUsage === renderer.scene.CameraUsage.GAME
                || camera.cameraUsage === renderer.scene.CameraUsage.GAME_VIEW;
            if (!isGameView) {
                // forward pass
                buildForwardPass(camera, pipeline, isGameView);
                continue;
            }
            // TODO: The actual project is not so simple to determine whether the ui camera, here is just as a demo demonstration.
            if (!isUICamera(camera)) {
                // forward pass
                const forwardInfo = buildForwardPass(camera, pipeline, isGameView);
                // fxaa pass
                const fxaaInfo = buildFxaaPass(camera, pipeline, forwardInfo.rtName);
                // bloom passes
                const bloomInfo = buildBloomPasses(camera, pipeline, fxaaInfo.rtName);
                // Present Pass
                buildPostprocessPass(camera, pipeline, bloomInfo.rtName, AntiAliasing.NONE);
                continue;
            }
            // render ui
            buildUIPass(camera, pipeline);
    }
}
}

game.on(Game.EVENT_RENDERER_INITED, () => {
    rendering.setCustomPipeline('Test', new TestCustomPipeline);
});
可以看到上述代码引用了 PassUtils 脚本文件,该文件通过简单封装常用 RenderPass 的相关逻辑,方便用户直接使用(PassUtils可以在这 下载)。
PassUtils有不少函数,我们抽取 buildPostprocessPass 的部分逻辑来介绍:
typescript
function buildPostprocessPass (camera,
ppl,
inputTex: string,
antiAliasing: AntiAliasing = AntiAliasing.NONE) {
// ...
const postprocessPassRTName = `postprocessPassRTName${cameraID}`;
const postprocessPassDS = `postprocessPassDS${cameraID}`;
if (!ppl.containsResource(postprocessPassRTName)) {
// 注册 color texture 资源,因为当前 pass 是要上屏,所以传递 camera.window 作为上屏信息。如果是离屏的则需要调用 ppl.addRenderTarget 函数即可
ppl.addRenderTexture(postprocessPassRTName, Format.BGRA8, width, height, camera.window);
// 注册 depthStencil texture 资源
ppl.addDepthStencil(postprocessPassDS, Format.DEPTH_STENCIL, width, height, ResourceResidency.MANAGED);
}
// 下面两行会更新 color texture 与 depthStencil texture 的注册信息(主要为尺寸大小),同样如果离屏的则调用 'ppl.updateRenderTarget' 函数
ppl.updateRenderWindow(postprocessPassRTName, camera.window);
ppl.updateDepthStencil(postprocessPassDS, width, height);
// 注册一个 RasterPass,它的 layoutName 为 post-process
const postprocessPass = ppl.addRasterPass(width, height, 'post-process');
postprocessPass.name = `CameraPostprocessPass${cameraID}`;
// 设置当前 rasterPass 的 viewport
postprocessPass.setViewport(new Viewport(area.x, area.y, area.width, area.height));
// 判断系统中是否有输入纹理的同名信息,并把该输入纹理注入到 outputResultMap的sampler 中
if (ppl.containsResource(inputTex)) {
const computeView = new ComputeView();
computeView.name = 'outputResultMap';
postprocessPass.addComputeView(inputTex, computeView);
}
// 设置 postprocessPass 的 clear color 信息
const postClearColor = new Color(0, 0, 0, camera.clearColor.w);
if (camera.clearFlag & ClearFlagBit.COLOR) {
postClearColor.x = camera.clearColor.x;
postClearColor.y = camera.clearColor.y;
postClearColor.z = camera.clearColor.z;
}
// 注册 color texture 相关的 pass view
const postprocessPassView = new RasterView('_',
AccessType.WRITE, AttachmentType.RENDER_TARGET,
getLoadOpOfClearFlag(camera.clearFlag, AttachmentType.RENDER_TARGET),
StoreOp.STORE,
camera.clearFlag,
postClearColor);
// 注册 depth stencil texture 相关的 pass view
const postprocessPassDSView = new RasterView('_',
AccessType.WRITE, AttachmentType.DEPTH_STENCIL,
getLoadOpOfClearFlag(camera.clearFlag, AttachmentType.DEPTH_STENCIL),
StoreOp.STORE,
camera.clearFlag,
new Color(camera.clearDepth, camera.clearStencil, 0, 0));
// 把 color texture 资源与相关的pass view产生关联(即 renderpass 的 color texture 输出口)
postprocessPass.addRasterView(postprocessPassRTName, postprocessPassView);
// 把 depth stencil texture 资源与相关的 pass view 产生关联
postprocessPass.addRasterView(postprocessPassDS, postprocessPassDSView);
// 添加具体的渲染队列,拿到 postprocess material 去画一个与屏幕等尺寸的四边形
postprocessPass.addQueue(QueueHint.NONE).addFullscreenQuad(
postInfo.postMaterial, 0, SceneFlags.NONE,
);
// ...
if (profilerCamera === camera) {
// 开启 profiler 渲染
postprocessPass.showStatistics = true;
}
// 把 color texture 与 depth stencil texture 的资源返回,可以用于后续其它 render pass 的数据源
return { rtName: postprocessPassRTName, dsName: postprocessPassDS };
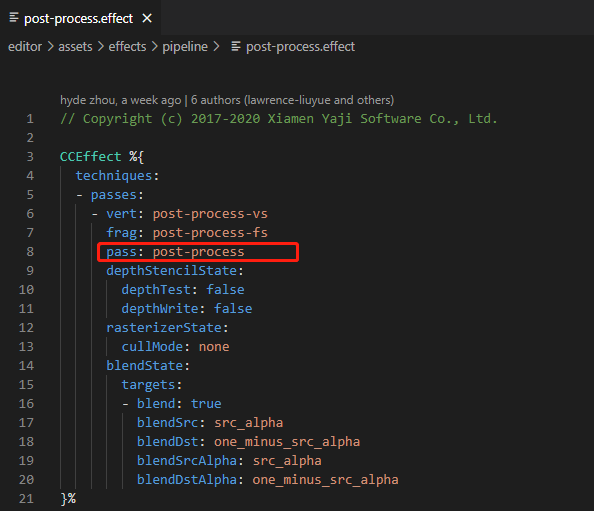
}首先我们需要知道 RasterPass 如何配置 layoutName (即上述代码中的 post-process 字符串)。打开 post-process.effect 文件后,可以看到内部定义的 pass 名称就是 post-process ,所以 effect 文件中的 pass name 就是作为 RasterPass 的 layoutName。如果 effect 没有定义 pass name,那么 RasterPass 的 layoutName 就得赋值为 default (forward/gbuffer 相关的 RasterPass 都是通过 default 配置)。所以要配置自己的后处理方案,就需要为自己编写的 effect 文件正确配置 pass name。
另外我们还需要把上一个 pass 的输出纹理作为当前 pass 的输入信息,上面说到需要通过 ComputeView 实现,而这里 ComputeView 的 name 设置为了 outputResultMap,那么该怎么正确配置这个名称?继续对 post-process.effect 文件分析,可以看到下面的代码,ComputeView 的 name 与 post-process-fs 的片元着色器的纹理输入名称一致。
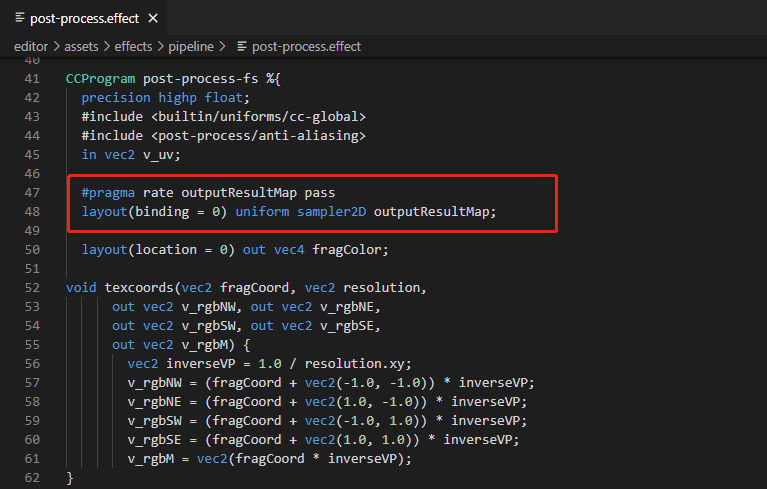
同时我们需要通过下述代码行对 outputResultMap 名称进行声明,表明该输入纹理的使用频率为 Pass level。
glsl
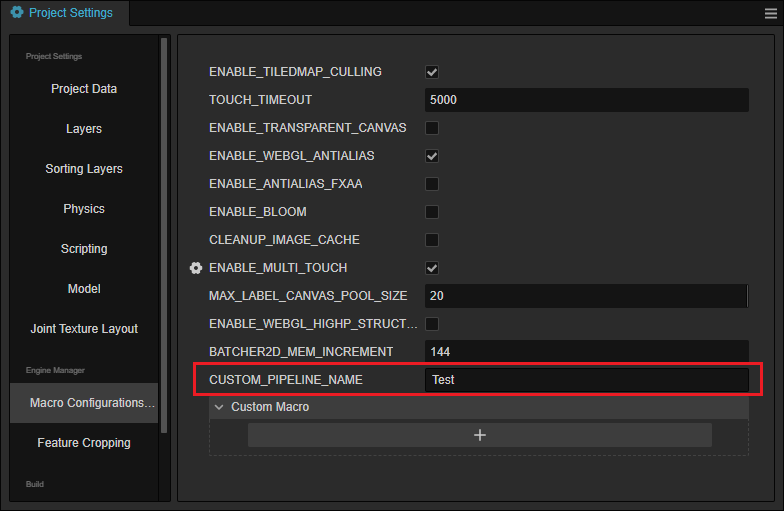
#pragma rate outputResultMap pass定义完 TestCustomPipeline 后需要通过其它逻辑代码(如:组件等)引入该文件,以便激活 Game.EVENT_RENDERER_INITED 事件监听,之后改变 项目设置 -> 宏配置 -> CUSTOM_PIPELINE_NAME 为 Test:
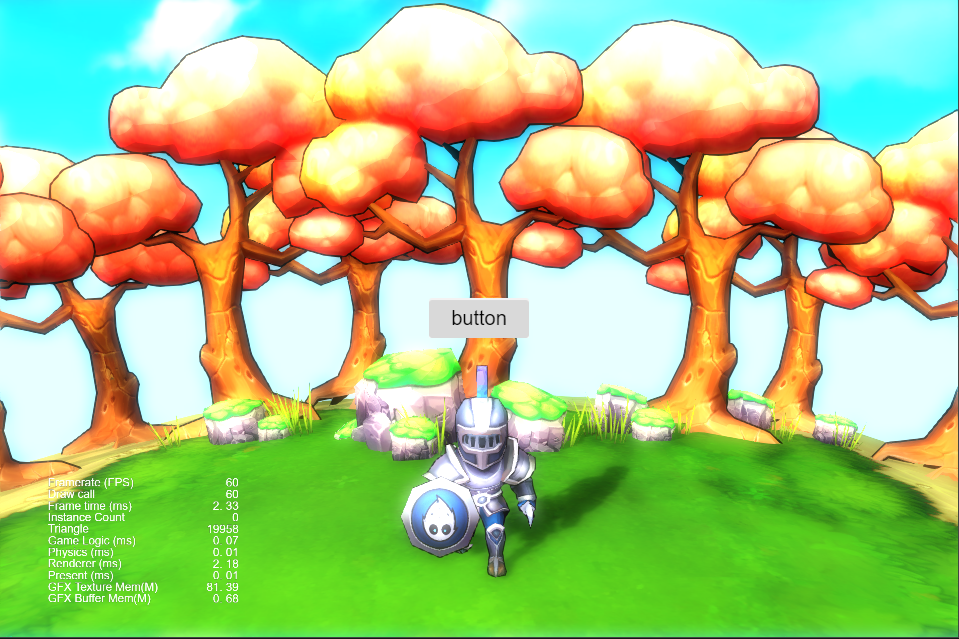
运行后的效果如下所示,它包含了 fxaa 与 bloom 的后效:
这就是定义一个 RenderPass 的流程,PassUtils 还定义了其它 Pass 可以提供用户参考,包括 BloomPasses,FxaaPass 等。这些 RenderPass 提供了调节参数可对输出效果进行调整(如Bloom的曝光强度,迭代次数等),用户可查看相关的代码进行尝试。