Cocos Creator
Setup Native Development Environment
Apart from publish game to Web, Cocos Creator uses the JSB technology based on cocos2d-x engine for the cross-platform release of native games. Before using Cocos Creator to bundle and publish games to native platforms, you need to configure related cocos2d-x development environment first.
Android platform dependencies
To publish to the Android platform, you need to install all of the following development environments.
If you do not have a plan to publish to the Android platform, or if your operating system already has a full Android development environment, you can skip this section.
Download the Java SDK (JDK)
Compile the Android project requires a complete Java SDK tool on your local computer, download it at the following address:
Java SE Development Kit 8 Downloads
Download and pay attention to select the machine and the operating system and architecture, download the installation can be completed after the installation process.
After the installation is complete, please confirm that the java command is valid on the command line. Input the following code into Mac terminal or Windows command line tool for check:
java -versionIf JAVA SE displays, there is no problem. If JRE displays, then you need to install JAVA SE running environment.
On Windows platform, please confirm if JAVA_HOME is included in your environmental variables. By right clicking Computer on your computer, choosing Property -> Advanced system setting -> Environment Variables to check and modify environmental variables. For effective running on Windows platform, you might need to restart the computer. For details, please refer to the document: How do I set or change the PATH system variable?.
Download and install Android Studio
Starting with v1.10, we no longer support Eclipse's ANT build, we need to use Android Studio as an Android platform's build tool and you should download the required SDK and NDK packages in Android Studio. First install Android Studio.
Download the SDK and NDK required to publish the Android platform
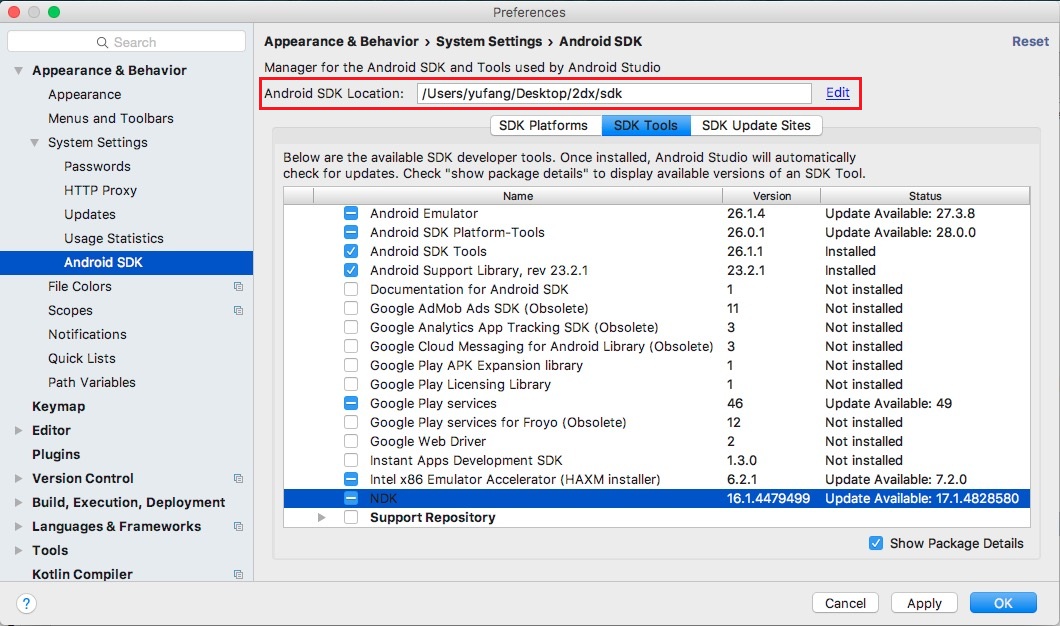
After installing Android Studio, refer to the official documentation and open the SDK Manager: SDK Manager Instructions.
- In the
SDK Platformstab page, check the API level you want to install, and it is recommended to select the required mainstream API Level such as 23 (6.0), 26 (8.0) and 28 (9.0), etc. - In the
SDK Toolstab page, first check the lower right corner of theShow Package Details, show the version of the tool selection. - In the
Android SDK Build-Tools, select the latest build Tools version. - Check the
Android SDK Platform-ToolsandAndroid SDK Tools. If you need to install the Android Support Library, please refer to the Official Documentation. - Check the
NDKand the recommended version is r17 - r19. - Take note of the path of
Android SDK Locationon top of the SDK Manager window. Later we need to fill in the location of the SDK in Cocos Creator. - Click
OKand follow the prompts to complete the installation.
Android Gradle Upgrade
Since we upgraded the Android Gradle version in Creator v2.4.7, it is necessary to explain it in the following two situations.
Before Creator v2.4.7
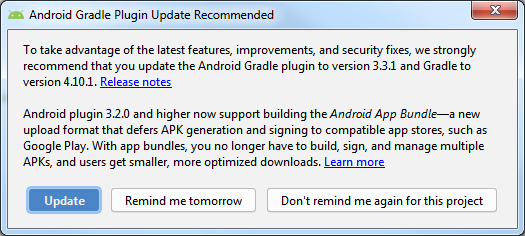
The supported version of Android Gradle before Creator v2.4.7 is 4.10.x, and the corresponding Gradle Tool version is 3.x (v3.2.0 is recommended). When using Android Studio to compile, please do not upgrade when prompted to upgrade the Android Gradle Plugin.
- View the file path for the Android Gradle version as:
YourProject\build\jsb-link\frameworks\runtime-src\proj.android-studio\build.gradle - View the file path for the Gradle Tool version as:
YourProject\build\jsb-link\frameworks\runtime-src\proj.android-studio\gradle\wrapper\gradle-wrapper.properties
Creator v2.4.7 and later
Creator v2.4.7 upgrades the Android Gradle version to 6.7.1 and the corresponding Gradle Tool version to 4.2.2. This upgrade mainly requires attention to the File Directory and Old Functionality Module sections.
File Directory
All Android projects with
instant-appmay encounter problems after the upgrade, as the following adjustments have been made to theinstantAppfile directory for this upgrade:Removed
gameand merged its project settings intoinstantapp.Upgraded
gradle plugin, the original lower version of the plugin will have renaming problem in the higher version, for example, the developer may need to adduseAndroidXto enable the original old plugin.Note:
On the File Directory, deprecate the
instantappandgamemodules and merge them into a newinstantappmodule. New features that were to be added to the deprecated module will need to be added to the newinstantappmodule after the upgrade.Since the original
instantappmodule's instant app functionality has been merged into the base app module, to publish to the Android Instant, need to set the project asinstantappin Android Studio: click Run -> Edit Configurations in the top menu bar, then check Deploy as instant app in the panel that opens, as shown in the following image:
Since this option cannot be saved by
build.gradle, it can only be enabled manually by the developer.
New projects will have no problems when publishing to the Android Instant platform.
Old Functionality Module
Some old functional modules of Gradle Tool v3.2.0 are deprecated after the upgrade, such as
'com.google.android.instantapps:instantapps:1.1.0’, developers need to adapt them according to the module features. Please refer to the Android Gradle plugin release notes documentation for details.
Install C++ compiling environment
Please install the following running environment:
Python 2.7.5+, download page. Pay attention! Don't download Python 3.x version.
In Windows, the installation of Visual Studio 2017 Community Edition is needed. When installing Visual Studio, please check Desktop development with C++ and Game development with C++ two modules.
Note: there is a Cocos option in the Game development with C++ module. Do NOT check it.
In Mac, the installation of Xcode and command line tool is needed.
Configure Native Develop Environments Path
Next, let's go back to Cocos Creator to configure the environmental path of the native platform. Choose CocosCreator -> Settings in the main menu, and open the Settings window:
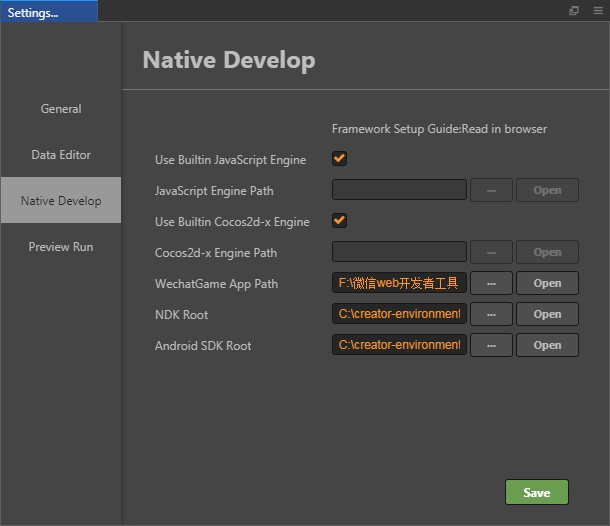
We need to configure the following two paths here:
NDK Root, choose the
ndk-bundlefolder inAndroid SDK Locationpath. You can skip this if you don't need to compile on Android platform.Note: the new version of Android Studio's NDK can be downloaded in multiple versions, with the previous
ndk-bundlefile name changed tondk. You can select a specific version of the NDK as needed in thendkdirectory.Android SDK Root, choose the
Android SDK Locationpath we just noted in Android Studio SDK Manager window (the directory of Android SDK should include folders like "build-tools", "platforms", etc.). You can skip this if you don't need to compile the Android platform.
Close the window after configuration is completed.
Note: the configure will work when build native project. If the configure not works(some Mac may occur this situation), please try to set these settings to System Environment manually:
COCOS_CONSOLE_ROOT,NDK_ROOT,ANDROID_SDK_ROOT.
Notes
We have received lots of feedback about original packing in the public beta, and some possible reasons are supplemented here:
Package name issue
Check the Package Name in the Build panel, please refer to the Package Name documentation for the specific naming convention.
Android built successfully, but prompt
dlopen failed: cannot locate symbol "xxxx" referenced by "libcocos2djs.so"...in runtime.Please check if the architecture and version of NDK and Android SDK correspond to the phone's Android system. In addition you can try to use the NDK and Android SDK version used in this article to test.
In the end, if building still fails, please post the bug with detailed reproducible steps and error information to us in the Forum.