Cocos Creator
Publish to OPPO Mini Games
Environment Configuration
Download OPPO Mini Game Debugger [cn] and install it on your OPPO phone (Android 6.0 or above is recommended).
Install nodejs-8.1.4 or above, globally.
Release Process
Use Cocos Creator to open the project that needs to be released. Open the Build panel from the Menu bar -> Project, select OPPO Mini Game in the Platform dropdown.
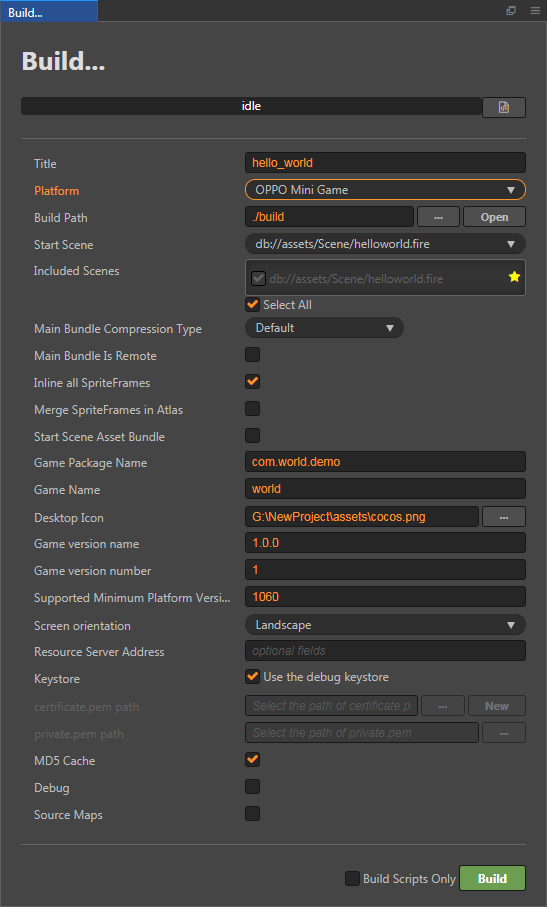
Configuration Options
The specific filling rules for the relevant parameter configuration are as follows:
Main Bundle Compression Type
Set the compression type of the main package, please refer to the built-in Asset Bundle —
maindocumentation for details.Main Bundle Is Remote
This option is optional and needs to be used with the Resource Server Address option.
If set, the main package is configured as a remote package, and along with its related dependent resources are built into a built-in Asset Bundle — main under the remote folder of the release package directory. You need to upload the entire remote folder to the remote server.Start Scene Asset Bundle
This option is optional.
If set, the start scene and its related dependent resources are built into the built-in Asset Bundle — start-scene to speed up the resource loading of the start scene. Please refer to the Start Scene Loading for details.Game Package Name
Game Package Name is filled in according to the user's needs. It's required.
Game Name
Game Name, the name of the OPPO Mini Game, is required. And the Title at the top of the Build panel does not participate in the OPPO mini game packaging process.
Desktop Icon
Desktop Icon is required. Click the ... button at the back of the input box to select the icon you want. When building, the Desktop Icon will be built into the OPPO Mini Game project. Desktop Icon suggest using PNG pictures.
Game Version Name
This item is required. Game Version Name is the real version, such as: 1.0.0.
Game Version Number
This item is required. Game Version Number is different from the Game Version Name, and the Game Version Number is mainly used to distinguish the version update. Each time when you submit audit, the game version number is at least 1 higher than the value of the last submitted audit. It must not be equal to or less than the value of the last submitted audit, and it is recommended that the Game Version Number be recursively incremented by 1 each time when the audit is submitted.
Note: the Game Version Number must be a positive integer.
Supported Minimum Platform Version Number
This item is required. According to the suggestions of OPPO Mini Game, this value is currently recommended for 1060. Please refer to the OPPO Mini Game Instructions [cn] for details.
Resource Server Address
This option is optional and used to fill in the address of the remote server where the resources are stored.
If this option is left blank, the
build/quickgame/remotefolder in the release package directory will be packaged into the rpk package.If this option is filled in, the
remotefolder will not be packaged into the built rpk package. You need to manually upload theremotefolder to the filled in Resource Server Address after build.
Refer to the Resource Management section at the bottom of the document for more details.
Keystore
When you check the Keystore, the default is to build the rpk package with a certificate that comes with Creator, which is used only for debugging.
Note: when the rpk package is to be used to submit an audit, do not check the Keystore to build it.
If you don't check the Keystore, you need to configure the signature files certificate.pem path and private.pem path, where you build a rpk package that you can publish directly. The user can configure two signature files by using the ... button to the right of the input box.
Note: these two signature files are not recommended to be placed in the
build/quickgamedirectory of the publish package, otherwise the build directory will be emptied each time when it is built, resulting in file loss.There are two ways to generate a signature files:
Generated by the New button after the certificate.pem path in the Build panel.
Generated by the command line.
The user needs to generate the signature file private.pem, certificate.pem through tools such as openssl.
bash# Generate a signature file with the openssl command tool openssl req -newkey rsa:2048 -nodes -keyout private.pem -x509 -days 3650 -out certificate.pemNote: openssl can be opened directly in the terminal in Linux or Mac environment, and in the Windows environment you need to install
openssland configure system environment variables. Restart Creator after the configuration is complete.
Separate Engine
This option is optional. Cocos Creator 2.4.6 adds the Game Engine Plugin feature, which has the official version of the Cocos Creator engine built-in. If this plugin is enabled in the first game the player experiences, all games that also have this plugin enabled will not need to download the Cocos Creator engine again, just use the same version of the engine directly from the public plugin library, or incrementally update the engine.
Check Separate Engine when using, and then build and release normally in the Build panel, without additional manual operation. Please refer to the WeChat Engine Plugin Instructions for details.
Custom npm folder path
This item is optional. Starting with v2.0.10, the global npm of the operating system can be automatically obtained and without manual setting. The way to obtain npm is:
- Windows: Gets the path in the environment variable from the system.
- Mac: Gets the path in the environment variable from the configuration file of Shell.
If not, make sure the npm is properly installed and can be started directly in the command line environment. The obtained npm is used to provide an environment for building rpk. If the npm folder path cannot be found at building, Cocos Creator will only export the game project directory and will not generate the rpk package.
Build
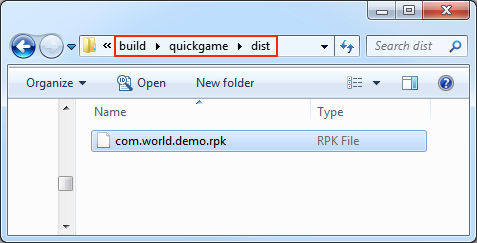
After the relevant options of the Build panel are set, click Build. After the build is complete, click the Open button behind the Build Path to open the build release package. You can see that the quickgame directory is generated under the default release path build directory, which is the exported OPPO Mini Game project directory and rpk, rpk package are in the build/quickgame/dist directory.
Run the built rpk to the phone
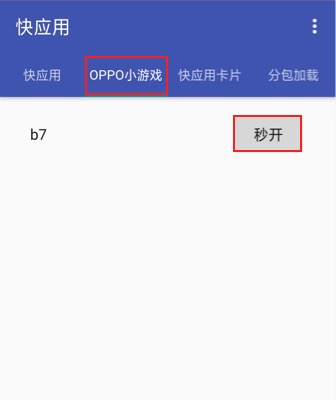
Copy the generated mini-game rpk file to the games directory on the OPPO phone's internal storage. Then open the Mini Game Debugger that has been installed before on the OPPO phone, click the OPPO Mini Game section, and then find the icon corresponding to the game name. If not found, click on the "More -> Refresh" button in the upper right corner to refresh.
Note: for Mini Game Debugger v3.2 and above, you need to copy rpk to the
Android/data/com.nearme.instant.platform/files/gamesdirectory of the OPPO phone's internal storage. If there is no games directory, you need to create a new one. Please refer to the Official Documentation [cn] for details.
Subpackage rpk
Subpackage loading, that is, splitting the game content into several packages according to certain rules, only downloading the necessary packages when starting up for the first time. This necessary package is called main package, and the developer can trigger in the main package to download other sub-packages, which can effectively reduce the time spent on the first boot. To use this function, you need to set Mini Game Subpackage in Cocos Creator, and the package will be automatically subpackaged when the setting is completed.
After the build is complete, the subpackage directory is in the build/quickgame/dist directory.
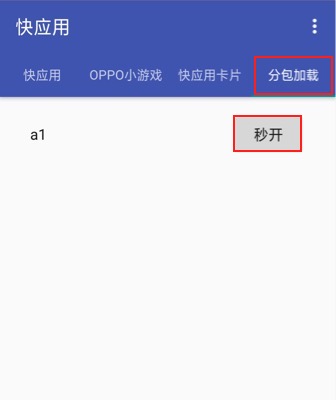
In this case, you need to create a new subPkg directory in the internal storage directory of the OPPO phone, and then copy the .rpk file in the build/quickgame/dist directory to the subPkg directory.
Then switch to the Package Load section of Mini Game Debugger, click Refresh at the top right to see the game name of the subpackage, click Second Open to use the same as the normal packaged rpk.
Subpackage rpk needs to be copied to the subPkg directory of the OPPO phone's internal storage, and non-subpackage rpk needs to be copied to the games directory of the OPPO phone's internal storage, both of which cannot be mixed.
Note: if the OPPO game debugger is v3.2 or above, copy the subpackage rpk to the
Android/data/com.nearme.instant.platform/files/subPkgdirectory of the OPPO phone's internal storage, if there is no subPkg directory, create a new one. The rpk without subpackage is copied to theAndroid/data/com.nearme.instant.platform/files/gamesdirectory of the OPPO phone's internal storage, both of which cannot be mixed.
For more information, please refer to the OPPO Mini Game - Subpackage [cn] documentation.
Resource Management for OPPO Mini Game Environment
OPPO Mini Game is similar to WeChat Mini Game. There are restrictions on the package size. The main package size limit for OPPO Mini Game is 4MB, more than that must be downloaded via a network request.
Cocos Creator already helps developers with downloading, caching and version management of remote resources. The specific implementation logic and operation steps are similar to the WeChat Mini Game. Please refer to the Resource Management for WeChat Mini Game documentation for details.